How to Use a Wood Laser Cutting Machine Effectively

A wood laser cutting machine is a powerful tool that uses a focused laser beam to cut, engrave, or mark wood with unmatched precision. So, what is wood laser cutting machine? It allows you to create intricate designs and detailed engravings effortlessly. Unlike traditional cutting techniques for different materials, this machine minimizes waste by targeting only the specific areas you want to cut. Whether you're crafting decorative pieces or working on professional projects, wood laser cutting offers endless possibilities.
The benefits of wood laser cutting go beyond its accuracy. You can explore creative applications in various industries, from furniture design to personalized gifts. Its versatility and ability to laser cut wood with clean edges make it an essential tool for both hobbyists and professionals. With a laser wood engraver, you can achieve stunning results while saving time and effort.
Getting Started with Wood Laser Cutting

Starting your journey with a wood laser cutting machine can feel exciting yet overwhelming. By following a few essential steps, you’ll set yourself up for success and create stunning projects with ease.
Setting Up the Laser Cutter
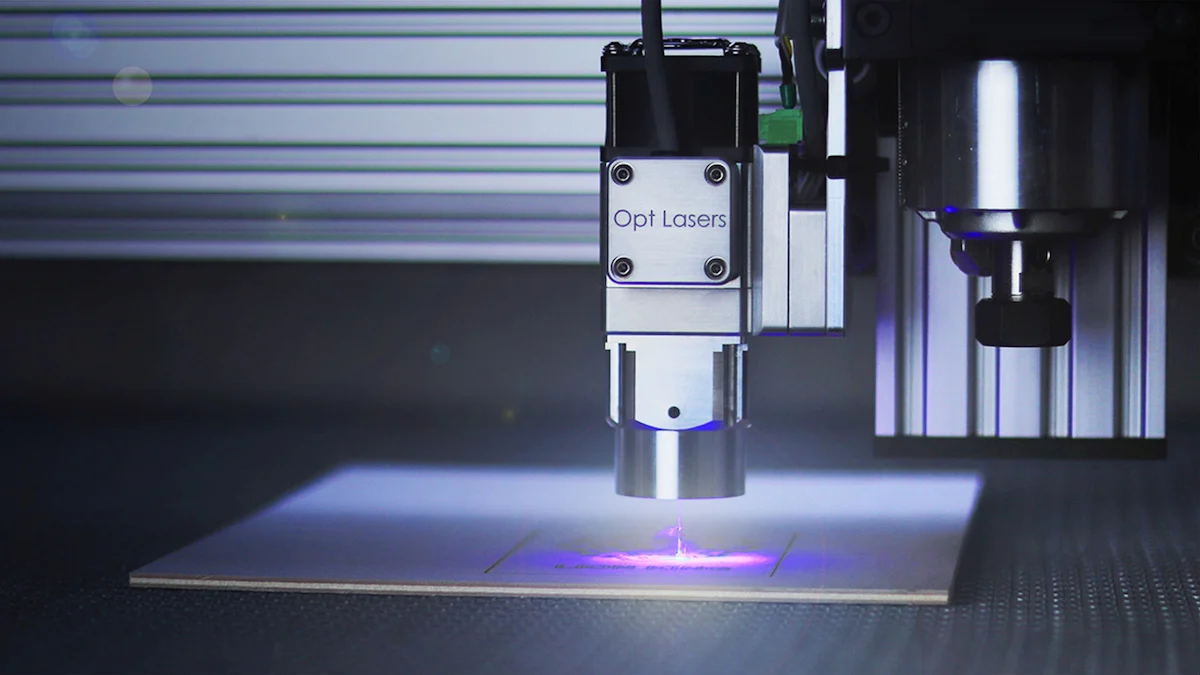
The first step is setting up your laser cutter properly. Begin by placing the machine on a stable, flat surface in a well-ventilated area. This ensures safety and prevents overheating during operation. Check the manufacturer’s manual for specific assembly instructions, as each model may have unique requirements.
Next, connect the laser cutter to a power source and your computer. Most machines come with a USB or Ethernet connection. Ensure all cables are secure to avoid interruptions during use. Before powering it on, inspect the machine for any loose parts or debris that could interfere with its performance.
Calibration is crucial for precise cuts. Adjust the focus of the laser beam according to the thickness of the wood you plan to cut. Many machines include a focus tool or guide to help you achieve the correct alignment. Once everything is in place, perform a quick test to confirm the laser cutter is functioning correctly.
Selecting the Right Wood for Laser Cutting
Choosing the right wood is just as important as setting up the machine. Different types of wood react differently to laser cutting. For example, softwoods like pine cut easily but may char more, while hardwoods like maple provide cleaner edges but require higher laser power.
When selecting wood, consider its thickness and density. Thinner pieces are easier to cut and engrave, making them ideal for beginners. Avoid woods with high resin content, as they can produce excessive smoke and residue. Plywood and MDF are popular choices for their affordability and versatility, but ensure they are laser-safe and free from harmful adhesives.
If you’re planning intricate designs or detailed laser engraving, opt for woods with a smooth, even grain. This enhances the precision of the laser cutter and results in a polished finish. Always test a small piece of your chosen wood to see how it reacts before starting your main project.
Installing and Using Laser Cutting Software
To bring your designs to life, you’ll need compatible laser cutting software. Most laser cutting machines for wood come with their own software, but you can also use third-party programs like LightBurn or CorelDRAW. These tools allow you to create, edit, and prepare designs for cutting or engraving.
Start by installing the software on your computer. Follow the installation prompts and ensure the software recognizes your laser cutter. Once installed, familiarize yourself with the interface. Most programs include basic design tools, such as shapes, text, and image import options.
When creating your design, pay attention to the dimensions and settings. Use vector files for cutting and raster files for engraving. Adjust the power, speed, and frequency settings within the software based on the type of wood you’re using. These settings control how deep the laser cuts and how fast it moves, so fine-tuning them is essential for achieving optimal results.
After finalizing your design, send it to the laser cutter. Double-check the material placement on the cutting bed to align it with your design. With the software and machine working together, you’re ready to start your first project.
Safety Precautions for Laser Cutting Wood
When working with a laser cutter, safety should always come first. This powerful tool can create stunning designs, but it also comes with risks like fire hazards, harmful fumes, and potential damage to your eyes or skin. By following essential safety measures, you can enjoy the creative process while protecting yourself and your workspace.
Preparing a Safe Workspace for Laser Cutting
Setting up a safe workspace is the foundation of laser cutting safety. Start by choosing a well-ventilated area. Laser cutting wood produces fumes and combustion byproducts that can irritate your lungs or pose health risks. Proper ventilation helps reduce these dangers and keeps the air clean.
Keep your workspace organized and free of flammable materials. Items like paper, fabric, or sawdust can ignite if they come into contact with the laser beam. Place a fire extinguisher nearby in case of emergencies. A clean and clutter-free environment minimizes risks and ensures smooth operation.
Position your laser cutter on a stable surface to prevent movement during use. Secure all cables and connections to avoid accidental disconnections. If your machine has a built-in exhaust system, make sure it’s functioning properly. These steps create a safe and efficient workspace for your projects.
Using Personal Protective Equipment (PPE)
Personal protective equipment (PPE) is essential when operating a laser cutter. Protect your eyes with safety goggles designed for laser use. The laser beam can cause serious eye damage, even if you’re not looking directly at it. Goggles block harmful wavelengths and keep your vision safe.
Wear gloves to shield your hands from heat and sharp edges on the wood. While the laser cutter does most of the work, handling materials can still pose risks. Choose gloves that provide both protection and flexibility for easy handling.
Consider wearing a mask to filter out fine particles and fumes generated during cutting. Even with proper ventilation, a mask adds an extra layer of protection for your respiratory system. By using PPE, you reduce exposure to potential hazards and stay safe throughout the process.
Monitoring the Laser Cutter During Operation
Never leave your laser cutter unattended while it’s running. Fires can start quickly if the laser beam overheats the wood or if debris catches fire. Stay close to the machine and watch for any signs of smoke, excessive charring, or unusual noises.
Keep an eye on the material placement to ensure it doesn’t shift during cutting. Misaligned materials can lead to inaccurate cuts or damage to the machine. If you notice any issues, pause the operation and make adjustments before continuing.
Regularly check the laser cutter’s performance during use. Look for signs of wear or malfunction, such as inconsistent cutting or unusual vibrations. Addressing problems early prevents accidents and maintains the quality of your work. Staying vigilant ensures a safe and successful cutting experience.
Configuring the Laser Cutter for Optimal Results
Fine-tuning your laser cutter is essential for achieving clean, precise cuts and avoiding unnecessary errors. By adjusting the machine’s settings and ensuring proper alignment, you can maximize its performance and create stunning results.
Adjusting Power, Speed, and Frequency for Laser Cutting Wood
Getting the right balance of power, speed, and frequency is key to successful wood laser cutting. These laser settings determine how the laser interacts with the wood, affecting the depth, precision, and overall quality of the cut.
-
Power Settings: Start by adjusting the laser’s power output. Higher power works well for thicker or denser woods, while lower power is better for thinner materials. For example, hardwoods like oak may require more power to cut through cleanly, whereas softwoods like pine need less power to avoid scorching.
-
Speed Settings: The speed of the laser cutter controls how quickly the beam moves across the wood. Slower speeds allow the laser to cut deeper, but they can also increase the risk of burning. Faster speeds reduce burning but may result in incomplete cuts. Experiment with different speeds to find the sweet spot for your project. For instance, when working with 3mm thick wood, a cutting speed of 2-5% often delivers excellent results.
-
Frequency Settings: Frequency determines how many laser pulses are applied per inch of the cut. Lower frequencies are ideal for cutting, as they produce cleaner edges. Higher frequencies work better for engraving, creating smoother and more detailed designs. Adjust this setting based on whether you’re cutting or engraving.
To ensure optimal results, always perform a test cut on a scrap piece of wood. This allows you to fine-tune the settings without risking your main material. Keep a record of successful cutting techniques and settings for future reference. This practice saves time and helps you achieve consistent results across projects.
Pro Tip: If you notice excessive burning or discoloration, try reducing the power and increasing the speed. This adjustment minimizes heat exposure and keeps the wood’s surface clean.
Focusing and Aligning the Laser Cutter
Proper focus and alignment are critical for precision in laser cutting wood. A misaligned laser beam can lead to uneven cuts or damage to the material.
-
Focusing the Laser: Use the focus tool provided with your laser cutting machine to adjust the distance between the laser head and the wood. The correct focus ensures that the laser beam is concentrated at the right point, delivering maximum cutting power. Follow the manufacturer’s guidelines for your specific machine.
-
Aligning the Laser Beam: Check the alignment of the laser beam to ensure it hits the intended spot on the wood. Misalignment can cause the beam to miss the cutting path or produce jagged edges. Most machines include an alignment tool or guide to help you make precise adjustments.
-
Testing the Focus and Alignment: After setting the focus and alignment, perform a quick test cut or engraving. This step confirms that the laser cutter is properly configured and ready for your project.
By taking the time to focus and align your laser engraver, you’ll achieve cleaner cuts and reduce the risk of errors. These steps are especially important when working on intricate designs or using expensive materials.
Advanced Tips: For thicker wood, consider using a larger lens and making multiple passes at lower power settings. This approach reduces the risk of scorching and ensures a smooth finish.
Configuring the machine settings correctly not only enhances the quality of your work but also extends the lifespan of your laser engraving cutting machine. With the right adjustments, you can tackle any project with confidence and precision.
Performing a Test Cut Before Laser Cutting Wood

Before diving into your main project, running a test cut is a crucial step that ensures success. This simple yet effective practice helps you fine-tune your laser cutter’s settings and avoid costly mistakes. Think of it as a dress rehearsal for your final design.
Importance of Test Cuts in Laser Cutting
A test cut allows you to evaluate how your laser cutter interacts with the wood you’ve chosen. Different woods have unique characteristics, such as density and grain patterns, which can affect the cutting process. By testing on a scrap piece of the same material, you can see how the laser performs and make adjustments as needed.
Skipping this step can lead to disappointing results. Imagine finishing a project only to find uneven cuts or incomplete engravings. A test cut prevents these issues by giving you a chance to tweak the power, speed, and frequency settings. For example, if the edges of your test piece appear charred, you might need to reduce the laser’s power or increase its speed.
Pro Tip: Always keep spare material on hand for test cuts. This ensures you can experiment without risking your main project.
Test cuts also help you confirm the alignment and focus of your laser cutter. Misaligned beams or incorrect focus can ruin intricate designs. A quick test ensures everything is in place before you commit to the final cut.
Analyzing Test Results for Better Laser Cutting
Once you’ve completed a test cut, take a close look at the results. Check the edges of the cut for smoothness and consistency. If the edges are rough or jagged, adjust the frequency settings to achieve cleaner lines. For engraving, examine the depth and clarity of the design. Shallow or faint engravings may require an increase in power.
Pay attention to the cutting depth as well. If the laser doesn’t cut all the way through, you’ll need to either slow down the speed or increase the power. On the other hand, if the laser cuts too deeply, reducing the power or speeding up the process can help.
Quick Tip: Keep a notebook or digital record of successful settings for different types of wood. This step-by-step guide will save you time on future projects and ensure consistent results.
Analyzing test results also helps you identify potential problems with your material. For instance, if the wood produces excessive smoke or residue during the test, it might not be suitable for laser cutting. Testing gives you the opportunity to switch materials before wasting time or effort.
By performing and analyzing test cuts, you gain confidence in your setup and reduce the risk of errors. This small investment of time pays off with professional-quality results that showcase your creativity and precision.
How to Use a Laser Cutter for the Final Cut
When it’s time to make the final cut, precision and preparation are key. This stage brings your design to life, so every step matters. Let’s dive into how to ensure your wood laser cutting project turns out exactly as planned.
Preparing the Design and Material for Laser Cutting
Before starting, double-check your design and material setup. Begin by reviewing your design file in the laser cutting software. Ensure the dimensions match your material and that the settings, such as power and speed, are optimized for the type of wood you’re using. If you’ve already performed a test cut, use those settings as a reference.
Next, focus on preparing the material. Clean the surface of the wood to remove dust or debris that could interfere with the laser beam. Smooth, clean wood ensures better results. When loading the material onto the cutting bed, align it carefully with the design layout in the software. Use clamps or weights if necessary to keep the wood steady during the process.
Pro Tip: Always verify that the wood is flat and free of warping. Uneven surfaces can lead to inconsistent cuts or misaligned engravings.
Finally, inspect the laser cutter one last time. Confirm that the lens is clean and the laser head is properly focused. A well-maintained machine ensures the best performance and reduces the risk of errors.
Monitoring the Laser Cutting Process
Once the cutting begins, stay attentive. Monitoring the laser cutter during operation is crucial for both safety and quality. Watch the progress closely to ensure the laser follows the design accurately. If you notice any issues, such as the material shifting or excessive smoke, pause the machine immediately and make adjustments.
Keep an eye on the edges of the cut. Smooth, clean edges indicate that the settings are correct. If you see charring or incomplete cuts, adjust the power or speed settings for future projects. Staying vigilant helps you catch problems early and prevents wasted material.
Safety Reminder: Never leave the laser cutting machine unattended while it’s running. Fires can start quickly if the laser overheats the wood or encounters debris.
Proper ventilation is also essential during this step. Wood laser cutting produces fumes that need to be safely exhausted. Ensure the workspace remains well-ventilated to protect your health and maintain a clear view of the cutting process.
Post-Cut Finishing for Clean Results
After the laser cutter completes its work, carefully remove the wood from the cutting bed. Inspect the finished piece for quality. Look for clean edges, accurate cuts, and any areas that may need touch-ups. If you notice minor imperfections, sand the edges lightly to smooth them out.
For projects involving laser engraving, wipe the surface with a soft cloth to remove any residue left by the laser. This step enhances the appearance of the engraving and gives your project a polished finish. If your design includes multiple pieces, assemble them to ensure everything fits as intended.
Pro Tip: Apply a protective coating, such as varnish or wood sealant, to preserve the wood and enhance its appearance. This step is especially useful for decorative or outdoor projects.
Proper post-cut finishing not only improves the look of your project but also extends its durability. Taking the time to refine your work ensures that the final product meets your expectations and showcases the full potential of your laser engraving cutting machine.
By following these steps, you’ll master how to use a laser cutter for the final cut. With careful preparation, active monitoring, and thoughtful finishing touches, your wood laser cutting projects will stand out with professional-quality results.
Maintenance and Care for Your Wood Laser Cutting Machine
Taking care of your wood laser cutting machine is essential for keeping it in top condition. Regular maintenance not only ensures consistent performance but also extends the lifespan of your equipment. By following a few simple steps, you can avoid costly repairs and enjoy smooth operation for years to come.
Cleaning the Laser Cutter
Keeping your laser cutter clean is one of the most important maintenance tasks. Dust, wood resin, and debris can accumulate on the machine’s components, affecting its performance and precision. Start by cleaning the laser lens and mirrors. These parts are crucial for directing the laser beam, so any dirt or scratches can reduce cutting quality. Use a soft, lint-free cloth and a cleaning solution recommended by the manufacturer to gently wipe these surfaces.
Don’t forget to clean the cutting bed and surrounding workspace. Wood dust and residue can build up quickly, especially when working with materials like MDF or plywood. A vacuum or soft brush works well for removing debris from hard-to-reach areas. For sticky residues caused by wood oils, a mild solvent can help. Regular cleaning prevents blockages and ensures the laser cutter operates efficiently.
Tip: Make cleaning a part of your routine after every project. This habit keeps your machine ready for the next use and minimizes wear and tear.
Performing Regular Maintenance Checks
Routine inspections are key to identifying potential issues before they become major problems. Check the laser cutter’s lens and mirrors for signs of damage, such as scratches or discoloration. Replace these components if necessary to maintain optimal performance. Inspect the belts, rails, and motors for wear or misalignment. Tighten any loose parts and lubricate moving components as recommended by the manufacturer.
Calibration is another critical step. Over time, the laser cutter may lose alignment, leading to inaccurate cuts. Follow the calibration instructions in your user manual to ensure the laser beam is properly focused and aligned. Many machines, like those from Boss Laser and Thunder Laser, emphasize the importance of regular calibration for achieving precise results.
Pro Tip: Schedule maintenance checks weekly or monthly, depending on how often you use your laser cutting machine. Consistency is the key to avoiding unexpected downtime.
Proper Storage of the Laser Cutter
When not in use, store your laser cutter in a safe and suitable environment. Choose a dry, dust-free location to prevent damage from moisture or debris. Cover the machine with a protective sheet to keep it clean and shield it from accidental bumps or scratches. If your workspace is prone to temperature fluctuations, consider using a climate-controlled area to protect sensitive components.
Before storing the machine, ensure it’s completely clean and free of any leftover materials. Disconnect the power supply and secure all cables to avoid tangling or damage. For long-term storage, consult the manufacturer’s guidelines for additional precautions. Proper storage not only preserves the condition of your laser cutter but also ensures it’s ready to use whenever inspiration strikes.
Reminder: Always keep a fire extinguisher nearby, even during storage. Safety should remain a priority at all times.
By following these maintenance and care tips, you’ll keep your wood laser cutting machine running smoothly and efficiently. A well-maintained machine delivers better results, saves you time, and enhances your overall experience with laser cutting.
Mastering a wood laser cutting machine opens up endless possibilities for your creative and professional projects. By following the steps outlined in this guide, you can confidently set up your laser cutter, fine-tune its settings, and achieve precise results. Always prioritize safety by preparing a well-ventilated workspace, wearing protective gear, and monitoring the machine during operation. Regular maintenance, like cleaning and calibration, ensures your laser engraving cutting machine performs at its best.
Now it’s your turn to experiment with wood laser cutting projects. Whether you’re crafting intricate designs or exploring new techniques, let your creativity shine. Remember, consistent care and attention to detail will help you laser cut wood with precision and bring your ideas to life.
FAQ
What materials can I use with a wood laser machine?
You’re not limited to just wood when using a laser cutting machine. While it excels at cutting and engraving various types of wood, you can also work with materials like acrylic, leather, paper, and certain types of fabric. However, avoid materials that contain PVC or other harmful chemicals, as they can release toxic fumes when cut. Always check the manufacturer’s guidelines to ensure your material is safe for laser cutting.
How do I maintain my laser cutter machine?
Regular maintenance keeps your laser cutter running smoothly. Clean the lens and mirrors after every project to remove dust and residue. Inspect belts, rails, and moving parts weekly for wear and lubricate them as needed. Perform calibration checks to ensure the laser beam stays aligned. Store the machine in a clean, dry space when not in use. These steps prevent breakdowns and extend the life of your equipment.
Can I cut all types of wood with a laser cutter?
Not all woods are ideal for laser cutting. Softwoods like pine cut easily but may char more, while hardwoods like oak require higher power settings. Avoid woods with high resin content, as they produce excessive smoke and residue. Plywood and MDF are popular choices, but ensure they’re laser-safe and free from harmful adhesives. Always test a small piece before starting your main project.
Why is a test cut important before starting a project?
A test cut helps you fine-tune your settings for the specific material you’re using. Different woods have unique characteristics, like density and grain patterns, that affect how they react to the laser. Testing ensures you get clean cuts and precise engravings without wasting your main material. It’s a small step that saves time and prevents costly mistakes.
What safety precautions should I take when using a laser cutter?
Safety should always come first. Work in a well-ventilated area to avoid inhaling fumes. Wear laser safety goggles to protect your eyes and gloves to handle materials safely. Keep flammable items away from the workspace and always have a fire extinguisher nearby. Never leave the machine unattended while it’s running, as fires can start quickly if something goes wrong.
How do I choose the right laser cutting software?
Most laser cutters come with their own software, but third-party options like LightBurn or CorelDRAW offer more flexibility. Choose software that’s compatible with your machine and supports both vector and raster files. Look for user-friendly interfaces and features like design editing and material-specific settings. Spend some time learning the software to unlock its full potential.
What should I do if my laser cutter isn’t cutting properly?
If your laser cutter isn’t performing well, start by checking the lens and mirrors for dirt or damage. Clean or replace them if necessary. Ensure the laser beam is properly focused and aligned. Adjust the power, speed, and frequency settings based on the material you’re using. If the problem persists, consult the manufacturer’s troubleshooting guide or contact customer support.
Can I engrave as well as cut with a wood laser machine?
Yes, most wood laser machines can both cut and engrave. Cutting involves slicing through the material, while engraving creates surface designs without cutting all the way through. Use lower power and higher frequency settings for engraving to achieve detailed and smooth results. This versatility makes laser cutters perfect for creative projects like personalized gifts or intricate artwork.
How do I prevent charring or burning on wood?
To minimize charring, adjust the laser’s power and speed settings. Lower the power and increase the speed to reduce heat exposure. Use masking tape on the wood’s surface to protect it from scorch marks. Proper ventilation also helps by removing smoke and debris during cutting. Testing your settings on a scrap piece ensures cleaner results.
Is a wood laser cutting machine suitable for beginners?
Absolutely! Many laser cutting machines are beginner-friendly, with intuitive software and straightforward setup processes. Start with simple projects and gradually explore more complex designs as you gain confidence. Follow safety guidelines, perform test cuts, and experiment with different materials to learn the machine’s capabilities. With practice, you’ll master the art of laser cutting in no time.
See Also
Effective Techniques for Operating a Laser Cutter
Is CNC Machinery Capable of Efficiently Cutting Wood?
Guidelines for Selecting the Best Wood Cutting Machine