What Tools Are Needed to Use Metal Cutting Dies Manually

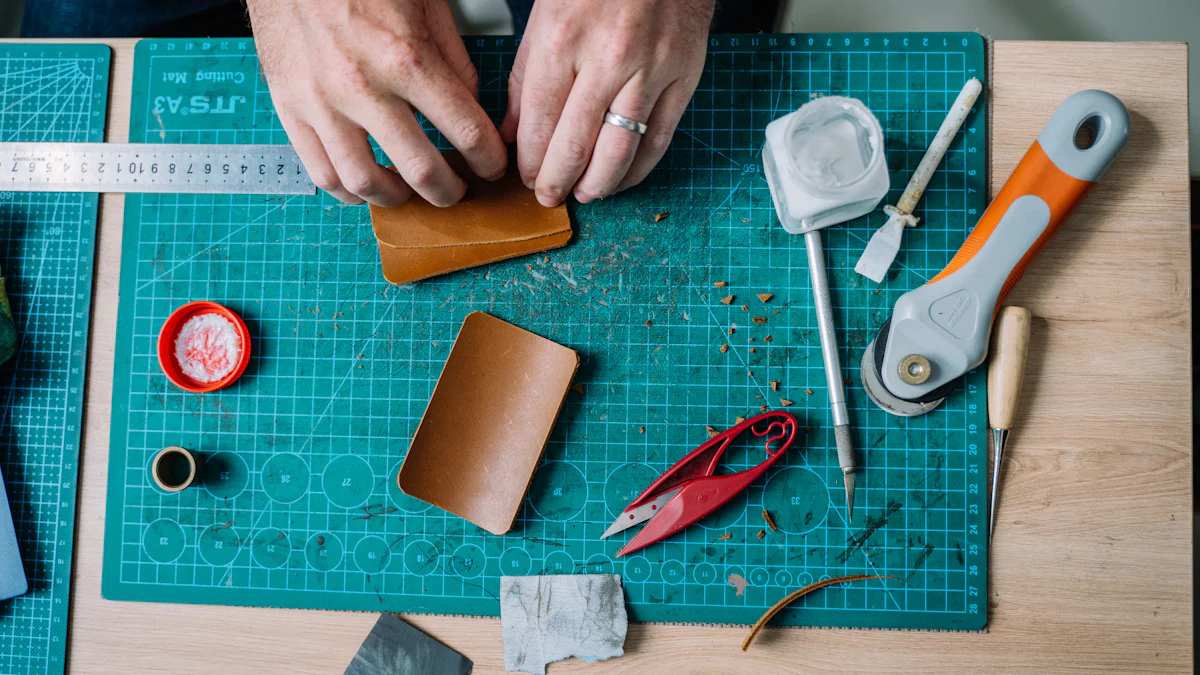
Learning how to use metal cutting dies without a machine can unlock endless creative possibilities for crafting and design. These versatile tools allow you to cut precise shapes from materials such as paper, cardstock, or even thin metal sheets. Without relying on a machine, manual methods provide greater control and flexibility. Whether you're crafting custom decorations or intricate designs, having the right tools is essential. For example, a rolling pin can be used to apply pressure in place of a machine, while craft knives are perfect for refining edges. Mastering these techniques can elevate your projects to professional-quality results.
Key Takeaways
- Gather essential tools like metal cutting dies, flush cutters, and rolling pins to start your manual die-cutting journey.
- Proper alignment of metal cutting dies is crucial for achieving clean and precise cuts; practice this technique to minimize material waste.
- Use a rolling pin or household items like glass bottles to apply even pressure when cutting without a machine.
- Maintain your tools by cleaning them after each use and storing them properly to extend their lifespan and effectiveness.
- Experiment with embossing folders and mats to add unique textures and effects to your designs, enhancing their visual appeal.
- Always use sharp craft knives and scissors for refining edges, as dull tools can lead to uneven cuts and frustration.
- Create an organized workspace to improve efficiency and safety, keeping all tools within easy reach and properly stored.
Essential Tools for Using Metal Cutting Dies Manually
When working with metal cutting dies manually, having the right tools makes all the difference.
Metal Cutting Dies
Metal cutting dies are the foundation of your crafting process. These tools allow you to cut intricate shapes and designs from various materials like paper, cardstock, or thin fabric.
Types of Metal Cutting Dies
There are two main types of metal cutting dies you’ll encounter:
- Thin Metal Dies: These are lightweight and perfect for detailed designs. They work well with softer materials like paper or vinyl.
- Steel Rule Dies: These are heavier and more durable. They can handle thicker materials such as cardboard or felt.
Choosing the right type depends on the material you’re working with and the essential tools of your design.
How to Align and Use Metal Cutting Dies Effectively
Proper alignment ensures your cuts are clean and accurate. Place the die on your material, ensuring the cutting edge faces down. Use a stable surface to keep everything steady. If you’re using a manual pressure tool like a rolling pin, apply even pressure across the die to achieve a consistent cut. Practice aligning your dies to avoid wasting materials.
Flush Cutters
Flush cutters are indispensable for trimming excess material and refining edges after cutting. They help you achieve a polished, professional look.
Purpose of Flush Cutters and How to Use Them for Clean Cuts
Flush cutters are designed to make precise cuts close to the edge of your material. Hold the flat side of the cutter flush against the die or material. Squeeze firmly to remove any unwanted bits. This tool is especially useful for intricate designs where scissors might not reach.
Tips for Maintaining Flush Cutters for Long-Term Use
To keep your flush cutters in top condition:
- Clean them after each use to remove debris.
- Store them in a dry place to prevent rust.
- Avoid cutting materials that are too thick or hard, as this can damage the blades.
With proper care, your flush cutters will last for years.
Rolling Pin or Manual Pressure Tools
If you’re wondering how to use metal cutting dies without a machine, a rolling pin or similar tool can be a game-changer. These tools help you apply the pressure needed to cut through your material.
Using a Rolling Pin to Apply Pressure for Cutting Without a Machine
A rolling pin is a simple yet effective alternative to a die-cutting machine. Place your material and die on a sturdy surface. Cover them with a protective layer, like a piece of cardboard, to prevent damage. Roll the pin firmly over the die, applying even pressure. Repeat until the die cuts through the material completely.
Alternatives to Rolling Pins for Manual Die-Cutting
If you don’t have a rolling pin, other household items can work just as well:
- Glass Bottles: Their cylindrical shape makes them a good substitute.
- Heavy Books: Pressing down with a heavy book can also create enough pressure for cutting.
Experiment with different tools to find what works best for you.
Craft Knives and Scissors
Craft knives and scissors are must-have tools when working with metal cutting dies manually. They help you refine your designs and ensure every detail looks polished.
How to Manually Cut Along the Edges of Metal Dies
When you don’t have a die-cutting machine, craft knives and scissors become your go-to tools for precision. After placing your metal die on the material and applying pressure, you might notice areas where the cut isn’t complete. This is where these tools shine. Use a sharp craft knife to trace along the edges of the die. Hold the knife at a slight angle and apply steady pressure to follow the design’s outline. For simpler shapes, scissors can be just as effective. Choose small, sharp scissors for better control, especially when working with intricate patterns.
Best Practices for Achieving Clean and Precise Cuts
To get the best results, always start with sharp tools. A dull blade or pair of scissors can tear your material instead of cutting it cleanly. Keep your hand steady and work slowly to avoid mistakes. If you’re using a craft knife, place a cutting mat underneath to protect your surface and improve accuracy. For scissors, make small, deliberate cuts rather than trying to cut through the entire shape in one go. This approach gives you more control and reduces the risk of uneven edges. Regularly clean your tools to remove debris and maintain their sharpness.
Embossing Folders and Mats
Embossing folders and mats add an extra layer of creativity to your projects. They allow you to create textures and effects that elevate your designs.
Adding Texture and Effects with Embossing Folders
Embossing folders are perfect for adding dimension to your materials. These folders have raised patterns that press into your material when pressure is applied. To use them manually, place your material inside the folder and sandwich it between two sturdy surfaces, like thick cardboard. Apply pressure evenly using a rolling pin or a similar tool. The result is a beautifully textured design that enhances your project. You can experiment with different embossing folder patterns to match your theme or style.
Using Embossing Mats for Manual Die-Cutting
Embossing mats are another handy tool for manual die-cutting. These mats provide a soft surface that helps you achieve cleaner cuts and better embossing results. Place the mat under your material and die before applying pressure. The mat cushions the die, ensuring it cuts through the material without damaging your workspace. It also helps create subtle embossed details around the edges of your design. For best results, choose a high-quality mat that’s durable and easy to clean.
Tips for Using Metal Cutting Dies Without a Machine
When working without a machine, mastering the right setup, techniques, and maintenance can make your crafting process smoother and more enjoyable. Let’s dive into some practical tips to help you get the best results.
Proper Setup and Workspace
Creating an efficient workspace is the first step to successful manual die-cutting. A well-organized area ensures safety and precision.
Ensuring a Stable Surface for Manual Die-Cutting
A stable surface is essential for clean and accurate cuts. Use a sturdy table or desk that doesn’t wobble. Place a cutting mat on your surface to protect it and provide a smooth base for your materials. The mat also helps prevent slipping, which can lead to uneven cuts or accidents. If you don’t have a cutting mat, thick cardboard can work as a temporary solution.
Organizing Tools for Efficiency and Safety
Keep your tools within easy reach to save time and avoid distractions. Arrange items like craft knives, scissors, and flush cutters in a way that makes sense for your workflow. Use small containers or trays to separate sharp tools from other supplies. This not only keeps your workspace tidy but also reduces the risk of injury. Always store sharp tools with their blades covered when not in use.
Techniques for Manual Die-Cutting
Using the right techniques can significantly improve your results. Focus on applying consistent pressure and adapting your approach based on the material.
Applying Even Pressure for Consistent Results
Even pressure is key to achieving clean cuts. When using tools like a rolling pin, press down firmly and roll across the die in multiple directions. This ensures the die cuts through the material evenly. If you’re using heavy books or other alternatives, press down steadily rather than applying force in short bursts. Consistency is more important than strength.
Adjusting Techniques for Different Materials
Different materials require different approaches. For softer materials like paper or cardstock, light pressure often suffices. For thicker materials like felt or cardboard, you may need to apply more force or repeat the process several times. Use craft knives to refine edges on tougher materials. Always test your technique on a scrap piece before working on your final project.
Maintenance and Care of Tools
Proper care extends the life of your tools and ensures they perform at their best. Regular cleaning and storage are crucial.
Cleaning and Storing Metal Cutting Dies and Tools
After each use, clean your tools to remove debris. Wipe down metal cutting dies with a soft cloth to prevent residue buildup. For tools like flush cutters and craft knives, check for stuck material and gently remove it. Store your tools in a dry place to avoid rust or damage. Use protective covers for sharp items to keep them safe and ready for the next project.
Extending the Lifespan of Manual Cutting Tools
To keep your tools in top condition, avoid using them on materials they aren’t designed for. For example, don’t use scissors meant for paper on thicker materials like fabric or metal. Replace dull blades on craft knives promptly to maintain precision. Periodically inspect your tools for wear and tear, and address any issues immediately. With proper care, your tools can last for years and deliver consistent results.
By following these tips, you’ll find that learning how to use metal cutting dies without a machine becomes a rewarding and creative experience. With the right setup, techniques, and maintenance, you can achieve professional-quality results every time.
Using metal cutting dies manually offers a hands-on, creative experience that can produce stunning results. Start by gathering essential tools like metal cutting dies, flush cutters, and embossing mats. These tools form the foundation of your crafting process. Experiment with techniques such as applying pressure with a rolling pin or refining edges with craft knives. Each method adds a unique touch to your projects. With consistent practice and proper care for your tools, you’ll master the art of manual die-cutting. This approach not only saves costs but also allows you to craft professional-quality designs without relying on a machine.
FAQ
What materials can you cut with metal cutting dies?
You can cut a variety of materials with metal cutting dies, including paper, cardstock, thin fabric, vinyl, and even lightweight metal sheets.
Can you use metal cutting dies without a machine?
Yes, you can use metal cutting dies without a machine. Tools like rolling pins, heavy books, or even glass bottles can help apply the pressure needed for cutting. Craft knives and scissors are also great for refining edges and completing intricate designs manually.
How do you align metal cutting dies for accurate cuts?
To align metal cutting dies, place the die on your material with the cutting edge facing down. Use a stable surface to keep everything steady. Applying even pressure, whether with a rolling pin or another tool, ensures clean and precise cuts. Practicing alignment can help reduce material waste.
What’s the difference between thin metal dies and steel rule dies?
Thin metal dies are lightweight and ideal for detailed designs on softer materials like paper or vinyl. Steel rule dies are heavier and more durable, making them suitable for thicker materials such as cardboard or felt. Choose the type based on your project’s material and design complexity.
How do you maintain flush cutters for long-term use?
To keep flush cutters in good condition, clean them after each use to remove debris. Store them in a dry place to prevent rust. Avoid using them on materials that are too thick or hard, as this can damage the blades. Regular maintenance ensures they stay sharp and effective.
Can embossing folders be used without a machine?
Yes, you can use embossing folders manually. Place your material inside the folder and sandwich it between sturdy surfaces like thick cardboard. Apply even pressure using a rolling pin or similar tool. This method creates beautiful textures and patterns without needing a machine.
What tools can replace a rolling pin for manual die-cutting?
If you don’t have a rolling pin, you can use alternatives like glass bottles or heavy books. These items can apply the necessary pressure to cut through your material. Experiment with different tools to find what works best for your project.
How do you ensure clean cuts with craft knives and scissors?
Start with sharp tools to avoid tearing your material. Use a cutting mat under your material when working with craft knives for better precision. For scissors, make small, deliberate cuts instead of trying to cut through the entire shape at once. This approach gives you more control and cleaner edges.
What’s the best way to organize tools for manual die-cutting?
Keep your tools within easy reach by arranging them in small containers or trays. Separate sharp tools like craft knives and scissors from other supplies to ensure safety. Cover blades when not in use to prevent accidents and maintain their sharpness.
How do you extend the lifespan of metal cutting dies?
Clean your metal cutting dies after each use to remove residue. Store them in a dry place to prevent rust. Avoid using them on materials they aren’t designed for, as this can dull the cutting edges. With proper care, your dies can last for years and deliver consistent results.
See Also
Mastering The Basics Of Using A Die Cutting Machine
A Beginner's Guide To Operating A Die Cutting Machine
Exploring Compatible Materials For Die Cutting Machines