Steps to Achieve Precise Cuts on Thick Materials with Lasers

Precision in laser cutting plays a vital role when working with thick materials, raising the question: what is the max thickness a laser machine can cut? Achieving clean and accurate cuts ensures that your projects maintain professional quality while minimizing waste. Laser cutting technology offers unmatched accuracy, allowing you to create intricate designs with smooth edges. By mastering this technique, you can enhance efficiency and reduce the need for post-processing. Whether you’re crafting complex shapes or handling industrial applications, understanding how to achieve precise cuts transforms your results. With the right approach, you can unlock the full potential of laser technology and tackle even the most challenging materials.
Understanding Laser Cutting Technology
How Laser Machines Work
Basics of laser cutting (beam generation, focusing, and material interaction)
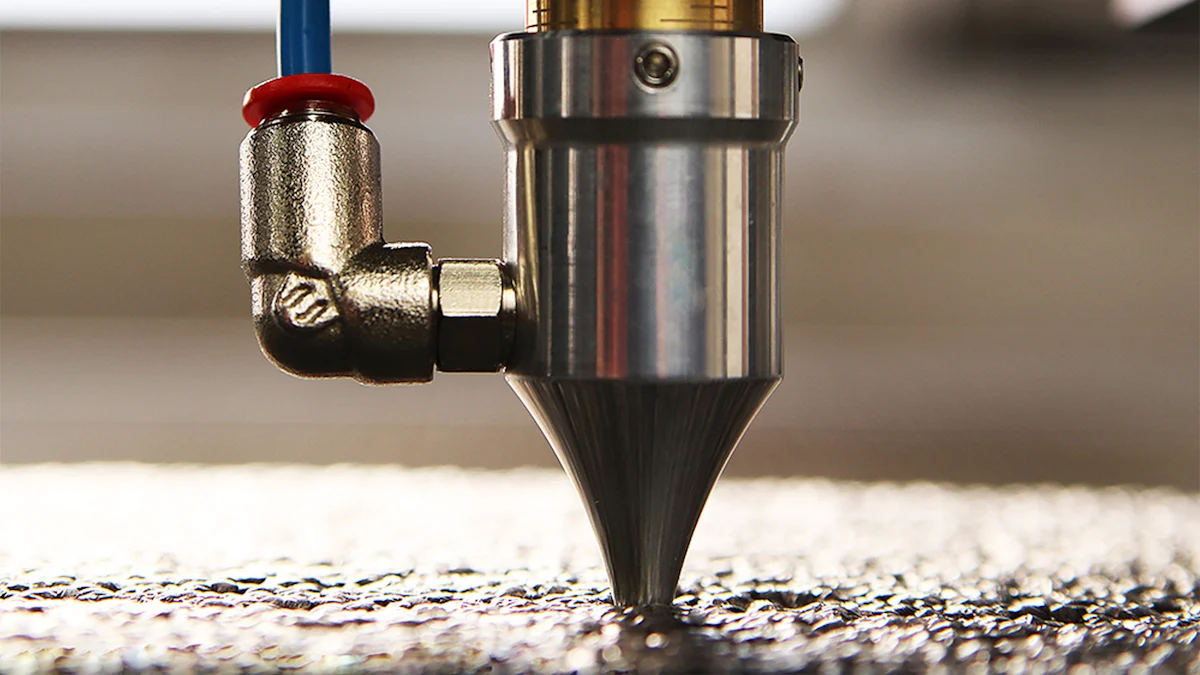
Laser cutting relies on a high-powered beam of light to slice through materials with precision. The process begins with the generation of the laser beam, which is created by exciting atoms within a laser source. This beam is then focused through a lens or mirror system to concentrate its energy into a small, intense spot. When the focused beam interacts with the material, it heats the surface to the point of melting, burning, or vaporizing, creating a clean cut.
The interaction between the laser and the material determines the quality of the cut. For thick materials, the beam must maintain consistent energy to penetrate the entire depth. Proper focusing ensures that the beam remains sharp and effective, which is crucial for achieving smooth edges and intricate designs.
Key differences between cutting thin and thick materials
Cutting thin materials requires less laser power and often results in faster processing times. The beam can easily pass through the material without significant resistance. However, when working with thick materials, the process becomes more complex. Higher laser power is necessary to penetrate the greater depth, and the cutting speed must be reduced to ensure accuracy.
Thick materials also demand precise focus and multiple passes in some cases. The heat generated during the process can cause warping or burns if not managed properly. Understanding these differences helps you adjust your approach based on the material's thickness, ensuring optimal results.
What is the Max Thickness a Laser Machine Can Cut?
Factors influencing maximum cutting thickness (e.g., laser power, material type)
The maximum thickness a laser machine can cut depends on several factors. Laser power plays a significant role; higher-power lasers can handle thicker materials with ease. For instance, some industrial-grade lasers can cut metals several inches thick. Material type also affects the cutting process. Metals like steel and aluminum require more power compared to non-metals like wood or acrylic.
The type of laser machine you use further influences the cutting capability. CO2 lasers, for example, are ideal for non-metals and can cut up to about 1 inch thick. Fiber lasers, on the other hand, excel at cutting metals and can handle thicknesses of up to 30mm with high-power models. Properly matching the laser type and power to the material ensures efficient and precise cuts.
Examples of thickness limits for common laser machines
Different laser machines have varying capabilities when it comes to cutting thickness. Here are some examples:
- CO2 lasers: Best suited for non-metals, these machines can cut materials up to 25mm thick and metals up to 5mm.
- Fiber lasers: Designed for metals, they can cut up to 30mm with higher power models.
- Nd lasers: Ideal for thinner materials, typically cutting up to 10mm.
When asking "what is the max thickness a laser machine can cut," consider the specific machine and material combination. Always check the manufacturer's specifications to understand the limits of your equipment.
Choosing the Right Laser Cutter
Selecting the right laser cutter is essential for achieving precise results, especially when working with thicker materials. The type of laser machine and its specifications play a significant role in determining the quality and efficiency of your cuts. Understanding these factors will help you make an informed decision tailored to your specific needs.
Types of Laser Machines
CO2 lasers: Best for non-metal thick materials
CO2 lasers are highly versatile and widely used for cutting non-metallic materials. Operating at a wavelength of 10.6 micrometers, they excel at handling materials like wood, acrylic, glass, and plastics. Their ability to cut, engrave, and mark with precision makes them a popular choice in industries such as signage, apparel, and automotive manufacturing.
For thicker materials, CO2 lasers provide excellent performance due to their ability to maintain consistent energy output. They are particularly effective for intricate designs and complex shapes. Additionally, their relatively low cost and efficiency make them an ideal option for both beginners and professionals.
Fiber lasers: Ideal for cutting thick metals
When it comes to cutting metals, fiber lasers are the go-to choice. These machines are designed to handle challenging materials like steel, aluminum, copper, and brass with ease. Their high power and precision make them suitable for industrial applications, including electronics manufacturing and medical device production.
Fiber lasers operate at a shorter wavelength, allowing them to focus more energy on the material. This capability enables them to cut through thicker metals with remarkable accuracy. If your projects involve heavy-duty metalwork, a fiber laser will deliver the performance you need.
Pro Tip: Choose a CO2 laser for non-metals and a fiber laser for metals to ensure optimal results based on your material type.
Key Specifications to Consider
Power output and its impact on cutting depth
The power output of a laser cutter directly affects its ability to cut through thicker materials. Higher power levels allow the laser to penetrate deeper into the material, ensuring clean and precise cuts. For instance, a 100W CO2 laser can handle non-metals up to 25mm thick, while a high-power fiber laser can cut metals up to 30mm.
When selecting a laser cutter, consider the thickness of the materials you plan to work with. Opt for a machine with sufficient power to meet your requirements without compromising on speed or accuracy.
Bed size and material compatibility
The bed size of a laser cutter determines the maximum dimensions of the material you can work with. A larger bed size provides greater flexibility, allowing you to handle bigger projects or multiple pieces simultaneously. Ensure that the bed size matches the scale of your work to avoid limitations during the cutting process.
Material compatibility is another critical factor. While CO2 lasers are ideal for non-metals, fiber lasers are better suited for metals. Verify that the laser cutter you choose supports the materials you intend to use, ensuring seamless operation and high-quality results.
Quick Tip: Always check the manufacturer's specifications for power output, bed size, and material compatibility before purchasing a laser cutter.
Preparing the Material

Proper preparation of your material is a critical step in achieving precise results with a laser cutter. By selecting the right material and ensuring it is clean and correctly positioned, you can optimize the cutting process and avoid common issues like uneven edges or burns.
Material Selection
Types of materials suitable for laser cutting (e.g., wood, acrylic, metal)
Laser cutting works effectively on a wide range of materials, each offering unique properties that influence the final outcome. Common materials include:
- Wood: Ideal for intricate designs, wood provides a smooth finish and is easy to cut through materials like plywood or MDF.
- Acrylic: Known for its clarity and durability, acrylic is perfect for creating signage or decorative items.
- Metal: Metals such as steel, aluminum, and brass require higher laser power but deliver exceptional precision and strength.
Each material reacts differently to the laser beam. For example, metals demand more energy due to their density, while acrylic melts cleanly, leaving polished edges. Understanding these characteristics helps you choose the best material for your project.
Factors to consider, such as thickness, density, and composition
When selecting a material, consider its thickness, density, and composition. Thicker materials require higher laser power to ensure the beam penetrates fully. Dense materials, like certain metals, may need slower cutting speeds to maintain accuracy. Composition also plays a role; for instance, composite materials with mixed elements may produce inconsistent results.
Tip: Always test a small sample of your material before starting a full project. This allows you to adjust settings and avoid wasting resources.
Cleaning and Setup
Importance of cleaning the material surface for optimal results
A clean material surface ensures the laser interacts directly with the material without interference. Dust, grease, or debris can scatter the laser beam, reducing its effectiveness and causing uneven cuts. For example, metals often have protective coatings or oxidation layers that must be removed to achieve a smooth finish.
Use a soft cloth or appropriate cleaning solution to prepare the surface. For metals, consider using a degreaser or abrasive pad to remove any residue. Clean materials not only improve cutting quality but also extend the lifespan of your laser cutter by reducing wear on its components.
Proper placement and securing of the material on the laser bed
Positioning your material correctly on the laser bed is essential for consistent results. Ensure the material lies flat to prevent the laser from losing focus. Warped or uneven surfaces can lead to jagged edges or incomplete cuts.
Secure the material using clamps or weights to keep it stable during the cutting process. Movement can disrupt the laser's path, resulting in errors. Align the material with the laser cutter's grid or guides to ensure precise placement, especially for intricate designs.
Pro Tip: Double-check the alignment of your material with the cutting design in your software. This step prevents misalignment and wasted material.
By carefully selecting, cleaning, and setting up your material, you lay the foundation for successful laser cutting. These steps ensure the laser can cut through materials efficiently, delivering clean and professional results.
Optimizing Laser Settings
Fine-tuning your laser cutter settings is essential for achieving clean and precise cuts, especially when working with thick materials. By adjusting power, speed, frequency, and focus, you can optimize the cutting process and enhance the quality of your results.
Adjusting Power, Speed, and Frequency
How to balance power and speed for clean cuts
Balancing power and speed is critical for clean and efficient cutting. Higher power levels allow the laser to penetrate thicker materials, but excessive power can cause burns or rough edges. Lower power may fail to cut through the material entirely. To achieve the right balance, start with moderate power and adjust incrementally based on the material's thickness and density.
Speed also plays a significant role. Slower speeds give the laser more time to cut through the material, which is necessary for thicker pieces. However, moving too slowly can lead to overheating and warping. For thinner materials, faster speeds often yield better results. Testing different combinations of power and speed helps you find the optimal settings for your project.
Quick Tip: Begin with the manufacturer's recommended settings for your material and make small adjustments to refine the results.
Role of frequency in cutting different materials
Frequency refers to the number of laser pulses emitted per second. This setting affects how the laser interacts with the material. For metals, higher frequencies produce smoother edges by delivering continuous energy. For non-metals like wood or acrylic, lower frequencies reduce the risk of burns and charring.
Adjusting frequency based on the material type ensures cleaner cuts and minimizes imperfections. For example, when cutting acrylic, a lower frequency prevents melting and leaves polished edges. On the other hand, metals benefit from higher frequencies to maintain precision and reduce surface roughness.
Pro Tip: Experiment with frequency settings on a test piece to determine the best configuration for your material.
Setting the Focus
Importance of precise focus for thick materials
Precise focus is crucial when cutting thick materials. The laser beam must concentrate its energy at the correct depth to achieve a clean cut. Misaligned focus can result in uneven edges, incomplete cuts, or excessive heat damage. Proper focus ensures that the laser's energy is fully utilized, improving both efficiency and accuracy.
For thick materials, the focal point should align with the material's surface or slightly below it. This positioning allows the laser to penetrate deeper while maintaining a sharp and consistent cut. Regularly checking and adjusting the focus prevents errors and enhances the overall quality of your work.
Techniques for achieving accurate focus (e.g., focus gauges, manual adjustments)
Several techniques can help you achieve accurate focus. Many laser cutters come with built-in focus gauges or autofocus systems that simplify the process. These tools measure the distance between the laser head and the material, ensuring precise alignment.
If your laser cutter lacks an autofocus feature, manual adjustments are equally effective. Use a focus gauge or a piece of scrap material to test the beam's sharpness. Adjust the laser head's height until the beam creates a fine, concentrated spot. For advanced users, adjusting the Z-axis height during multiple passes can further improve precision when working with very thick materials.
Quick Reminder: Always recheck the focus after changing materials or settings to maintain consistent performance.
By mastering these laser cutter settings, you can significantly improve the quality of your cuts. Adjusting power, speed, frequency, and focus ensures that your laser cutter operates at its full potential, delivering professional-grade results every time.
Design Considerations
Accounting for Kerf
What kerf is and its impact on design accuracy
Kerf refers to the width of material removed by the laser during the cutting process. This width depends on several factors, including the laser's power, speed, and focal position. A narrower kerf results in more precise cuts, while a wider kerf can affect the accuracy of your designs. When working with thick materials, the kerf becomes even more significant because the laser beam spreads slightly as it penetrates deeper.
Failing to account for kerf can lead to misaligned parts or gaps in your final project. For example, if you design a piece to fit snugly into another, an unaccounted kerf may result in a loose or uneven fit. Understanding kerf ensures that your designs translate accurately from software to the finished product.
Tip: Always measure the kerf width of your laser cutter by performing a test cut on your material. Use this measurement to adjust your designs for better precision.
Adjusting designs to compensate for kerf width
To achieve accurate results, you must adjust your designs to compensate for the kerf width. This process involves offsetting the cutting path in your design software to account for the material removed by the laser. For instance, when creating interlocking parts, you can reduce the dimensions of the cutouts or increase the size of the tabs to ensure a tight fit.
Most design software allows you to specify the kerf width during the design phase. Programs like LightBurn or RDWorks include tools for adjusting the cutting path based on your laser cutter's kerf. By incorporating these adjustments, you can maintain the integrity of your designs and avoid errors during assembly.
Pro Tip: Save your adjusted designs as templates for future projects. This practice saves time and ensures consistent results across similar materials.
Joint Types and Design Software
Common joint types for thick materials (e.g., finger joints, lap joints)
When working with thick materials, choosing the right joint type enhances the strength and stability of your project. Some common joint types include:
- Finger joints: These interlocking rectangular tabs provide a strong connection and are ideal for box-like structures. They work well with wood and acrylic.
- Lap joints: These joints involve overlapping two pieces of material and cutting away a portion of each to create a flush connection. They are suitable for metals and other dense materials.
- Mortise and tenon joints: These traditional joints involve inserting a protruding tenon into a matching mortise hole. They offer excellent durability for heavy-duty applications.
Each joint type requires precise cutting to ensure a proper fit. By understanding the strengths and applications of these joints, you can select the best option for your project.
Quick Reminder: Test your chosen joint type on scrap material before committing to the final design. This step helps you refine the fit and avoid wasting valuable materials.
Recommended design software for laser cutting
Designing for laser cutting requires specialized software that translates your ideas into precise cutting paths. Popular options include:
- LightBurn: Known for its user-friendly interface, this software offers advanced tools for adjusting kerf, optimizing cutting paths, and preparing files for various laser cutters.
- RDWorks: Designed for CO2 laser machines, RDWorks provides robust features for creating intricate designs and controlling cutting parameters.
- Adobe Illustrator: While not laser-specific, this software allows you to create detailed vector designs that can be imported into laser cutter software.
- AutoCAD: Ideal for technical and industrial designs, AutoCAD supports precise measurements and complex geometries.
These programs enable you to create, modify, and optimize your designs for laser cutting. They also allow you to adjust parameters like kerf width, cutting speed, and focal position, ensuring that your designs align perfectly with your laser cutter's capabilities.
Pro Tip: Choose software compatible with your laser cutter to streamline the design-to-cutting process. Many manufacturers recommend specific programs for their machines.
By understanding kerf, selecting appropriate joint types, and using reliable design software, you can elevate your laser cutting projects. These considerations ensure that your designs translate seamlessly into high-quality, professional results.
Testing and Calibration
Importance of Trial Cuts
How to perform test cuts to refine settings
Trial cuts are essential for achieving precise results with your laser cutter. They allow you to test and adjust the machine's settings before committing to the final project. To perform a trial cut, start by selecting a small piece of the material you plan to use. This ensures that the test reflects the actual cutting conditions.
Begin by setting the laser's power, speed, and frequency based on the manufacturer's recommendations for your material. Use a simple design, such as a straight line or a basic shape, to evaluate the cut quality. Observe the edges for smoothness and check if the laser has fully penetrated the material. If the cut appears uneven or incomplete, adjust the settings incrementally. For example, increase the power slightly or reduce the speed to allow the laser more time to cut through the material.
Tip: Keep a record of the settings used during each trial. This helps you identify the optimal configuration for future projects.
Identifying and addressing issues during testing
During trial cuts, you may encounter common issues such as burns, warping, or uneven edges. These problems often result from incorrect settings or improper material preparation. For instance, excessive power can cause burns, while insufficient power may leave the material partially cut. Adjusting the laser's power and speed can resolve these issues.
If the edges appear rough or jagged, check the focus of the laser. Misaligned focus can reduce the beam's precision, leading to poor cut quality. Use a focus gauge or manually adjust the laser head to ensure accurate alignment. Additionally, inspect the material for cleanliness. Dust or debris on the surface can scatter the laser beam, affecting the cut's consistency.
Pro Tip: Perform multiple trial cuts at different settings to compare results. This approach helps you fine-tune the laser cutter for optimal performance.
Regular Calibration
Steps to calibrate the laser machine for consistent performance
Calibration ensures that your laser cutter operates at peak efficiency. Regular calibration aligns the machine's components, such as the laser head, mirrors, and lenses, to maintain accuracy. Follow these steps to calibrate your laser cutter:
- Clean the optics: Dust and residue can accumulate on the mirrors and lenses, reducing the laser's effectiveness. Use a soft cloth and an appropriate cleaning solution to remove any buildup.
- Check the alignment: Misaligned mirrors can distort the laser beam. Use the machine's alignment tools or a piece of tape to verify that the beam travels in a straight path.
- Adjust the focus: Ensure that the laser's focal point aligns with the material's surface. Use a focus gauge or test cuts to confirm the alignment.
- Test the bed level: An uneven bed can cause inconsistent cuts. Use a leveling tool to check the bed's flatness and make adjustments as needed.
Quick Reminder: Perform these steps regularly, especially after moving the machine or changing its components.
Tools and techniques for accurate calibration
Several tools can assist you in calibrating your laser cutter. Focus gauges help you set the correct focal distance, ensuring that the laser beam remains sharp and precise. Alignment tools, such as laser pointers or alignment cards, allow you to verify the beam's path and make necessary adjustments.
For advanced calibration, consider using software tools that analyze the laser's performance. These programs can identify issues like beam distortion or uneven power distribution, providing detailed feedback for improvement. Additionally, some laser cutters include built-in calibration features, simplifying the process.
Scientific Insight: Studies have shown that proper calibration significantly improves cut quality. For example, research on industrial laser cutting highlights the importance of aligning key parameters, such as focus and cutting speed, to achieve smooth edges and consistent kerf geometry.
By performing regular calibration and using the right tools, you can ensure that your laser cutter delivers reliable and high-quality results. This practice not only enhances the machine's performance but also extends its lifespan.
Troubleshooting Common Issues
Uneven Cuts
Causes of uneven cuts and how to fix them
Uneven cuts often occur due to inconsistent power output from the laser cutter. Fluctuations in the power supply or issues with the laser tube can disrupt the energy flow, leading to irregular results. Improper speed and power settings also contribute to this problem. Each material and thickness requires specific adjustments, and incorrect settings may result in incomplete cuts or jagged edges.
To fix uneven cuts, start by calibrating your laser cutter. Regular calibration ensures that the laser beam remains aligned and maintains consistent power. Check the power supply for stability and inspect the laser tube for any signs of wear. Adjust the speed and power settings based on the material's thickness and density. For example, thicker materials require slower speeds and higher power to achieve clean cuts. Additionally, ensure the material lies flat and level on the cutting table. Warped or uneven surfaces can cause the laser to lose focus, resulting in inconsistent cuts.
Pro Tip: Perform a test cut on scrap material before starting your project. This allows you to identify and correct any issues with the settings or alignment.
Tips for maintaining consistent cutting quality
Maintaining consistent cutting quality requires attention to detail and regular maintenance. Follow these tips to ensure reliable results:
- Monitor the power output: Use a power meter to check the laser's energy levels. Inconsistent power can lead to uneven cuts, so address any fluctuations immediately.
- Clean the optics: Dust and debris on the mirrors or lenses can scatter the laser beam, reducing its precision. Clean these components regularly with a soft cloth and appropriate cleaning solution.
- Level the cutting bed: An uneven bed can cause the material to shift during cutting. Use a leveling tool to ensure the bed is flat and stable.
- Inspect the material: Ensure the material is free of dust, grease, or warping. A clean and flat surface improves the laser's interaction with the material.
By following these steps, you can maintain high-quality cuts and avoid common issues.
Burns or Material Warping
How to prevent burns on the material surface
Burns on the material surface often result from excessive laser power or improper speed settings. When the laser lingers too long on one spot, it generates excessive heat, scorching the material. To prevent burns, balance the power and speed settings. Use lower power levels for thinner materials and increase the speed to reduce heat buildup. For thicker materials, adjust the settings incrementally to find the optimal configuration.
Another effective method is to use masking tape or a protective coating on the material's surface. This layer absorbs excess heat and prevents direct contact between the laser and the material. After cutting, you can easily remove the tape or coating to reveal a clean surface.
Quick Tip: Test different speed and power combinations on a small piece of material to determine the best settings for your project.
Techniques to minimize warping during cutting
Warping occurs when the heat from the laser causes the material to expand unevenly. This issue is common with thin or flexible materials, but it can also affect thicker pieces if the heat is not managed properly. To minimize warping, follow these techniques:
- Use multiple passes: Instead of cutting through thick materials in a single pass, use multiple passes at lower power. This approach reduces heat buildup and prevents the material from distorting.
- Optimize the focus: Ensure the laser beam is precisely focused on the material's surface. Misaligned focus can generate excess heat, increasing the risk of warping.
- Secure the material: Clamp or weigh down the material to keep it stable during cutting. Movement can exacerbate warping and lead to uneven cuts.
- Cool the material: Use an air assist system to blow cool air onto the cutting area. This helps dissipate heat and prevents the material from overheating.
By implementing these techniques, you can achieve clean cuts without damaging the material.
Achieving precise cuts on thick materials requires a systematic approach. Start by understanding your laser cutter's capabilities and selecting the right machine for your needs. Prepare your materials carefully, optimize the laser settings, and adjust your designs to account for kerf. Regular testing and calibration ensure consistent performance, while troubleshooting common issues helps maintain quality.
Practice and experimentation are key to mastering laser cutting. Each project refines your skills and builds confidence. Patience and attention to detail will transform your results, allowing you to unlock the full potential of this cutting-edge technology.
FAQ
What is laser cutting?
Laser cutting is a precise manufacturing process that uses a high-powered laser beam to cut, engrave, or shape materials. This method works effectively on a variety of materials, including metal, plastic, wood, and textiles. It is widely recognized for its ability to create intricate designs with exceptional accuracy.
How does laser cutting work?
Laser cutting works by focusing a high-intensity laser beam onto the material's surface. The concentrated energy either melts, burns, or vaporizes the material along a predefined path. This process results in clean, smooth, and accurate cuts, making it ideal for both simple and complex designs.
What materials can a laser cutter handle?
A laser cutter can work with a wide range of materials. Common options include metals like steel and aluminum, non-metals such as wood and acrylic, and even fabrics or plastics. Each material reacts differently to the laser, so understanding its properties ensures optimal results.
What are the benefits of laser cutting?
Laser cutting offers several advantages. It provides high precision, allowing you to achieve tight tolerances and smooth edges. The process reduces material waste and minimizes the need for post-processing. Additionally, it can handle complex shapes and designs with ease, making it a versatile choice for various applications.
Can laser cutting services handle thick materials?
Yes, laser cutting services can handle thick materials, but the capability depends on the type of laser cutter and its power. For instance, CO2 lasers are suitable for non-metal thick materials, while fiber lasers excel at cutting thick metals. Always check the specifications of the service provider to ensure compatibility with your project.
How do I choose the right laser cutter for my needs?
Choosing the right laser cutter involves considering factors like the material type, thickness, and the complexity of your designs. CO2 lasers are ideal for non-metals, while fiber lasers are better suited for metals. Additionally, evaluate the machine's power output and bed size to match your project requirements.
Is laser cutting environmentally friendly?
Laser cutting is considered environmentally friendly compared to traditional cutting methods. It generates minimal waste and uses less energy for precise cuts. However, the environmental impact also depends on the material being cut and the disposal of any byproducts.
Do I need special software for laser cutting designs?
Yes, specialized software is often required to create and prepare designs for laser cutting. Popular options include LightBurn, RDWorks, and Adobe Illustrator. These programs allow you to adjust parameters like kerf width and cutting paths, ensuring your designs translate accurately to the final product.
How can I ensure precise cuts with a laser cutter?
To achieve precise cuts, focus on proper material preparation, accurate laser settings, and regular calibration of the machine. Clean the material surface, adjust the power and speed settings based on the material's thickness, and ensure the laser beam is correctly focused. Performing trial cuts can also help refine your settings.
Are laser cutting services cost-effective?
Laser cutting services are cost-effective for many projects. They reduce material waste, minimize the need for secondary finishing, and save time by delivering precise results. For businesses or individuals without access to a laser cutter, these services provide a practical and efficient solution.
See Also
Maximizing Efficiency with Your Laser Cutting Machine
Guidelines for Metal Cutting Using Desktop CNC Machines
Techniques to Enhance CNC Machines for Metal Cutting