How to Make Laser Cutting Machine at Home Easily

Creating your own laser cutting machine at home can be an exciting and rewarding journey. It’s not just about saving money; it’s about the thrill of building something with your hands. You’ll gain valuable technical skills as you dive into electronics, mechanics, and design. Plus, you get to customize the machine to suit your unique needs. Imagine the satisfaction of cutting intricate designs or crafting precise parts, all from a tool you built yourself. This project isn’t just for engineers—it’s perfect for anyone curious about how to make laser cutting machine at home.
Key Takeaways
- Building your own laser cutting machine can save you money compared to purchasing commercial models, making it a cost-effective solution for hobbyists and small businesses.
- The process enhances your technical skills in electronics, mechanics, and design, providing valuable hands-on experience that can lead to future DIY projects or career opportunities.
- Customizing your machine allows for creative freedom, enabling you to tailor it to your specific needs and projects, whether for crafting, prototyping, or artistic expression.
- The sense of accomplishment from creating a functional tool with your own hands fosters pride and a deeper connection to your work, enhancing your overall satisfaction.
- Gathering the right tools and materials beforehand ensures a smoother building process, helping you avoid frustration and stay organized.
- Starting with simple designs and materials allows beginners to build confidence and gradually tackle more complex projects as they gain experience.
- Prioritizing safety during the building and operation of your laser cutting machine is crucial to prevent accidents and ensure a successful DIY experience.
Benefits of Building a Laser Cutting Machine at Home
Building your own laser cutting machine at home comes with a range of benefits. It’s not just about creating a tool; it’s about the value you gain throughout the process. Let’s explore why this DIY project is worth your time and effort.
Cost-Effectiveness
One of the biggest advantages of making a laser cutting machine at home is saving money. Commercial laser cutters can cost thousands of dollars, which might not fit into your budget. By building one yourself, you can significantly cut down on expenses. You’ll only need to purchase the essential tools and components, many of which are affordable and readily available.
“DIY laser cutting machines are a relatively affordable solution for individuals and small-scale businesses.”
This affordability makes it an excellent choice for hobbyists or small business owners who want to avoid the high costs of outsourcing cutting and engraving tasks. Plus, you’ll have the freedom to upgrade or modify your machine without spending a fortune.
Skill Development
Creating a laser cutting machine isn’t just about the final product—it’s about the journey. You’ll dive into areas like electronics, mechanics, and software, gaining hands-on experience that enhances your technical knowledge. This project challenges you to solve problems, think critically, and learn new skills.
Imagine learning how to assemble a frame, install a laser module, and calibrate electronics. These are valuable skills that can open doors to other DIY projects or even career opportunities. The process of figuring out how to make a laser cutting machine at home will leave you feeling more confident and capable.
Creative Freedom
When you build your own laser cutting machine, you’re not limited by the constraints of pre-made models. You can customize it to suit your specific needs and preferences. Want a larger cutting area? Need a machine that handles certain materials? You’re in control.
This creative freedom allows you to bring your unique ideas to life. Whether you’re crafting intricate designs, prototyping engineering projects, or working on art pieces, your DIY laser cutter becomes a tool that reflects your vision. It’s not just a machine—it’s an extension of your creativity.
Personal Satisfaction
Building your own laser cutting machine brings a sense of accomplishment that’s hard to match. You’re not just assembling parts; you’re creating something functional and valuable with your own hands. That feeling of pride when you see your machine come to life is truly rewarding.
Unlike buying a commercial laser cutter, making one yourself gives you a deeper connection to the tool. You understand every component, every wire, and every bolt. This connection makes using the machine even more satisfying because you know the effort and thought that went into its creation.
“DIY projects like this foster a sense of ownership and pride that you can’t get from store-bought items.”
The satisfaction doesn’t stop at the building process. Every time you use your laser cutter to craft a design or complete a project, you’ll feel a renewed sense of achievement. It’s not just a tool—it’s a testament to your skills and determination.
Tools and Materials Needed for How to Make Laser Cutting Machine at Home
Before you dive into building your laser cutting machine, gathering the right tools and materials is essential.
Essential Tools
To get started, you’ll need a set of basic tools. These are items you might already have in your toolbox or can easily find at a hardware store. Here’s a list to guide you:
- Screwdrivers: Both flathead and Phillips screwdrivers are necessary for assembling and securing parts.
- Allen Wrenches: These are crucial for tightening bolts and screws, especially for the frame assembly.
- Drill: A power drill will help you create precise holes for mounting components.
- Soldering Iron: You’ll use this to connect wires and electronic components securely.
- Measuring Tape: Accurate measurements are key to ensuring your machine functions properly.
- Wire Cutters and Strippers: These tools will help you handle electrical wiring with ease.
“Having the right tools on hand not only saves time but also ensures a more professional outcome.”
These tools form the foundation of your project. They’ll help you work efficiently and avoid unnecessary frustration.
Key Components
The heart of your laser cutting machine lies in its components. These parts are what bring your machine to life. Here’s what you’ll need:
- Laser Module: This is the core of your machine. Choose a laser module with the appropriate power level for your intended projects. For beginners, a 5W or 10W laser is a good starting point.
- Stepper Motors: These motors control the movement of the laser head. Look for reliable and precise stepper motors to ensure smooth operation.
- Controller Board: This board acts as the brain of your machine, processing commands and controlling the laser and motors.
- Linear Rails or Rods: These provide stability and guide the laser head’s movement along the X and Y axes.
- Power Supply Unit (PSU): A stable power source is essential for running the laser and electronics.
- Cooling System: Lasers generate heat, so a cooling system like a fan or water cooling setup is necessary to prevent overheating.
Each component plays a vital role in the machine’s functionality. Take your time selecting quality parts to ensure your laser cutter performs well.
Additional Supplies
In addition to tools and components, you’ll need some extra supplies to complete your build. These items might seem minor, but they’re just as important:
- Wires and Connectors: These will link your electronic components together.
- Heat Shrink Tubing: Use this to insulate and protect your wiring connections.
- Screws, Nuts, and Bolts: These fasteners will hold your machine together securely.
- Acrylic or Aluminum Sheets: These materials can be used to build the frame of your machine.
- Safety Gear: Don’t forget safety goggles and gloves to protect yourself during the build and while using the machine.
“Attention to detail in gathering supplies can make or break the success of your DIY project.”
Having these additional items on hand will save you from last-minute trips to the store and keep your project on track.
With the right tools, components, and supplies, you’re well on your way to mastering how to make laser cutting machine at home. Preparing everything beforehand ensures a smoother building process and sets you up for success.
Step-by-Step Guide for How to Make Laser Cutting Machine at Home
Step 1: Plan Your Design
Start by sketching out your laser cutting machine's design. Think about the size, functionality, and materials you want to work with. Will your machine handle wood, acrylic, or even leather? Decide on the cutting area dimensions based on your projects. A larger cutting area is great for big designs, but it might require more space and stronger components.
Next, create a bill of materials (BOM). This list should include every part and tool you’ll need, from the laser module to the smallest screws. Planning ahead saves time and prevents unnecessary trips to the store. You can find templates for BOMs online or create your own using a spreadsheet.
“A clear plan is the foundation of any successful DIY project.”
Finally, research similar DIY laser cutting machines. Look for tutorials, videos, or forums where others share their experiences. Learning from others’ successes and mistakes will help you refine your design and avoid common pitfalls.
Step 2: Gather Tools and Materials
For materials, focus on quality components. Here’s a quick checklist:
For materials, focus on quality components. Here’s a quick checklist:
- Laser Module: Choose one with the right power level for your projects. A 5W laser works well for beginners.
- Stepper Motors: These control the movement of the laser head. Reliable motors ensure smooth and precise operation.
- Controller Board: This acts as the brain of your machine, processing commands and controlling the laser and motors.
- Linear Rails or Rods: These guide the laser head along the X and Y axes.
- Power Supply Unit (PSU): A stable power source is essential for consistent performance.
- Cooling System: Prevent overheating with a fan or water cooling setup.
You’ll also need additional supplies like wires, connectors, and fasteners (nuts, bolts, and screws). For the frame, materials like acrylic or aluminum sheets work well. If you’re unsure about sourcing parts, many online stores offer kits specifically for DIY laser cutters.
“Investing in high-quality materials ensures your machine performs reliably and lasts longer.”
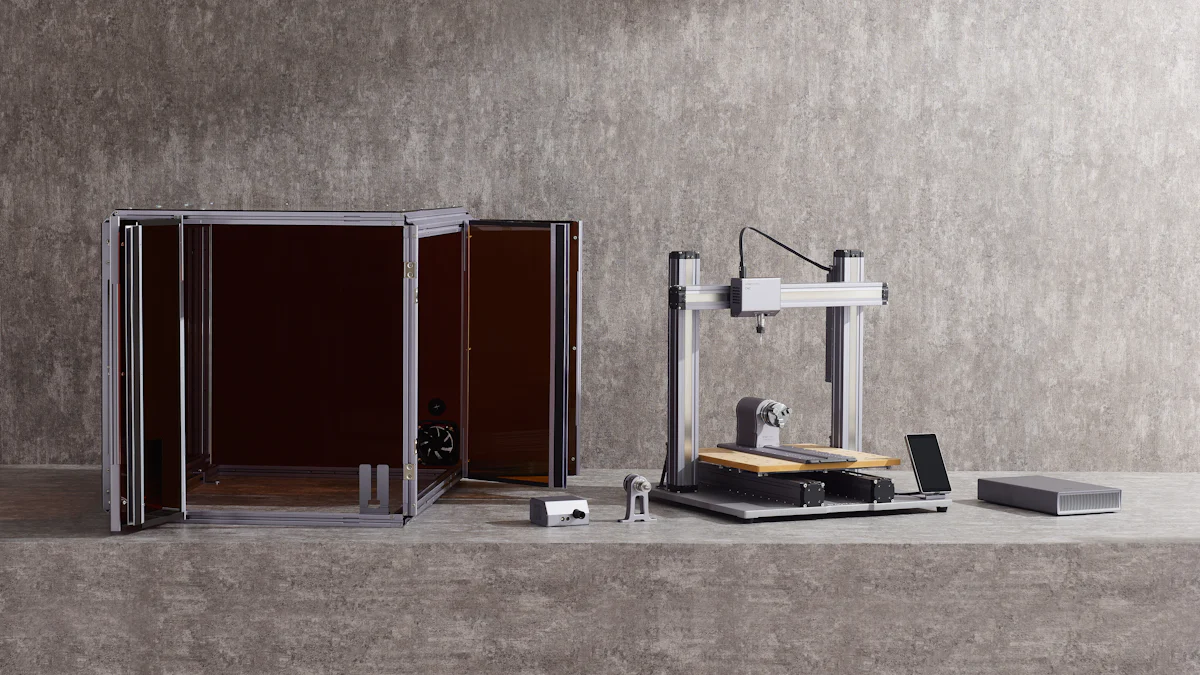
Step 3: Assemble the Frame
The frame is the backbone of your laser cutting machine. It holds everything together and provides stability during operation. Start by cutting your chosen material—acrylic or aluminum sheets are popular options—into the required dimensions. Use a metal saw for precise cuts.
Once the pieces are ready, assemble them using nuts, bolts, and screws. Tighten everything securely to avoid wobbling or misalignment. If your design includes linear rails or rods, attach them to the frame at this stage. These will guide the laser head’s movement, so ensure they’re perfectly aligned.
“A sturdy frame is crucial for accurate and consistent cutting results.”
Double-check all measurements and connections before moving on. A small mistake here can affect the entire machine’s performance. Take your time and make adjustments as needed.
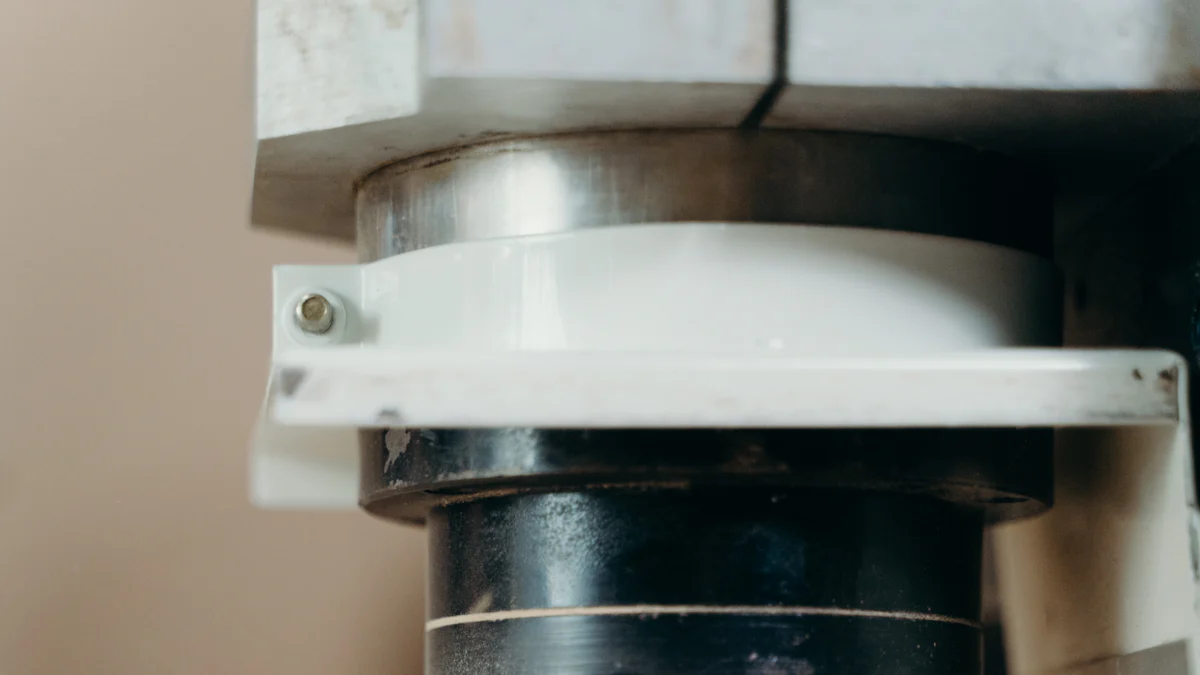
Step 4: Install the Laser Module
The laser module is the heart of your machine, and installing it correctly is crucial for its performance. Start by identifying the mounting point on your frame. This spot should align with the linear rails or rods to ensure smooth movement during operation. Use screws, nuts, and bolts to secure the laser module firmly in place. Tighten everything carefully to avoid any wobbling or misalignment.
Next, connect the laser module to the controller board. Follow the wiring diagram provided with your components. Use wires and connectors to establish a secure connection. If you’re unsure about the wiring, refer to online tutorials or forums for guidance. A soldering iron can help you create strong and reliable connections. Don’t forget to use heat shrink tubing to insulate the wires and prevent short circuits.
“Proper installation of the laser module ensures precise cutting and engraving results.”
Once the module is installed, check its alignment. The laser beam should point straight down onto the cutting surface. Adjust the position if necessary. This step is vital for achieving accurate cuts and avoiding damage to the machine or materials.
Step 5: Set Up Electronics
Setting up the electronics brings your laser cutting machine to life. Begin by connecting the controller board to the stepper motors. These motors control the movement of the laser head along the X and Y axes. Use the provided cables and connectors to link the components. Ensure the connections are secure to avoid interruptions during operation.
Next, connect the power supply unit (PSU) to the controller board. The PSU provides the necessary power for the laser module and other electronic components. Double-check the voltage and current ratings to match the requirements of your machine. Incorrect settings can damage the components.
Install the cooling system to prevent overheating. A fan or water cooling setup works well for most DIY laser cutters. Position the cooling system near the laser module and ensure it operates efficiently. Overheating can reduce the lifespan of your machine and affect its performance.
Finally, organize the wiring. Use cable ties or clips to keep the wires neat and out of the way. A clean setup not only looks professional but also reduces the risk of accidental damage.
“A well-organized electronic setup ensures smooth and reliable operation of your laser cutting machine.”
Step 6: Calibrate and Test
Calibration is the final step before you start using your laser cutting machine. Begin by adjusting the laser focus. Most laser modules have a focus ring or knob that allows you to fine-tune the beam. Place a piece of scrap material under the laser and adjust the focus until the beam creates a sharp and precise cut.
Next, test the movement of the laser head. Use the controller board’s software to move the laser head along the X and Y axes. Check for smooth and accurate movement. If you notice any issues, revisit the alignment of the linear rails or rods.
Run a test cut on a piece of scrap material. Choose a simple design and observe how the machine performs. Pay attention to the cutting speed, depth, and precision. Adjust the settings in the software if needed. This step helps you identify and fix any issues before working on actual projects.
“Testing your machine thoroughly ensures it’s ready for real-world use.”
Once you’re satisfied with the performance, your laser cutting machine is ready to go. You’ve successfully mastered how to make laser cutting machine at home. Enjoy the creative possibilities and start exploring different materials like wood, acrylic, and leather for your projects.
Tips for Success in Building a Laser Cutting Machine
Prioritize Safety
Safety should always come first when working on a DIY laser cutting machine. Lasers can be dangerous if not handled properly, so taking precautions is essential. Start by wearing safety goggles designed for laser protection. These goggles shield your eyes from harmful laser beams, reducing the risk of injury.
Set up your workspace in a well-ventilated area. Laser cutting can produce fumes and particles, especially when working with materials like acrylic or wood. A proper ventilation system or an exhaust fan helps keep the air clean and safe to breathe. Avoid working in confined spaces without airflow.
“A safe workspace ensures not only your well-being but also the success of your project.”
Always double-check your wiring and connections. Faulty wiring can lead to short circuits or overheating, which might damage your machine or cause accidents. Use heat shrink tubing to insulate exposed wires and prevent electrical hazards. Keep a fire extinguisher nearby as an added precaution.
Finally, never leave the machine unattended while it’s running. Even a small mistake can escalate quickly. Stay alert and monitor the machine during operation to ensure everything runs smoothly.
Start Small
When you’re just starting out, it’s best to keep things simple. Begin with a basic design and focus on mastering the fundamentals. A smaller cutting area and a low-power laser module are great for beginners. These choices make the build process more manageable and less intimidating.
Work with easy-to-cut materials like cardboard or thin plywood for your initial projects. These materials are forgiving and help you get a feel for the machine’s capabilities. Once you’re comfortable, you can move on to more challenging materials like acrylic or leather.
“Starting small allows you to learn and grow without feeling overwhelmed.”
Take your time with each step of the build. Rushing through the process increases the chances of mistakes. Pay attention to details, like aligning the frame and calibrating the laser. These small adjustments make a big difference in the machine’s performance.
As you gain confidence, you can upgrade your machine. Add features like a larger cutting area or a more powerful laser module. These enhancements let you tackle more complex projects and expand your creative possibilities.
Troubleshoot Issues
No DIY project is complete without a few hiccups along the way. Troubleshooting is a natural part of the process, and it’s where you’ll learn the most. When something doesn’t work as expected, take a step back and analyze the problem.
Start by checking the basics. Ensure all connections are secure and components are installed correctly. Loose wires or misaligned parts are common culprits. Use a multimeter to test electrical connections and verify that the power supply is functioning properly.
If the laser isn’t cutting accurately, revisit the calibration. Adjust the focus of the laser beam and check the alignment of the linear rails. Even a slight misalignment can affect the precision of your cuts. Test the machine with scrap material to fine-tune the settings.
“Troubleshooting challenges help you develop problem-solving skills and improve your machine.”
Don’t hesitate to seek help from online communities or forums. Many DIY enthusiasts share their experiences and solutions to common issues. Learning from others can save you time and frustration. Remember, every problem you solve brings you closer to mastering your laser cutting machine.
By prioritizing safety, starting small, and embracing troubleshooting, you’ll set yourself up for success. These tips not only make the process smoother but also enhance your skills and confidence as a DIY maker.
Applications of a DIY Laser Cutting Machine
Building your own laser cutting machine opens up a world of possibilities. Whether you're a hobbyist, an engineer, or an entrepreneur, this tool can transform your projects and ideas into reality. Let’s explore some of the most exciting ways you can use your DIY laser cutter.
Crafting and Art Projects
Your laser cutting machine can become a powerful tool for crafting and artistic expression. It allows you to create intricate designs with precision that’s hard to achieve by hand. You can cut, engrave, or etch materials like wood, acrylic, leather, and even paper. This versatility makes it perfect for a wide range of creative projects.
Imagine designing custom jewelry, personalized gifts, or decorative wall art. You can also use it to create stencils for painting or engraving unique patterns on everyday items. The ability to experiment with different materials and designs gives you endless opportunities to bring your artistic vision to life.
“Laser cutters are a game-changer for artists and crafters, enabling them to produce professional-quality work from home.”
If you enjoy DIY crafts, your laser cutter can help you take your projects to the next level. It’s not just a tool; it’s a gateway to exploring your creativity in ways you never thought possible.
Prototyping and Engineering
For engineers and inventors, a DIY laser cutting machine is an invaluable resource. It allows you to prototype designs quickly and accurately. Whether you’re working on mechanical parts, electronic enclosures, or architectural models, your laser cutter can help you turn ideas into tangible objects.
The precision of laser cutting ensures that your prototypes are accurate and functional. You can test your designs, make adjustments, and refine your creations without relying on expensive manufacturing processes. This hands-on approach saves time and money while giving you full control over your projects.
“Calibration and testing of the laser ensure that every cut and engraving meets your exact specifications.”
Prototyping isn’t just for professionals. If you’re a student or a hobbyist interested in engineering, your laser cutter can help you learn and experiment. It’s a practical way to explore concepts and bring your technical ideas to life.
Small Business Opportunities
Your DIY laser cutting machine can also open doors to entrepreneurial ventures. With its ability to create high-quality, customized products, you can start a small business right from your home. Personalized items like engraved keychains, custom signs, or unique home decor are always in demand.
You can also offer services like cutting or engraving for other businesses or individuals. Many small businesses need custom parts or promotional items, and your laser cutter can provide a cost-effective solution. By offering these services, you can turn your DIY project into a profitable venture.
“A homemade laser cutter can serve as a valuable tool for small businesses, reducing outsourcing costs and increasing creative flexibility.”
Starting small and focusing on niche markets can help you build a loyal customer base. Over time, you can expand your offerings and grow your business. Your laser cutter isn’t just a tool for personal use—it’s an investment in your future.
With a DIY laser cutting machine, the possibilities are endless. From crafting and prototyping to starting your own business, this tool empowers you to explore new opportunities and achieve your goals. What will you create with yours?
Building a laser cutting machine at home is more than just a project—it’s an opportunity to learn, create, and innovate. You save money while gaining hands-on experience with tools, electronics, and design. The freedom to customize your machine ensures it fits your unique needs and creative goals. Plus, the satisfaction of using something you built yourself is unmatched. Take the first step today. Start exploring how to make laser cutting machine at home, and unlock a world of possibilities for crafting, prototyping, and beyond.
FAQ
What materials can I cut or engrave with a DIY laser cutting machine?
You can work with a variety of materials using your DIY laser cutter. Common options include wood, acrylic, leather, and even paper. For example, plywood is a popular choice for projects like wall clocks, birdhouses, or intricate 3D models. Each material offers unique possibilities, so you can experiment to find what works best for your designs.
“Laser cutters are versatile tools that allow you to explore endless creative opportunities.”
Always check the specifications of your laser module to ensure it’s compatible with the material you want to use.
How much does it cost to build a laser cutting machine at home?
The cost depends on the components and tools you choose. On average, building a basic DIY laser cutter can range from $300 to $800. High-quality parts, like a powerful laser module or advanced controller board, may increase the cost. However, this is still more affordable than purchasing a commercial laser cutter, which can cost thousands of dollars.
“DIY laser cutting machines are a cost-effective solution for hobbyists and small businesses.”
Planning your budget and sourcing components wisely can help you save money.
Is it safe to use a DIY laser cutting machine?
Yes, it’s safe if you follow proper safety precautions. Always wear laser safety goggles to protect your eyes. Set up your machine in a well-ventilated area to avoid inhaling fumes from materials like acrylic or wood. Double-check all wiring and connections to prevent electrical hazards.
“Prioritizing safety ensures a smooth and worry-free experience with your laser cutter.”
Never leave the machine unattended while it’s running, and keep a fire extinguisher nearby as a precaution.
Can I upgrade my DIY laser cutting machine later?
Absolutely! One of the best things about building your own laser cutter is the ability to customize and upgrade it. You can add a more powerful laser module, expand the cutting area, or integrate advanced features like automatic focusing. These upgrades allow your machine to grow with your skills and project needs.
“DIY projects give you the freedom to adapt and improve as you go.”
Start with a basic setup and enhance it over time as you gain confidence.
What software do I need to operate a DIY laser cutting machine?
Most DIY laser cutters use open-source or affordable software for design and control. Popular options include LaserGRBL and LightBurn. These programs let you create or import designs and control the laser’s movement and power settings. Some controller boards come with their own software, so check compatibility before purchasing.
“User-friendly software makes it easy to bring your creative ideas to life.”
Explore tutorials and forums to learn how to use the software effectively.
How precise are DIY laser cutting machines?
DIY laser cutters can achieve impressive precision, often comparable to commercial models. The accuracy depends on factors like the quality of your components, proper calibration, and alignment. With careful assembly and regular maintenance, you can create intricate designs and detailed engravings.
“Precision is key to unlocking the full potential of your laser cutting projects.”
Test your machine on scrap materials to fine-tune its performance.
What are some beginner-friendly projects for a DIY laser cutter?
If you’re new to laser cutting, start with simple projects like coasters, keychains, or decorative signs. Plywood is an excellent material for beginners because it’s easy to cut and engrave. As you gain experience, you can move on to more complex creations like 3D models, custom jewelry, or personalized gifts.
“Beginner projects help you build confidence and explore the capabilities of your machine.”
Platforms like Etsy, Pinterest, and Instagram offer endless inspiration for laser cutter projects.
Can I use a DIY laser cutter for business purposes?
Yes, many people use DIY laser cutters to start small businesses. You can create and sell custom products like engraved keychains, personalized gifts, or unique home decor. Offering cutting or engraving services to other businesses is another way to generate income.
“A homemade laser cutter can be a valuable tool for turning creativity into profit.”
Focus on niche markets and high-quality craftsmanship to stand out.
How long does it take to build a DIY laser cutting machine?
The time required depends on your experience and the complexity of your design. For most beginners, assembling a basic laser cutter can take a few days to a week. Planning your design, gathering materials, and following a step-by-step guide will help streamline the process.
“Patience and attention to detail are essential for a successful build.”
Take your time to ensure each step is done correctly for the best results.
Where can I find inspiration for laser cutting projects?
You can find inspiration on platforms like Etsy, Pinterest, and Instagram. Communities like the Creality Falcon Facebook group also share ideas and tips for laser cutter projects. From crafting unique timepieces to creating intricate art pieces, the possibilities are endless.
“Exploring online communities can spark your creativity and help you discover new ideas.”
Bookmark your favorite designs and adapt them to suit your style and machine’s capabilities.
See Also
Maximizing Efficiency With Your Laser Cutting Machine
Understanding the Basics of Laser Cutting Technology
The Functionality of CNC Laser Cutting Machines