How to Make CO2 Laser Cutting Machine Easily

Learning how to make a CO2 laser cutting machine can be an exciting and rewarding endeavor. This process not only allows you to tailor the machine to your specific needs but also helps you save money compared to buying a commercial model. Many hobbyists and creators have embraced this approach, motivated by the high cost of pre-made machines. For example, a young enthusiast successfully built their own laser cutter at just 17 years old, transforming financial limitations into an opportunity for innovation. With the right tools and materials, you too can master how to make a CO2 laser cutting machine and experience the satisfaction of creating something both functional and efficient from scratch.
Materials and Tools for Building a Laser Cutting Machine
Creating a CO2 laser cutting machine requires gathering the right materials and tools. Each component plays a vital role in ensuring the machine operates efficiently and delivers precise results. Below, you’ll find a breakdown of the essential components and tools needed to get started.
Essential Components
To build a functional laser cutting machine, you need several key parts. These components form the backbone of your machine and directly impact its performance:
- CO2 Laser Tube: The laser tube is the heart of your machine. It generates the laser beam used for cutting and engraving. Choose a high-quality tube with the appropriate wattage for your intended projects. For instance, a 40W tube works well for light materials, while a 150W tube is better for cutting metals.
- Frame and Gantry System: The frame provides structural support, while the gantry system ensures smooth and precise movement of the laser head. A sturdy frame prevents vibrations that could affect cutting accuracy.
- Mirrors and Lens: These optical parts direct and focus the laser beam. Proper alignment of mirrors and a clean lens are crucial for maintaining cutting precision.
- Power Supply: A reliable power supply is necessary to operate the laser tube and other electronic components. Ensure it matches the wattage requirements of your tube.
- Cooling System: A water cooling system dissipates heat generated by the laser tube. This prevents overheating and extends the lifespan of the tube.
- Control Board and Software: The control board acts as the brain of your machine, interpreting design files and controlling the laser’s movements. Pair it with user-friendly software for seamless operation.
- Exhaust System: An exhaust system removes smoke and fumes produced during cutting. This keeps your workspace safe and ensures clean cuts.
Tools Required
Having the right tools simplifies the assembly process and ensures each part is installed correctly. Here’s a list of tools you’ll need:
- Screwdrivers and Wrenches: These basic tools help you secure the frame and attach various parts.
- Multimeter: Use this to test electrical connections and ensure proper wiring of the power supply and control board.
- Laser Alignment Tool: This tool helps you align the mirrors and lens for optimal laser beam focus.
- Wire Strippers and Soldering Kit: These are essential for connecting wires and securing electrical components.
- Measuring Tape and Level: Accurate measurements and leveling are critical for building a stable and precise machine.
- Safety Gear: Always wear protective eyewear designed for CO2 lasers. Gloves and a mask are also recommended when handling certain materials.
Pro Tip: Using 3D-printed parts for non-critical components can reduce costs and simplify the building process. However, ensure these parts are durable enough to withstand regular use.
By gathering these materials and tools, you’ll be well-prepared to start building your CO2 laser cutting machine. Each item serves a specific purpose, so take the time to source high-quality components. This will save you time and effort during assembly and ensure your machine performs reliably.
Safety Precautions for Building and Using a Laser Cutting Machine
When working with a CO2 laser cutting machine, safety must always come first. The high temperatures, powerful laser beams, and electrical components involved can pose serious risks if not handled properly. By following these safety precautions, you can protect yourself and ensure a secure working environment.
Laser Safety
CO2 lasers emit powerful beams that can cause severe eye injuries or skin burns. To safeguard yourself:
- Wear Protective Eyewear: Always use certified laser safety goggles designed for CO2 lasers. These goggles shield your eyes from harmful laser radiation.
- Avoid Direct Exposure: Never look directly at the laser beam or its reflection. Even brief exposure can damage your vision permanently.
- Enclose the Laser Beam: Use protective enclosures around the laser path to prevent accidental contact with the beam.
- Follow Standards: Adhere to safety guidelines like those outlined in ANSI Z136.1 and ISO 11553-1. These standards provide detailed instructions for safe laser usage.
- Post Warning Signs: Place visible warning signs near the machine to alert others about the potential hazards.
Important: A 40W CO2 laser can cause significant harm. Treat the laser with respect and caution at all times.
Electrical Safety
The electrical components of your laser cutting machine, including the power supply and wiring, require careful handling. To minimize risks:
- Turn Off Power: Always disconnect the power supply before performing maintenance or adjustments.
- Inspect Wiring: Regularly check all wires for damage or loose connections. Faulty wiring can lead to short circuits or electrical shocks.
- Use a Multimeter: Test electrical connections with a multimeter to ensure proper voltage and current flow.
- Ground the Machine: Proper grounding prevents electrical surges and reduces the risk of shocks.
- Avoid Water Contact: Keep electrical components away from water, especially when using a water cooling system.
Pro Tip: Label all electrical connections clearly. This makes troubleshooting easier and reduces the chance of errors during assembly.
General Safety Tips
In addition to laser and electrical safety, follow these general precautions to create a safe workspace:
- Ensure Proper Ventilation: Install an exhaust system to remove smoke and fumes generated during cutting. Poor ventilation can lead to respiratory issues.
- Keep a Fire Extinguisher Nearby: High temperatures and flammable materials increase the risk of fire. A fire extinguisher provides quick response in emergencies.
- Maintain a Clean Workspace: Remove clutter and flammable objects from the area around the machine. A tidy workspace reduces accidents.
- Wear Protective Gear: Use gloves and a mask when handling materials that produce dust or toxic fumes.
- Never Leave the Machine Unattended: Always monitor the machine while it’s operating. Unexpected issues can arise, requiring immediate attention.
By implementing these safety measures, you can significantly reduce the risks associated with building and using a CO2 laser cutting machine. Prioritizing safety not only protects you but also ensures the longevity and reliability of your machine.
Step-by-Step Guide on How to Make CO2 Laser Cutting Machine
Creating a CO2 laser cutting machine from scratch can seem daunting, but breaking it into manageable steps makes the process achievable. This section provides a detailed step-by-step instruction to help you build your own lasercutter with precision and efficiency.
Designing and Planning the Machine
The foundation of any successful project lies in careful planning. Before you begin assembling your laser cutting machine, take time to design and map out the structure and functionality.
- Define Your Goals: Determine the purpose of your machine. Will it focus on laser engraving, cutting, or both? Decide the types of materials you plan to work with, such as wood, acrylic, or metal.
- Choose the Cutting Dimensions: Decide the size of the cutting area based on your project needs. A larger cutting area allows for more versatility but requires a bigger frame and higher power.
- Create a Blueprint: Sketch a detailed design of your machine. Include the placement of key parts like the frame, gantry system, mirrors, lens, and CO2 laser tube. Use CAD software for precise measurements.
- Prepare a Bill of Materials (BOM): List all the parts and tools required. Include the CO2 laser tube, power supply, mirrors, lens, cooling system, and control board. Ensure you source high-quality components for optimal performance.
Tip: Incorporate a gantry system in your design to enhance the precision and movement of the laser head.
Planning thoroughly ensures you avoid costly mistakes during assembly and helps you create a high quality co2 lasercutter tailored to your needs.
Building the Frame
The frame serves as the backbone of your laser cutting machine. A sturdy and well-aligned frame ensures stability and accuracy during operation.
- Select the Material: Use durable materials like aluminum extrusions or steel for the frame. These materials provide strength and reduce vibrations.
- Assemble the Frame: Follow your blueprint to construct the frame. Use screws and brackets to secure the structure. Ensure all connections are tight and stable.
- Level the Frame: Use a level to check that the frame is even. An uneven frame can cause misalignment of the laser beam and affect cutting precision.
- Install the Gantry System: Attach the gantry system to the frame. This system allows the laser head to move smoothly along the X and Y axes. Test the movement to ensure it operates without resistance.
Pro Tip: Double-check all measurements during assembly. Small errors in the frame can lead to significant issues later.
A strong and precise frame lays the groundwork for a reliable DIY laser cutter.
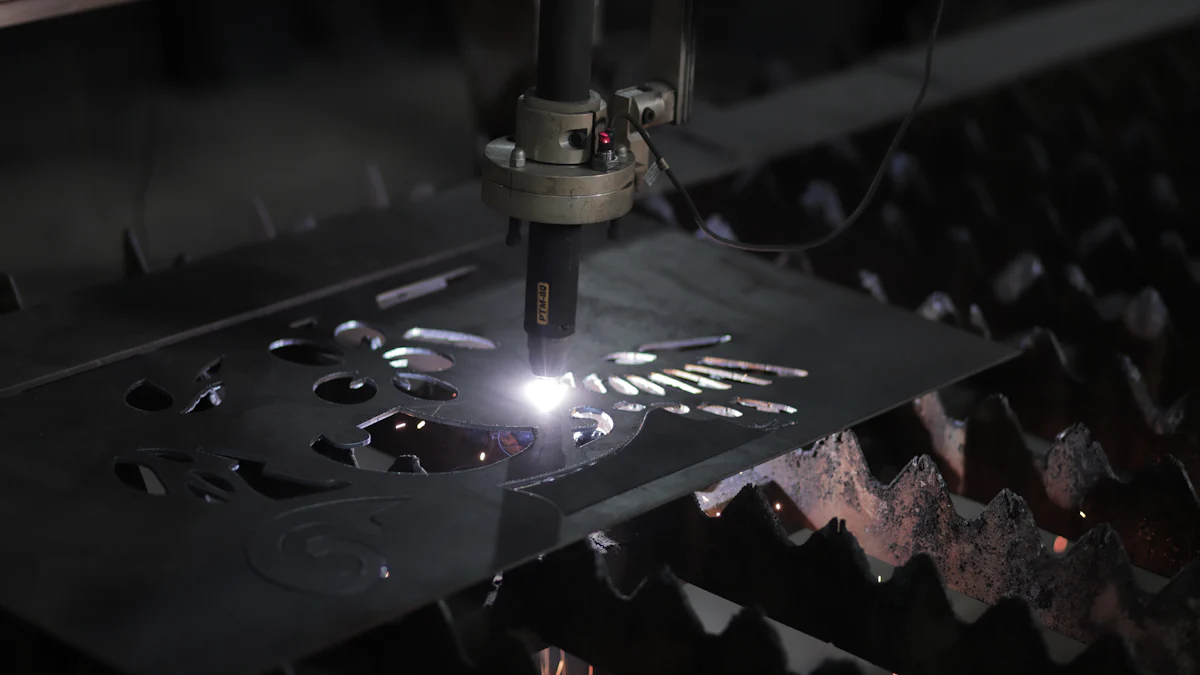
Installing the CO2 Laser Tube
The CO2 laser tube is the heart of your machine. Proper installation is crucial for the machine’s functionality and safety.
- Choose the Right Tube: Select a tube with the appropriate wattage for your projects. For example, a 40W tube works well for light materials, while a 150W tube is ideal for cutting metals.
- Secure the Tube: Mount the tube onto the frame using brackets or clamps. Ensure it is stable and aligned with the mirrors.
- Connect the Cooling System: Attach the water cooling system to the tube. This system prevents overheating and extends the tube’s lifespan. Check for leaks and ensure water flows smoothly.
- Wire the Power Supply: Connect the tube to the power supply. Use a multimeter to test the connections and verify proper voltage. Label the wires to avoid confusion during troubleshooting.
- Align the Tube: Adjust the position of the tube to ensure the laser beam travels straight through the mirrors and lens. Use a laser alignment tool for accuracy.
Important: Never operate the machine if the cooling system is not functioning. Overheating can damage the tube and pose safety risks.
Installing the CO2 laser tube correctly ensures your machine delivers consistent and precise results.
By following these steps, you can confidently progress in building your CO2 laser cutting machine. Each stage plays a vital role in creating a functional and efficient machine capable of handling various projects.
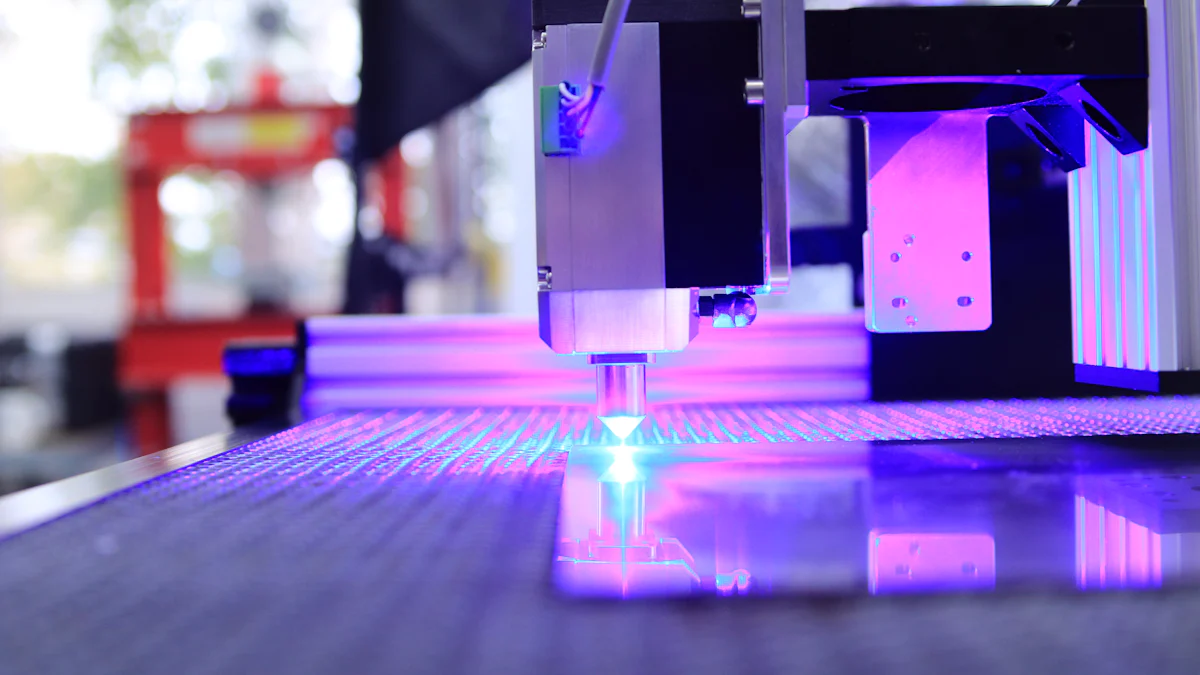
Setting Up the Mirrors and Lens
The mirrors and lens play a crucial role in directing and focusing the laser beam. Proper setup ensures your laser cutting machine operates with precision and efficiency. Follow these steps to align and install these critical parts:
- Install the Mirrors: Secure the mirrors onto their designated mounts. Position them at the correct angles to reflect the laser beam from the tube toward the lens. Use adjustable mounts to fine-tune their alignment.
- Align the Mirrors: Turn on the laser at a low power setting. Place a piece of thermal paper in the beam's path to check its trajectory. Adjust each mirror until the beam travels straight and hits the center of the next mirror.
- Mount the Lens: Insert the lens into its holder, ensuring the curved side faces the correct direction. A properly oriented lens focuses the laser beam for precise cutting and engraving.
- Test the Beam Focus: Place a test material under the laser head. Fire a short pulse and inspect the mark. A sharp, clean dot indicates proper focus. If the dot appears blurry, adjust the lens position.
Pro Tip: Clean the mirrors and lens regularly using a microfiber cloth and lens cleaner. Dust or smudges can scatter the laser beam, reducing cutting accuracy.
Accurate alignment of the mirrors and lens ensures your high quality co2 lasercutter delivers consistent results.
Wiring the Electronics
Wiring the electronics connects all the machine's components, enabling them to function as a cohesive system. Proper wiring ensures safety and optimal performance.
- Connect the Power Supply: Attach the power supply to the CO2 laser tube. Match the voltage and current ratings to the tube's specifications. Use a multimeter to verify the connections.
- Wire the Control Board: Link the control board to the power supply, stepper motors, and other electronic parts. Follow the wiring diagram provided with your control board to avoid errors.
- Install Safety Switches: Add emergency stop buttons and limit switches. These features enhance safety by allowing you to shut down the machine quickly in case of an issue.
- Test the Connections: Power on the machine and check each component. Ensure the laser tube fires correctly, the motors move smoothly, and the control board responds to commands.
Important: Label all wires during installation. Clear labeling simplifies troubleshooting and prevents mistakes during future maintenance.
Proper wiring is essential to build your own lasercutter that operates reliably and safely.
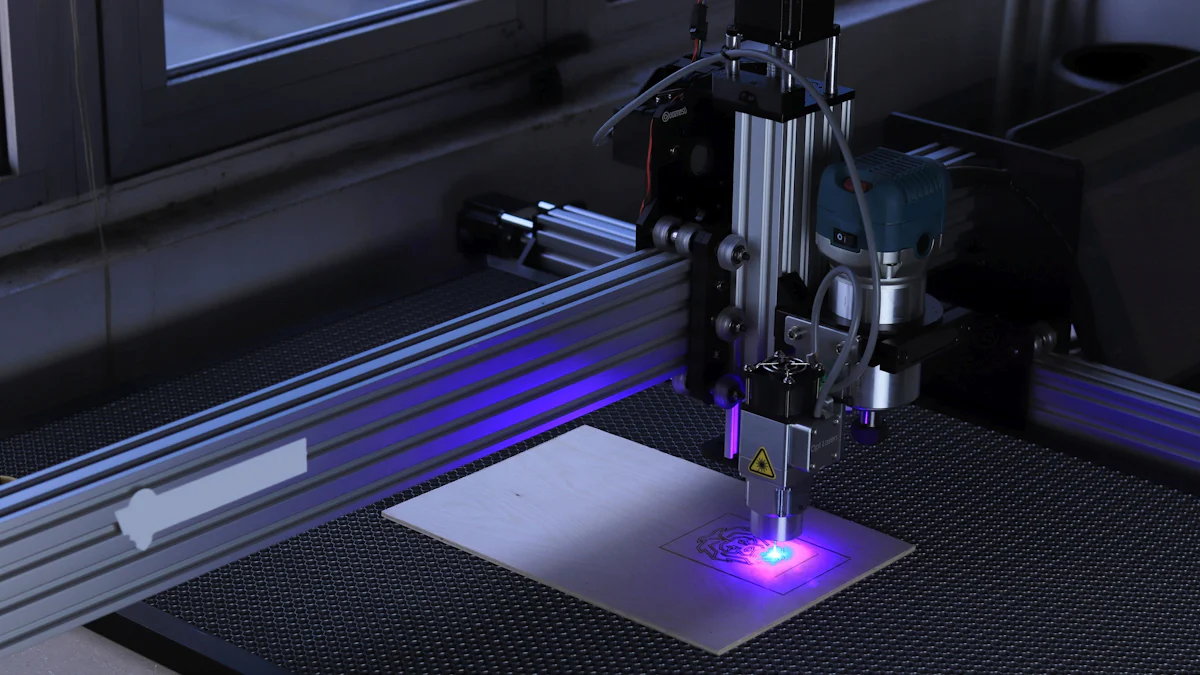
Configuring the Software
The software acts as the brain of your laser cutting machine, translating design files into precise movements. Configuring it correctly ensures seamless operation.
- Install the Software: Download and install the software compatible with your control board. Popular options include LightBurn and LaserGRBL.
- Set Machine Parameters: Input the machine's specifications, such as cutting dimensions, laser power, and movement speed. These settings ensure the software communicates effectively with the hardware.
- Calibrate the Laser: Use the software to test the laser's movement and power output. Adjust the settings until the laser cuts and engraves materials accurately.
- Import Design Files: Load a simple design file into the software. Run a test cut to verify the machine's performance. Fine-tune the settings as needed.
Pro Tip: Save your configuration settings as a profile. This allows you to quickly reload them if you need to reset the software.
Configuring the software transforms your machine into a fully functional tool for cutting and engraving.
Testing and Calibrating the Laser Cutting Machine
Testing and calibrating your CO2 laser cutting machine ensures it operates efficiently and produces precise results. This process involves verifying the functionality of each component and fine-tuning the machine for optimal performance. Follow these steps to test and calibrate your machine effectively.
Initial Power-On Test
The initial power-on test confirms that all components are correctly installed and functioning. Before proceeding, double-check all connections and ensure safety measures are in place.
- Inspect the Wiring: Verify that the wiring for the laser tube, power supply, and control board is secure. Loose connections can cause malfunctions or damage.
- Turn On the Machine: Power on the machine and observe its behavior. Listen for unusual noises or vibrations, which may indicate misaligned parts or loose screws.
- Check the Cooling System: Ensure the water cooling system is running smoothly. The laser tube relies on this system to prevent overheating. Look for leaks and confirm that water flows consistently.
- Test the Laser Beam: Set the laser to a low power level and fire a short pulse. Use a piece of thermal paper to confirm the beam is active. Avoid prolonged exposure to the beam during this step.
Tip: If you encounter issues during the power-on test, address them immediately. Consult the user manual or seek guidance from a laser machine specialist for troubleshooting.
Completing this test ensures your machine is ready for further calibration.
Laser Beam Alignment
Proper alignment of the laser beam is critical for achieving accurate cuts and engravings. Misaligned mirrors or lens can result in uneven or incomplete cuts.
- Prepare the Mirrors: Place thermal paper at each mirror's position. Fire the laser at a low power setting to check the beam's trajectory. Adjust the mirrors until the beam hits the center of each one.
- Align the Lens: Position the lens so the laser beam passes through its center. Use a test material to verify the beam's focus. A sharp, clean mark indicates proper alignment.
- Test Across the Cutting Area: Move the laser head to different points within the cutting area. Fire the laser at each position to ensure the beam remains centered and focused.
Pro Tip: Regularly clean the mirrors and lens to maintain alignment. Dust or smudges can scatter the beam and reduce accuracy.
Accurate alignment enhances the machine's performance and ensures consistent results across projects.
Fine-Tuning the Machine
Fine-tuning optimizes the machine's settings for precision and efficiency. This step involves adjusting parameters and testing the machine's capabilities.
- Adjust the Power Settings: Set the laser power according to the material you plan to cut. For example, use lower power for thin materials and higher power for thicker ones. Test different settings to find the ideal balance.
- Calibrate the Cutting Speed: Experiment with the machine's speed settings. Faster speeds may reduce cutting depth, while slower speeds improve precision. Choose a speed that suits your project's requirements.
- Test Material Compatibility: Use sample materials to evaluate the machine's performance. Check for clean cuts and minimal charring. Adjust the power and speed as needed.
- Save the Settings: Once you achieve optimal results, save the settings in the software. This allows you to replicate the same quality for future projects.
Important: Partnering with a trusted laser machine specialist can provide valuable insights during the calibration process. Their expertise ensures your machine operates at its full potential.
Fine-tuning transforms your laser cutting machine into a reliable tool for various applications. Regular calibration maintains its efficiency and extends its lifespan.
Maintenance Tips for Your Laser Cutting Machine
Proper maintenance ensures your CO2 laser cutting machine operates efficiently and lasts longer. By dedicating time to regular upkeep, you can prevent costly repairs and maintain consistent performance. Below are essential maintenance practices to keep your machine in top condition.
Regular Cleaning
Cleaning your laser cutting machine is vital for maintaining its precision and functionality. Dust, debris, and residue from materials can accumulate on critical components, affecting the machine's performance.
- Clean the Mirrors and Lens: Use a microfiber cloth and a lens cleaner to remove dust and smudges from the mirrors and lens. Dirty optics can scatter the laser beam, reducing cutting accuracy. Perform this cleaning weekly or after heavy use.
- Wipe Down the Frame: Dust and debris can settle on the frame and gantry system. Use a soft cloth to clean these areas, ensuring smooth movement of the laser head.
- Inspect the Laser Tube: Check the tube for any visible dirt or residue. Wipe it gently with a clean, dry cloth. A clean tube ensures optimal laser output and prevents overheating.
- Vacuum the Cutting Bed: Remove leftover material pieces and dust from the cutting bed. A clean surface improves airflow and prevents obstructions during operation.
Pro Tip: Avoid using abrasive cleaners or rough cloths on sensitive parts like mirrors and the tube. These can cause scratches and impair performance.
Regular cleaning not only enhances the machine's efficiency but also extends the lifespan of its components.
Routine Inspections
Routine inspections help you identify potential issues before they escalate into major problems. By checking your machine regularly, you can ensure all parts function correctly and safely.
- Examine the Cooling System: Inspect the water cooling system for leaks or blockages. Ensure the water flows smoothly through the tube to prevent overheating. Replace the water periodically to avoid contamination.
- Check the Electrical Connections: Look for loose or damaged wires. Use a multimeter to test the voltage and current flow. Faulty connections can lead to malfunctions or safety hazards.
- Inspect the Mirrors and Lens Alignment: Misaligned optics can cause uneven cuts. Use a laser alignment tool to verify that the beam travels straight through the mirrors and lens.
- Test the Exhaust System: Ensure the exhaust system removes smoke and fumes effectively. Clean or replace filters as needed to maintain proper ventilation.
- Monitor the Laser Tube's Performance: Over time, the tube's power output may decrease. Test its cutting ability on a sample material. If you notice a decline in performance, consider replacing the tube.
Important: Schedule these inspections monthly or after completing large projects. Consistent monitoring ensures your machine remains reliable.
By performing routine inspections, you can address minor issues early and avoid disruptions to your work.
Building a CO2 laser cutting machine offers a fulfilling and cost-effective way to explore laser engraving and cutting. By following this guide, you can create a reliable tool tailored to your specific needs. Take your time with each step, ensuring precision and safety throughout the process. This project not only saves money but also enhances your technical skills. As you gain experience, experiment with upgrades and improvements to maximize your machine’s potential. Regular maintenance and care will keep your laser cutting machine performing at its best, making it a valuable asset for your creative projects.
FAQ
What materials can a CO2 laser cutting machine cut?
A CO2 laser cutting machine works well with non-metallic materials. You can use it to cut wood, acrylic, plastics, leather, paper, and even fabrics. The laser's wavelength of 10.6 micrometers makes it highly efficient for these materials. However, cutting metals requires a higher-powered laser or additional modifications.
How precise are the cuts made by a CO2 laser cutting machine?
CO2 laser cutting machines deliver exceptional precision. The intense heat and focused beam create smooth and clean edges. This precision allows you to produce intricate designs and detailed engravings on various materials. The results are far superior to manual cutting methods.
Is building a CO2 laser cutting machine cost-effective?
Yes, building your own CO2 laser cutting machine can save you money. Pre-made machines often come with high price tags. By sourcing your own materials and assembling the machine, you can significantly reduce costs. Depending on the components you choose, the total expense may range from a few hundred to a few thousand dollars.
Are CO2 laser cutting machines safe to use?
CO2 laser cutting machines are safe when you follow proper precautions. Always wear protective eyewear designed for CO2 lasers. Ensure the machine has proper ventilation to remove fumes. Use enclosures to prevent accidental exposure to the laser beam. Regularly inspect electrical connections and keep a fire extinguisher nearby for emergencies.
Can I use a CO2 laser cutting machine for engraving?
Yes, CO2 laser cutting machines excel at engraving. You can create detailed patterns, logos, and text on materials like wood, acrylic, and leather. Adjusting the laser's power and speed settings allows you to achieve the desired depth and clarity for your engravings.
How long does it take to build a CO2 laser cutting machine?
The time required depends on your experience and the complexity of your design. For beginners, assembling the machine may take several weeks. This includes sourcing materials, designing the structure, and calibrating the components. Taking your time ensures better results and reduces the risk of errors.
What are the advantages of using a CO2 laser cutting machine?
CO2 laser cutting machines offer numerous benefits:
- Versatility: They handle a wide range of materials.
- Precision: The laser beam produces clean and accurate cuts.
- Efficiency: They work quickly and minimize material waste.
- Automation: You can integrate software for automated designs.
- Low Noise: The operation is quieter compared to other cutting methods.
These features make CO2 laser cutting machines a preferred choice for many industries.
How do I maintain my CO2 laser cutting machine?
Regular maintenance keeps your machine in top condition. Clean the mirrors and lens weekly to ensure optimal laser performance. Inspect the cooling system for leaks and replace the water periodically. Check electrical connections and test the exhaust system to maintain proper ventilation. Routine inspections prevent costly repairs and extend the machine's lifespan.
Can I upgrade my CO2 laser cutting machine later?
Yes, you can upgrade your machine as you gain experience. Common upgrades include installing a higher-wattage laser tube, adding an air assist system for cleaner cuts, or integrating advanced control boards for better precision. Experimenting with upgrades allows you to enhance your machine's capabilities over time.
Do I need technical skills to build a CO2 laser cutting machine?
Basic technical skills are helpful but not mandatory. With detailed guides and tutorials, you can learn the necessary steps. Familiarity with tools, wiring, and software configuration makes the process smoother. Patience and attention to detail are key to successfully building your machine.
See Also
Maximizing Efficiency with Your Laser Cutting Machine
Understanding the Functionality of CNC Laser Cutters
A Simple Explanation of Laser Cutting Machine Operation