How to Cut the Thread on a Sewing Machine Easily

Cutting thread on a sewing machine doesn’t have to be a struggle. If you're wondering how to cut the thread on a sewing machine, with the right tools and techniques, you can make this task quick and effortless. Modern sewing machines often include built-in thread cutters, which save time by trimming threads automatically after each seam. If you’ve ever dealt with brittle or weak threads breaking during sewing, you know how frustrating it can be. A reliable thread-cutting method ensures smooth progress and prevents interruptions. Whether you use an automatic cutter or manual tools, mastering how to cut the thread on a sewing machine enhances your sewing experience.
Key Takeaways
- Identify the location of the thread cutter on your sewing machine to streamline your sewing process.
- Utilize built-in automatic thread cutters for quick and efficient trimming with just a button press.
- Maintain your thread cutter by regularly cleaning and lubricating it to ensure optimal performance.
- If your built-in cutter malfunctions, use scissors or thread snips as reliable alternatives for clean cuts.
- Regularly inspect and replace or sharpen the cutter blade to prevent frayed edges and ensure smooth operation.
- Practice proper threading techniques to avoid jams and ensure your thread cutter functions effectively.
- Keep your sewing area organized with tools like thread cutter pendants for easy access and efficiency.
How to Cut the Thread on a Sewing Machine: Step-by-Step Guide
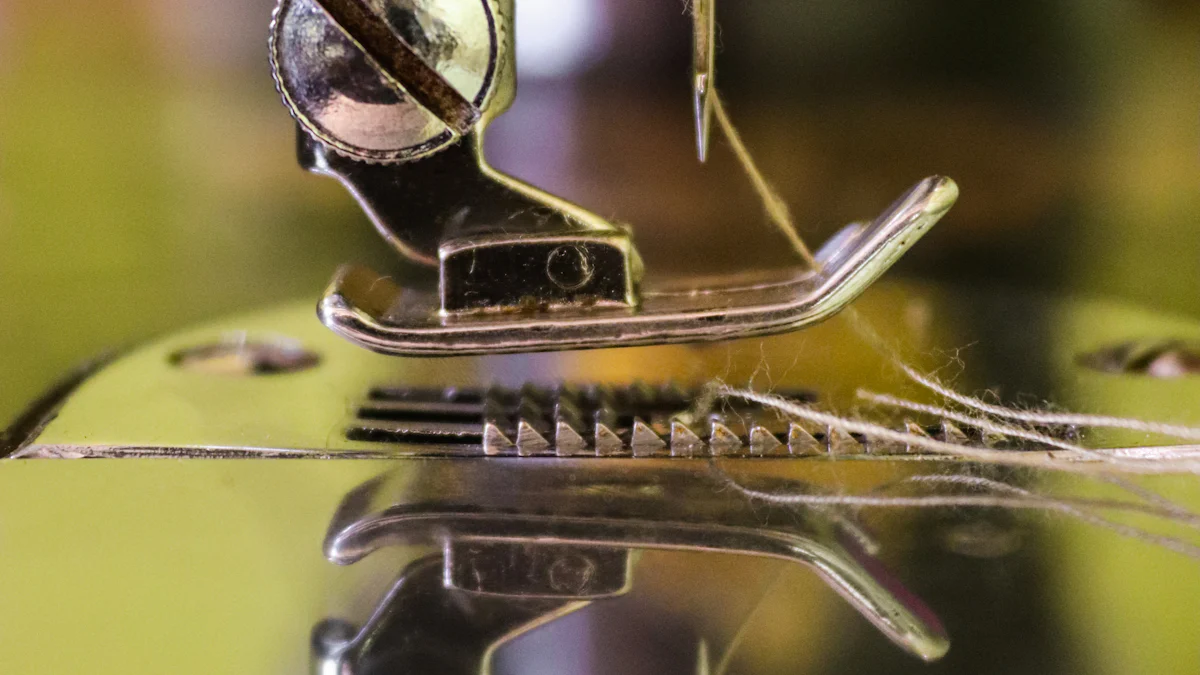
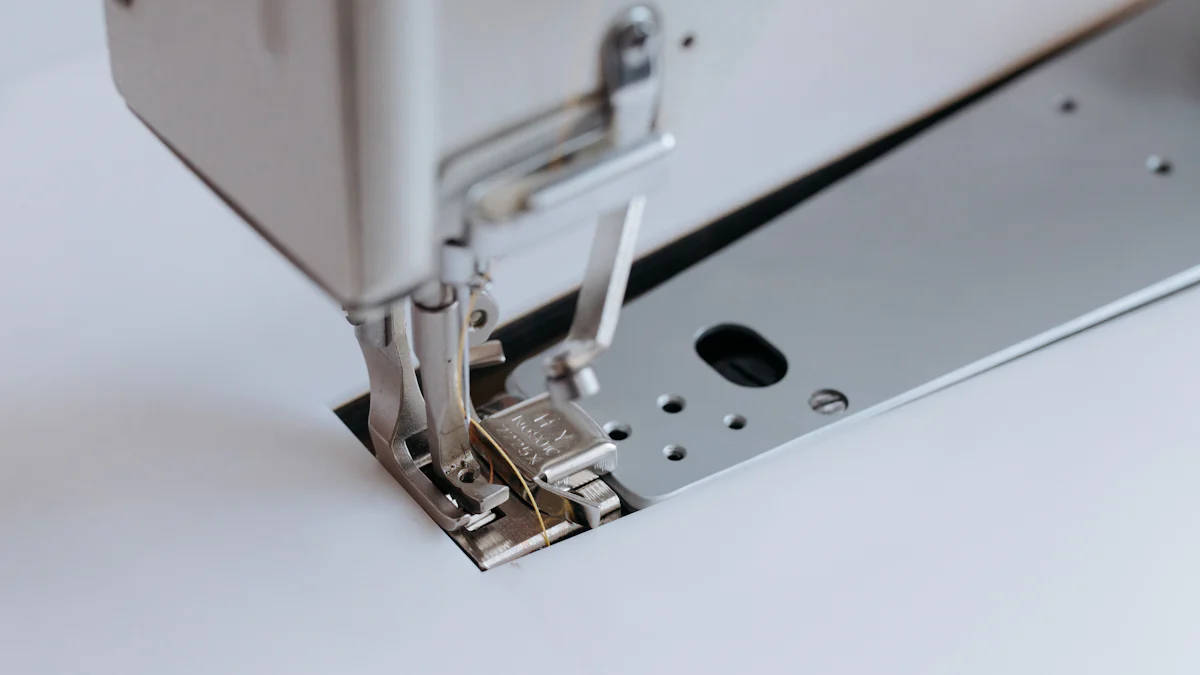
How to Locate the Thread Cutter on Your Sewing Machine
Finding the thread cutter on your sewing machine is the first step to mastering its use. Most modern sewing machines, such as the Juki HZL-DX7 or the Singer Quantum Stylist 9960, come with built-in thread cutters. These cutters are often located near the needle area or on the side of the machine. Look for a small blade or a lever marked with a thread-cutting symbol.
If you own a machine from the Janome Skyline series, like the S5 or S9, the thread cutter may be integrated into the control panel. For industrial models, such as Juki Industrial Sewing Machines, the cutter is typically part of the automated system. Refer to your machine’s manual for precise details, as the location can vary depending on the brand and model.
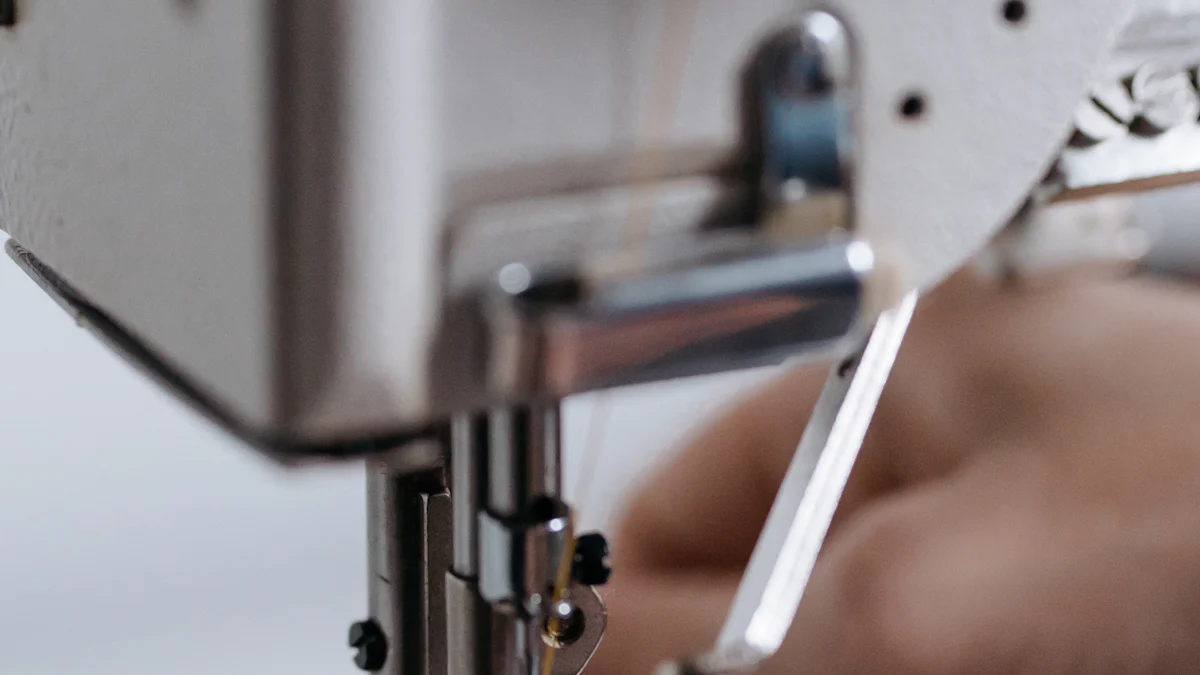
How to Use the Built-In Thread Cutter
Steps for Manual Thread Cutting
Manual thread cutters are simple to use and require minimal effort. Follow these steps:
- Finish sewing your seam and lift the presser foot.
- Pull the fabric gently toward the back of the machine to expose the thread.
- Locate the thread cutter blade, usually positioned near the needle or on the side of the machine.
- Slide the thread across the blade to cut it cleanly.
This method works well for machines like the Janome Sewist 780DC, which features a conveniently placed manual cutter.
Steps for Automatic Thread Cutting
Automatic thread cutters save time and effort by trimming threads with the press of a button. Here’s how to use them:
- Complete your seam and stop the machine.
- Press the thread cutter button, often marked with scissors or a similar icon. On machines like the Singer Quantum Stylist 9960, this button is located on the front panel.
- Wait for the machine to cut the thread automatically. The cutter trims both the upper and bobbin threads simultaneously.
Machines such as the Juki HZL-DX7 and Janome Skyline S7 offer this feature, making them ideal for efficient sewing projects.
Tips for Smooth and Efficient Thread Cutting
To ensure smooth thread cutting, follow these tips:
- Use quality thread: Cheap or brittle thread can fray or break, making it harder to cut cleanly.
- Keep the cutter clean: Dust and lint can accumulate around the blade, reducing its effectiveness. Regularly clean this area with a small brush.
- Check the blade’s sharpness: If the cutter struggles to trim the thread, the blade may be dull. Replace or sharpen it as needed.
- Practice proper threading: Ensure the thread is correctly positioned in the cutter mechanism. Misaligned threads can lead to uneven cuts.
By following these steps and tips, you’ll master how to cut the thread on a sewing machine with ease, whether you’re using a manual or automatic cutter.
Troubleshooting Common Thread Cutter Malfunctions
Thread cutter malfunctions can disrupt your sewing process, but identifying the issue and applying the right solution can restore smooth operation. Below, you’ll find common problems and practical steps to address them.
Thread Cutter Not Cutting Properly
A thread cutter that fails to cut cleanly can slow you down. Understanding the root cause is essential to fixing the problem.
Causes of Dull or Damaged Blades
Blades on a thread cutter can become dull or damaged over time. Frequent use, exposure to lint, or improper handling may contribute to this issue. According to sewing machine repair experts, dull blades are one of the most common reasons for thread cutters malfunctioning. If you notice frayed or uneven cuts, the blade likely needs attention.
How to Replace or Sharpen the Blade
Replacing or sharpening the blade can resolve cutting issues. Follow these steps:
- Turn off the machine: Always unplug your sewing machine before performing maintenance.
- Locate the blade: Refer to your machine’s manual to find the cutter blade. It’s often near the needle or bobbin area.
- Remove the old blade: Use a screwdriver to detach the blade carefully.
- Install a new blade: Align the replacement blade and secure it tightly.
- Test the cutter: Re-thread the machine and test the cutter to ensure it works properly.
If you prefer sharpening the blade, use a fine sharpening stone. Gently rub the blade’s edge until it regains sharpness. However, experts recommend replacing the blade for optimal results.
Thread Getting Stuck in the Cutter
Thread jams can occur when lint or debris accumulates in the cutter mechanism. This issue can halt your sewing progress.
How to Clear Jammed Threads
Clearing jammed threads requires patience and precision. Here’s how you can do it:
- Stop sewing immediately: Continuing to sew can worsen the jam.
- Cut excess thread: Use scissors to trim any visible thread around the cutter.
- Remove the jammed thread: Gently pull the stuck thread out of the cutter. Tweezers can help with hard-to-reach areas.
- Clean the cutter area: Use a small brush to remove lint or debris that may have caused the jam.
Preventing Thread Jams in the Future
Prevention is key to avoiding future jams. Follow these tips:
- Use high-quality thread: Cheap thread tends to shed fibers, increasing the risk of jams.
- Clean regularly: Dust and lint can accumulate quickly. Clean the cutter area after every sewing session.
- Thread correctly: Ensure the thread is properly aligned in the cutter mechanism to prevent tangles.
Thread Cutter Not Engaging
When the thread cutter doesn’t engage, it may indicate a mechanical or calibration issue.
Checking the Mechanism for Damage
Inspecting the cutter mechanism can help identify visible damage. Look for:
- Loose parts: Tighten any screws or components that appear loose.
- Broken pieces: If you notice cracks or breaks, the cutter may need replacement.
Expert Testimony: Sewing machine repair experts suggest checking for disconnected wires in automatic cutters. A loose connection can prevent the cutter from functioning.
Resetting or Recalibrating the Cutter
Resetting or recalibrating the cutter can resolve engagement issues. Follow these steps:
- Consult the manual: Your sewing machine’s manual will provide specific instructions for resetting the cutter.
- Perform a reset: For electronic machines, turn the machine off and on to reset the system.
- Recalibrate the cutter: Some machines allow you to recalibrate the cutter through the settings menu. Follow the prompts to complete the process.
If the cutter still doesn’t engage, consider seeking professional servicing. A technician can diagnose and fix complex issues.
By addressing these common thread cutter malfunctions, you can maintain your sewing machine’s performance and enjoy uninterrupted sewing sessions.
Tips for Maintaining the Thread Cutter for Optimal Performance
Proper maintenance of your sewing machine’s thread cutter ensures smooth operation and extends its lifespan. By following these tips, you can keep your thread cutter in excellent condition and avoid interruptions during your sewing projects.
Regular Cleaning and Maintenance
Regular cleaning is essential to prevent dust and lint from clogging the thread cutter. Accumulated debris can reduce the cutter’s efficiency and even cause malfunctions.
Removing Dust and Lint from the Cutter
Dust and lint often collect around the thread cutter, especially after prolonged use. To clean it effectively:
- Turn off and unplug your sewing machine for safety.
- Use a small, soft brush to gently remove lint and dust from the cutter area. A makeup brush or a sewing machine cleaning brush works well.
- For stubborn debris, use a can of compressed air to blow it away. Hold the nozzle at a slight angle to avoid pushing lint deeper into the machine.
Keeping the cutter area clean ensures that the blade remains sharp and functional. According to Ageberry, regular cleaning of the bobbin area and cutter mechanism prevents thread jams and improves performance.
Lubricating Moving Parts
Lubrication reduces friction and keeps the cutter mechanism operating smoothly. To lubricate:
- Refer to your sewing machine manual to identify the parts that require lubrication.
- Apply a drop of sewing machine oil to the moving parts of the cutter mechanism. Avoid over-oiling, as excess oil can attract more lint.
- Wipe away any excess oil with a clean cloth.
Lubricating the cutter regularly minimizes wear and tear, ensuring optimal performance over time.
Inspecting the Cutter for Wear and Tear
Frequent use can cause the thread cutter blade to dull or wear out. Inspect the blade periodically for signs of damage, such as nicks or uneven edges. If the cutter struggles to trim threads cleanly, it may be time to replace the blade. Machines like the Juki HZL-DX7 and Janome Skyline S7 often have replaceable blades, making maintenance straightforward.
When inspecting, also check for loose screws or misaligned parts. Tighten any loose components to prevent further damage. As noted by JUKI Europe, maintaining sharp and properly aligned blades enhances efficiency and reduces the risk of material damage.
When to Seek Professional Servicing
Sometimes, professional servicing becomes necessary to address complex issues. Seek expert help if:
- The thread cutter fails to engage despite cleaning and recalibration.
- You notice broken or severely damaged parts that you cannot replace yourself.
- The cutter mechanism requires recalibration beyond what the manual provides.
Professional technicians have the tools and expertise to diagnose and fix intricate problems. Regular servicing, combined with your maintenance efforts, ensures that your sewing machine operates at peak performance.
By following these maintenance tips, you can keep your thread cutter in excellent condition. Whether you’re learning how to cut the thread on a sewing machine or troubleshooting issues, proper care guarantees a seamless sewing experience.
Alternative Methods for Cutting Thread if the Built-In Cutter is Unavailable
When your sewing machine’s built-in thread cutter is unavailable or malfunctioning, alternative methods can help you continue your project without interruptions. These methods are simple, effective, and ensure that your work remains neat and professional.
Using Scissors or Thread Snips
Scissors and thread snips are essential tools for any sewing enthusiast. They provide a reliable way to cut threads cleanly and precisely. To use them effectively:
- Choose the right scissors: Opt for small, sharp scissors with a blade length of about 4 inches. These are perfect for snipping thread tails and trimming seam allowances. Bent-handle dressmaker’s shears are ideal for cutting fabric but may be too large for thread cutting.
- Keep them sharp: Dull blades can fray threads and damage your fabric. Regularly sharpen your scissors to maintain their cutting efficiency.
- Use proper technique: Hold the thread taut and snip close to the fabric for a clean cut. Avoid pulling the thread while cutting, as this can distort your stitches.
Thread snips, with their compact design, are particularly useful for quick trims. They are lightweight and easy to handle, making them a great addition to your sewing kit.
Using a Thread Cutter Pendant or Accessory
Thread cutter pendants and accessories offer a convenient and safe way to cut threads. These tools are designed to be portable and user-friendly. For example, the A+ Cutter stands upright on your work table, allowing you to cut threads without damaging your material or fingers. Here’s how to use them:
- Place the pendant or accessory near your sewing machine or workspace.
- Pull the thread taut and slide it across the cutting edge of the tool.
- Ensure the thread is cut cleanly before proceeding with your project.
These accessories are especially helpful when working on intricate projects like quilting or embroidery. They reduce the risk of accidental snips to your fabric and keep your workspace organized.
Tips for Cutting Thread Without Damaging Your Work
Cutting thread without harming your fabric or stitches requires attention to detail and the right tools. Follow these tips to achieve the best results:
- Avoid using dull tools: Dull scissors or cutters can tug on the thread, potentially pulling it out of place. Always use sharp tools for precise cuts.
- Cut close to the fabric: Leave a small tail of thread to prevent unraveling but avoid leaving excessively long ends that can tangle.
- Work in a well-lit area: Proper lighting helps you see the thread clearly, reducing the chances of cutting the wrong part of your project.
- Keep tools within reach: Place your scissors, snips, or thread cutter accessory near your sewing machine for easy access.
By incorporating these methods and tips, you can confidently cut threads even when your sewing machine’s built-in cutter is unavailable. These alternatives ensure that your sewing process remains smooth and your projects maintain a professional finish.
Cutting thread on a sewing machine becomes effortless when you use the right tools and techniques. By following the step-by-step guide, you can master this essential skill and avoid interruptions during your sewing projects. Troubleshooting malfunctions and maintaining your thread cutter ensures consistent performance and extends its lifespan. If your built-in cutter is unavailable, tools like scissors or thread snips provide reliable alternatives. These methods not only enhance efficiency but also keep your work neat and professional. Apply these tips to enjoy a smooth, frustration-free sewing experience every time.
FAQ
What is the most common reason for thread breaking on a sewing machine?
The most frequent cause of thread breaking is using damaged or old thread. Over time, thread can weaken, fray, or lose its elasticity, making it prone to snapping during sewing. Always check the condition of your thread before starting a project. Using high-quality, fresh thread ensures smoother stitching and reduces interruptions.
How can incorrect upper threading cause thread breakage while sewing?
Incorrect upper threading often leads to thread breakage. If the thread isn’t properly threaded through the tension discs or guides, it can snag or pull unevenly. This creates unnecessary stress on the thread, causing it to snap. Double-check your machine’s threading path and follow the manual to avoid this issue.
Why does my thread cutter leave frayed edges instead of clean cuts?
A dull or damaged blade in the thread cutter usually causes frayed edges. Over time, the blade can lose its sharpness due to frequent use or accumulated lint. Regularly inspect the blade and replace it if necessary. Keeping the cutter area clean also helps maintain its efficiency.
What should I do if my sewing machine’s thread cutter stops working?
If the thread cutter stops functioning, start by cleaning the cutter area. Dust and lint can clog the mechanism, preventing it from working. Check for any loose or damaged parts and tighten or replace them as needed. For automatic cutters, ensure the machine’s settings are correct. If the problem persists, consult a professional technician.
Can I use scissors instead of the built-in thread cutter?
Yes, scissors are a reliable alternative to a built-in thread cutter. Choose small, sharp scissors or thread snips for precise cuts. Keep them within reach while sewing for convenience. Ensure the blades remain sharp to avoid fraying the thread or damaging your fabric.
How often should I clean the thread cutter on my sewing machine?
You should clean the thread cutter after every sewing session. Dust and lint accumulate quickly, especially when working with fabrics that shed fibers. Use a small brush or compressed air to remove debris. Regular cleaning keeps the cutter functioning smoothly and extends its lifespan.
Why does my thread get stuck in the cutter?
Thread jams often occur due to lint buildup or improper threading. Misaligned threads can tangle in the cutter, causing it to jam. To fix this, stop sewing immediately and gently remove the stuck thread. Clean the cutter area thoroughly to prevent future jams. Always ensure the thread is correctly positioned in the cutter mechanism.
How can I prevent my thread cutter from becoming dull?
To prevent dullness, avoid cutting thick or inappropriate materials with the thread cutter. Use it only for sewing threads. Regularly clean the cutter area to remove lint and debris that can wear down the blade. If your machine allows, lubricate the moving parts to reduce friction and prolong the blade’s sharpness.
Is it necessary to replace the thread cutter blade, or can I sharpen it?
While sharpening the blade is an option, replacing it is often more effective. A new blade ensures precise cuts and restores the cutter’s performance. If you choose to sharpen the blade, use a fine sharpening stone and handle it carefully. Refer to your machine’s manual for guidance on blade replacement.
What tools can I use if my thread cutter malfunctions during a project?
If your thread cutter malfunctions, tools like scissors, thread snips, or a thread cutter pendant can help. These alternatives provide clean cuts without disrupting your workflow. Keep these tools in your sewing kit as backups to ensure uninterrupted sewing sessions.
See Also
Easily Cut Thread Using Your Sewing Machine
Is Fabric Cutting Simple with the Cricut Machine?
A Comprehensive Guide for Hair Cutting Machines