How to Cut Stickers Without Machine: Easy Tips

Creating stickers by hand can be a fun and rewarding experience. If you're wondering how to cut stickers without a machine, rest assured that you don’t need fancy equipment to achieve clean, professional-looking results. With the right tools, like scissors or a craft knife, and a bit of patience, you can create stickers that look just as good as those made with a machine. Practice will help you perfect your technique, and whether you’re crafting for fun or planning to sell your designs, mastering how to cut stickers without a machine unlocks endless creative possibilities.
Key Takeaways
- You don't need a machine to create professional-looking stickers; sharp scissors and a craft knife are essential tools for clean cuts.
- Setting up a clutter-free workspace with a cutting mat and good lighting enhances your cutting accuracy and safety.
- Using templates or stencils can help you achieve consistent shapes and save time, especially for cutting techniques.
- Practice on scrap materials to build confidence and refine your cutting technique before working on your final designs.
- Take your time and work slowly to ensure precision; rushing can lead to uneven edges and mistakes.
- Keep your tools sharp and clean to avoid tearing the sticker paper and to achieve the best results.
- Incorporate simple techniques like using Scotch tape along edges to reinforce cuts and improve the quality of your stickers.
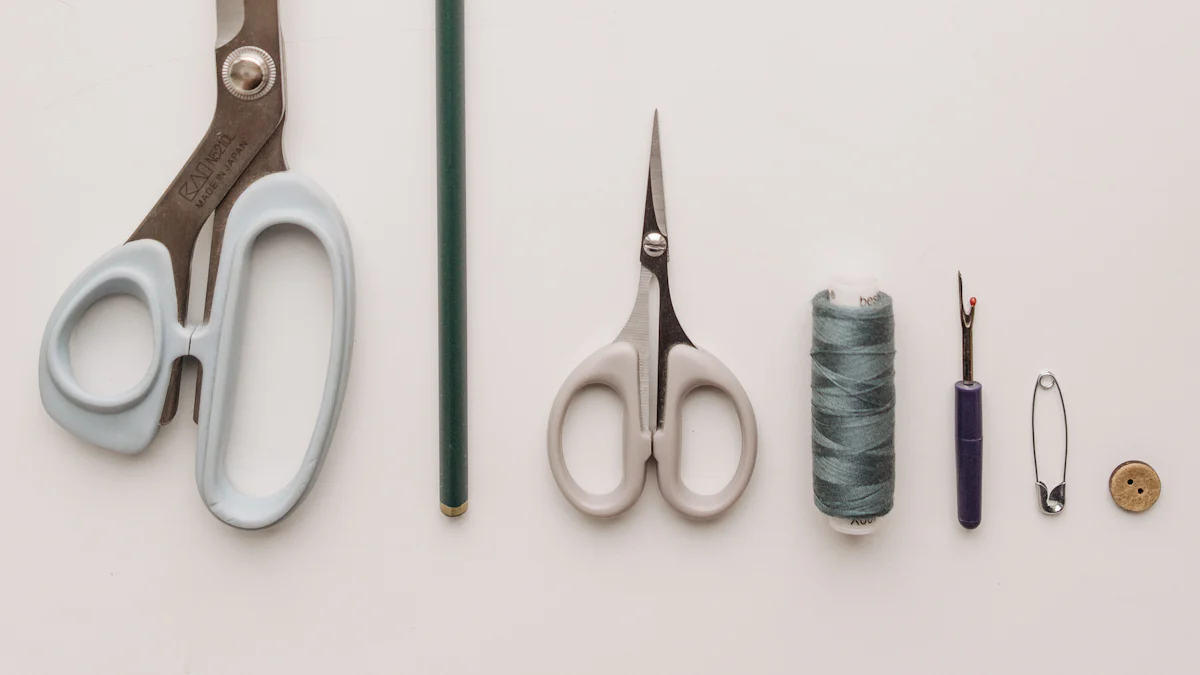
Essential Tools for Cutting Stickers Without a Machine
When cutting stickers by hand, having the right tools makes all the difference. These tools not only help you achieve clean and precise cuts but also make the process more enjoyable and efficient. Let’s dive into the essentials you’ll need.
Scissors
A good pair of sharp scissors is a must-have for cutting stickers. They’re versatile and easy to use, making them perfect for both straight cuts and intricate designs. Look for scissors with a comfortable grip to reduce hand fatigue during long crafting sessions. For smaller or more detailed cuts, consider using precision scissors like Fiskars nonstick scissors. These are especially handy when working with tiny stickers or complex shapes.
Craft Knife or X-Acto Knife
For more detailed or precise cuts, a craft knife or X-Acto knife is your best friend. These tools allow you to cut intricate designs with ease, giving you more control than scissors. Always use a sharp blade to ensure clean edges and avoid tearing the sticker paper. A dull blade can ruin your design and make the process frustrating. If you’re working with vinyl decals or thicker materials, combining a sharp knife with a slightly duller one can help you achieve the best results.
Pro Tip: Replace the blade regularly to maintain precision and avoid jagged cuts.
Cutting Mat
A cutting mat is essential for protecting your workspace and ensuring smooth cuts. It provides a stable surface that prevents your knife from slipping, which is crucial for safety and accuracy. Look for a self-healing cutting mat, as it can withstand repeated cuts without showing wear and tear. The grid lines on the mat can also help you measure and align your stickers for perfectly straight cuts.
With these tools in hand, you’re ready to start cutting stickers like a pro. Each tool plays a unique role in the process, so choose the ones that suit your needs and preferences.
Ruler or Straight Edge
A ruler or straight edge is a simple yet powerful tool for cutting stickers by hand. It helps you achieve clean, straight lines and ensures your designs look polished. Use it as a guide when cutting with a craft knife or scissors. This prevents uneven edges and gives your stickers a professional finish.
For best results, choose a metal ruler with a non-slip backing. The metal edge won’t get nicked or damaged by the blade, unlike plastic rulers. If you’re working on intricate designs, a clear ruler can help you see the sticker underneath, making alignment easier. Keep your ruler steady while cutting to avoid mistakes.
Pro Tip: Pair your ruler with a cutting mat for added stability and precision.
Optional Tools
While the essential tools are enough for most sticker-cutting projects, optional tools can make the process even smoother and more enjoyable. These extras can help you refine your technique and achieve consistent results.
Templates or Stencils for Consistent Shapes
Templates or stencils are perfect for creating stickers with uniform shapes. They save time and ensure every sticker looks identical. You can buy pre-made stencils or create your own using sturdy materials like cardboard or plastic sheets. Simply place the stencil over your sticker paper, trace the shape, and cut along the lines.
This method works well for repetitive designs like circles, stars, or hearts. It’s especially useful if you’re making a large batch of stickers for a project or small business.
Pro Tip: Laminate your homemade stencils to make them more durable and reusable.
Slice Safety Cutter for Added Precision and Safety
The Slice Safety Cutter is a game-changer for manual sticker cutting. Its compact design and ceramic blade make it safe to use, even for beginners. Unlike traditional knives, the blade is finger-friendly, reducing the risk of accidents. Despite its safety features, it delivers precise cuts, making it ideal for detailed designs.
This tool is lightweight and easy to handle, which minimizes hand fatigue during long crafting sessions. It’s also great for cutting through thicker materials like vinyl or laminated sticker paper.
Fun Fact: The Slice Safety Cutter is often recommended for its ergonomic design and versatility in crafting projects.
With these optional tools, you can elevate your sticker-making experience. Whether you’re aiming for consistent shapes or enhanced safety, these additions will help you achieve your goals with ease.
Step-by-Step Guide: How to Cut Stickers Without Machine
Cutting stickers by hand can feel intimidating at first, but with a clear process, it becomes simple and enjoyable. Follow these steps to create neat, professional-looking stickers without needing a machine.
Step 1: Prepare Your Workspace
Start by setting up a clean and organized workspace. A clutter-free area helps you focus and prevents mistakes. Lay down a cutting mat to protect your table and provide a stable surface for cutting. If you don’t have one, a thick piece of cardboard can work as a temporary solution.
Gather all your tools—scissors, a craft knife, a ruler, and any optional items like stencils or templates. Keep everything within easy reach to avoid interruptions. Good lighting is essential, so work near a window or use a desk lamp to clearly see the edges of your designs.
Pro Tip: Tape your sticker paper to the cutting mat to keep it from shifting while you cut. This ensures cleaner and more precise cuts.
Step 2: Print and Prepare Your Stickers
Print your sticker designs on high-quality sticker paper. Glossy or matte paper works well, depending on your preference. If you don’t have a printer, you can draw your designs directly onto the sticker paper or use pre-printed sheets.
Once printed, inspect your designs for any smudges or imperfections. Use a ruler to lightly mark cutting guidelines if you want straight edges. For intricate shapes, consider tracing around the design with a pencil to create a clear cutting path.
Fun Fact: Applying a layer of clear tape over your designs can protect them from water and scratches. It also makes cutting easier by reinforcing the edges.
Step 3: Cut Out Your Stickers
Now comes the fun part—cutting! Choose your tool based on the complexity of your design:
- For straight lines: Use a ruler as a guide and cut along the edge with a craft knife. This method ensures sharp, clean lines.
- For curved or intricate shapes: Small scissors are perfect for detailed designs. They allow you to follow the edges closely and create smooth curves.
- For repetitive shapes: Use stencils or templates to trace and cut consistent designs. This is especially helpful for circles, stars, or other uniform shapes.
Take your time and cut slowly. Rushing can lead to uneven edges or mistakes. If you’re using a craft knife, apply gentle pressure and make multiple passes instead of trying to cut through the paper in one go.
Pro Tip: Practice on scrap paper before cutting your actual stickers. This helps you get comfortable with your tools and refine your technique.
By following these steps, you’ll master how to cut stickers without a machine in no time. Whether you’re making stickers for fun or for a project, this process ensures your designs look polished and professional.
Step 4: Refine the Edges
Refining the edges of your stickers is the final step to achieving a polished and professional look. This process ensures that your stickers have smooth, clean borders, making them more visually appealing and easier to handle. Here’s how you can refine the edges effectively:
-
Inspect Your Cuts
Take a close look at the edges of your stickers. Check for any jagged or uneven areas that might need smoothing. If you notice rough spots, don’t worry—this step will help you fix them. -
Use Small Scissors for Precision
Small, sharp scissors are perfect for trimming tiny imperfections. They allow you to make precise adjustments, especially around intricate designs or clipart shapes. Hold the sticker steady and carefully snip away any uneven edges. This attention to detail can make a big difference in the final appearance. -
Smooth with a Craft Knife
For more detailed designs, a craft knife can help you refine the edges further. Place the sticker on a cutting mat and gently glide the knife along the border to remove any excess material. Use light pressure to avoid cutting too deep or damaging the design. -
Polish the Edges with Sandpaper (Optional)
If you’re working with thicker materials like vinyl or laminated paper, fine-grit sandpaper can help smooth the edges. Lightly rub the sandpaper along the sides of the sticker to create a clean finish. This step isn’t necessary for thinner sticker paper but can be useful for sturdier designs. -
Check for Consistency
Lay all your stickers side by side and compare their edges. Consistent borders give your stickers a professional and cohesive look. If one sticker stands out due to uneven trimming, go back and refine it until it matches the others.
Pro Tip: If you’re making die-cut stickers, aim for uniform shapes and sizes. This consistency enhances the overall presentation, especially if you’re selling or gifting your stickers.
Taking the time to refine the edges not only improves the appearance of your stickers but also makes them easier to peel and use. With practice, this step will become second nature, and your stickers will look as if they were made with a machine.
Pro Tips for Best Results When Cutting Stickers by Hand
Cutting stickers by hand can be a satisfying and creative process. With a few smart strategies, you can achieve clean, professional results every time. These tips will help you refine your technique and make the process even more enjoyable.
Use Templates or Stencils
Templates or stencils are fantastic tools for creating consistent shapes. They act as a guide, ensuring that each sticker looks uniform and polished. You can purchase ready-made stencils or create your own using sturdy materials like cardboard or plastic sheets. For repetitive designs like circles, stars, or hearts, stencils save time and effort.
To use a stencil, place it over your sticker paper and trace the shape with a pencil. Then, cut along the lines with scissors or a craft knife. This method works especially well if you're making a large batch of stickers for personal projects or small businesses.
Pro Tip: Laminate your homemade stencils to make them more durable and reusable. This small step can save you time in the long run.
Keep Your Tools Sharp
Sharp tools are essential for achieving clean cuts. Dull scissors or craft knives can tear the sticker paper, leaving jagged edges that ruin the design. Regularly check your tools and replace blades or sharpen scissors as needed. A sharp blade glides smoothly through the paper, giving you precise and professional-looking results.
If you're using a craft knife, keep extra blades on hand. Switching to a fresh blade when you notice resistance can make a big difference. For scissors, invest in a good-quality pair designed for crafting. Nonstick scissors are particularly useful when working with adhesive materials.
Pro Tip: Clean your tools after each use to remove any adhesive residue. Sticky blades can affect the quality of your cuts.
Practice on Scrap Material
Practice makes perfect, especially when learning how to cut stickers without a machine. Before cutting your actual designs, try practicing on scrap paper or leftover sticker sheets. This helps you get comfortable with your tools and refine your technique without risking your final product.
Start with simple shapes like squares or circles. As you gain confidence, move on to more intricate designs. Practicing also allows you to experiment with different tools, such as scissors, craft knives, or stencils, to see which works best for your style.
Fun Fact: Many professional crafters started by practicing on scrap materials. It's a great way to build your skills and avoid wasting valuable sticker paper.
By following these tips, you'll improve your hand-cutting skills and create stickers that look just as good as machine-made ones. Whether you're crafting for fun or working on a project, these techniques will help you achieve the best results.
Work Slowly and Steadily
When cutting stickers by hand, rushing often leads to mistakes. Taking your time ensures cleaner cuts and better results. Precision matters, especially for intricate designs or small details. By working slowly, you can focus on each cut and avoid uneven edges or accidental slips.
Start by holding your tool firmly but comfortably. Whether you're using scissors or a craft knife, steady hands make a big difference. If you feel your hand getting tired, take a short break. Fatigue can cause shaky movements, which might ruin your design.
Pro Tip: Use light, controlled movements instead of trying to cut everything in one go. For example, with a craft knife, make multiple gentle passes over the same line until the paper separates cleanly.
Patience is key when working on detailed shapes. If you're cutting curves or corners, move the paper instead of the scissors. This technique gives you more control and helps maintain smooth lines. For straight edges, use a ruler as a guide to keep your cuts sharp and precise.
Remember, practice improves your speed and accuracy over time. Start with simple shapes to build confidence, then gradually move on to more complex designs. The more you practice, the steadier your hands will become, and the better your stickers will look.
Use Scotch Tape for Cleaner Cuts
How applying tape on borders can help achieve perfect cuts.
Scotch tape is a simple yet effective trick for achieving cleaner cuts when hand-cutting stickers. Applying tape along the borders of your sticker designs reinforces the edges, making them easier to cut without tearing or fraying. This method works especially well for intricate shapes or thin lines.
Here’s how you can use this technique:
-
Apply the Tape
Place a strip of clear Scotch tape over the border of your sticker design. Make sure the tape lies flat without any air bubbles. The tape adds a layer of protection, preventing the paper from bending or tearing as you cut. -
Cut Along the Edges
Use scissors or a craft knife to cut along the taped border. The tape creates a smoother surface for your cutting tool, allowing for more precise and clean cuts. It also reduces the risk of jagged edges, giving your stickers a polished look. -
Peel Off the Excess Tape
After cutting, gently peel away any excess tape from the edges. The tape should come off easily, leaving your sticker with a clean, professional finish.
Fun Fact: This technique not only improves the quality of your cuts but also protects your designs from smudges or scratches during the cutting process.
Using Scotch tape is particularly helpful if you're working with glossy or delicate sticker paper. It provides extra stability, making it easier to handle intricate designs. Plus, it’s a budget-friendly solution that doesn’t require any special tools.
By incorporating this simple step into your process, you can elevate the quality of your hand-cut stickers. Whether you're crafting for fun or creating stickers to sell, this technique ensures your designs look neat and professional.
Common Mistakes to Avoid When Cutting Stickers Without a Machine
Cutting stickers by hand can be fun and rewarding, but certain mistakes can make the process frustrating. Avoiding these common pitfalls will help you achieve clean, professional results every time.
Using Dull Tools
Dull tools are one of the biggest culprits behind messy cuts. Scissors or craft knives with worn-out blades can tear your sticker paper, leaving jagged edges that ruin your design. A sharp blade glides smoothly through the material, giving you precise and clean cuts.
To keep your tools sharp, inspect them regularly. Replace dull craft knife blades and sharpen scissors when they start to feel resistant. If you’re working with adhesive materials, clean your tools after each use to remove sticky residue. Sticky blades can affect the quality of your cuts and make the process harder.
"I once tried cutting intricate designs with dull scissors, and it was a disaster," says Natasha LH, a crafting enthusiast. "Switching to small, sharp scissors made all the difference for detailed shapes like flag checklist stickers."
Cutting Without a Guide
Freehand cutting might seem quicker, but it often leads to uneven edges and inconsistent shapes. Without a guide, it’s easy to veer off course, especially with intricate designs or straight lines. Using a ruler, stencil, or template ensures your cuts stay precise and consistent.
For straight lines, place a metal ruler along the edge of your design and cut with a craft knife. The ruler acts as a guide, keeping your cuts sharp and straight. For repetitive shapes like circles or stars, trace a stencil onto your sticker paper before cutting. This method saves time and ensures uniformity.
Pro Tip: If you’re nervous about cutting freehand, practice on scrap paper first. This helps you build confidence and refine your technique.
Skipping the Workspace Setup
A cluttered or unstable workspace can lead to mistakes and accidents. Without a proper setup, your tools might slip, or your sticker paper could shift while cutting. Taking a few minutes to prepare your workspace can save you a lot of frustration.
Start by clearing your table of unnecessary items. Lay down a cutting mat to protect your surface and provide stability. If you don’t have a cutting mat, a thick piece of cardboard works as a temporary solution. Tape your sticker paper to the mat to keep it from moving while you cut. Good lighting is also essential—work near a window or use a desk lamp to clearly see your designs.
"Hand-cutting stickers became so much easier once I set up a proper workspace," shares Love From Mim, a crafting blogger. "Having everything organized and within reach made the process smoother and more enjoyable."
By avoiding these common mistakes, you’ll make the sticker-cutting process more efficient and enjoyable. With sharp tools, proper guides, and a well-prepared workspace, you’ll create stickers that look polished and professional every time.
Rushing the Process
Rushing through the process of cutting stickers often leads to mistakes that could have been avoided. When you hurry, you risk uneven edges, jagged cuts, or even damaging your designs. Taking your time ensures that each sticker looks polished and professional.
Start by focusing on precision rather than speed. Love From Mim, a crafting enthusiast, emphasizes the importance of patience when hand-cutting stickers. She suggests using sharp tools like a craft knife or scissors and carefully following the edges of your designs. This approach not only improves accuracy but also makes the process more enjoyable.
If you're working on detailed designs, small scissors can be a game-changer. Natasha LH, another crafting expert, highlights how small scissors are perfect for intricate cuts, such as creating the "v" shape in flag checklist stickers. These tools allow you to work slowly and make precise adjustments without rushing.
Here are some tips to help you avoid rushing:
- Take Breaks: If you feel your hands getting tired, pause for a moment. Fatigue can lead to shaky movements and mistakes. A short break can refresh your focus and improve your results.
- Plan Your Cuts: Before you start, take a moment to visualize how you'll cut each sticker. Having a clear plan reduces the temptation to rush and helps you stay on track.
- Work in Small Batches: Instead of cutting all your stickers at once, divide them into smaller groups. This makes the task feel more manageable and allows you to maintain your focus.
"Hand-cutting stickers can be just as effective with some practice and patience," says Love From Mim. "Taking your time ensures cleaner cuts and better results."
Remember, the goal is quality, not speed. By slowing down and paying attention to each cut, you'll create stickers that look neat and professional. Patience truly pays off when it comes to crafting!
Cutting stickers without a machine is a fun and creative process that anyone can master. With the right tools and techniques, you can achieve clean, professional results that rival machine-made stickers. Start by gathering your tools, setting up a proper workspace, and practicing on scrap materials. Take your time, focus on precision, and don’t rush the process. Experiment with different methods, like using stencils or Scotch tape, to find what works best for you. Most importantly, enjoy the journey of crafting your own unique stickers. The more you practice, the better your results will become!
FAQ
How do I make stickers without a cutting machine?
You can create stickers by hand using tools like scissors, a craft knife, or stencils. Start by printing your designs on sticker paper. Then, carefully cut them out following the edges of your design. For added precision, use a ruler or cutting mat. If you don’t have a printer, you can draw your designs directly on the sticker paper.
What type of paper should I use for making stickers?
Sticker paper is the best choice. You can choose between glossy or matte finishes depending on your preference. Glossy paper gives your stickers a shiny, vibrant look, while matte paper offers a more subtle, professional appearance. If you want waterproof stickers, consider using vinyl sticker paper.
Can I make stickers without a printer?
Yes, you can! Draw your designs directly onto sticker paper using markers, colored pencils, or pens. Another option is to trace printed images onto the sticker paper. To protect your designs, cover them with clear tape or laminate sheets before cutting.
How do I cut intricate designs by hand?
For detailed designs, use a craft knife or small precision scissors. Work slowly and follow the edges of your design carefully. A cutting mat provides stability and protects your workspace. If you’re nervous about cutting freehand, practice on scrap paper first to build confidence.
What’s the best way to get clean edges when cutting stickers?
Sharp tools are key. Dull scissors or blades can tear the paper and leave jagged edges. Use a ruler or stencil as a guide for straight lines. For curved shapes, move the paper instead of the scissors to maintain smooth cuts. Applying Scotch tape over the edges can also help reinforce the paper and make cutting easier.
How can I make my stickers waterproof?
To make your stickers waterproof, cover them with clear tape, laminate sheets, or use waterproof sticker paper. These materials protect your designs from water, smudges, and scratches. If you’re using clear tape, ensure it’s applied smoothly without air bubbles.
Is it possible to create kiss-cut stickers without a machine?
Yes, you can make kiss-cut stickers by hand. Use a craft knife to lightly cut through the top layer of the sticker paper without cutting through the backing. A steady hand and a cutting mat are essential for this technique. Practice on scrap paper to perfect your pressure and control.
How do I avoid wasting sticker paper?
Plan your designs carefully to maximize the use of your sticker paper. Arrange your designs close together before printing. If you’re cutting by hand, practice on scrap material first to avoid mistakes on your final stickers. Save leftover pieces of sticker paper for smaller designs or test cuts.
What should I do if my stickers don’t peel off easily?
If your stickers are hard to peel, check the backing paper. Some sticker papers have a split backing that makes peeling easier. If not, use a craft knife to gently lift the edge of the sticker. For kiss-cut stickers, ensure you’ve only cut through the top layer of the paper.
Can I sell hand-cut stickers?
Absolutely! Many crafters sell hand-cut stickers online or at local markets. Focus on creating clean, professional designs. Use high-quality materials and take your time cutting to ensure your stickers look polished. Packaging your stickers neatly can also make a great impression on customers.
See Also
Creating Bulk Stickers Using A Cutting Machine
Easily Utilize Die Cuts Without A Machine
Using Die Cuts Without Any Machine Assistance