How to Cut Helical Gears in the Milling Machine


Cutting helical gears in the milling machine demands precision and skill. To learn how to cut helical gears in the milling machine, you must ensure the proper setup of the machine and use the right tools to achieve accurate results. High-quality gear cutters play a vital role in this process, as they enhance efficiency and reduce waste. By mastering this technique, you can create gears with unmatched accuracy, which is essential for machinery functionality. Advanced methods, such as using a dividing head or applying lubricants during cutting, further improve the quality and lifespan of your tools and gears.
Key Takeaways
proper setup of your milling machine to achieve high-quality gear cuts; a clean and well-aligned machine is essential. Use high-quality gear cutters specifically designed for helical gears to enhance precision and reduce tool wear.
- Apply lubricants and coolants during the cutting process to prevent overheating and improve the surface finish of the gear teeth.
- Regularly inspect and maintain your milling machine to ensure consistent performance and extend its lifespan.
- Follow a systematic step-by-step process for cutting helical gears, from setup to finishing, to achieve accurate results.
- Avoid common mistakes such as incorrect tool selection and rushing the cutting process to ensure the best outcomes.
- Experiment with different materials and techniques to enhance your skills and confidence in gear cutting.
Understanding Helical Gears
What Are Helical Gears
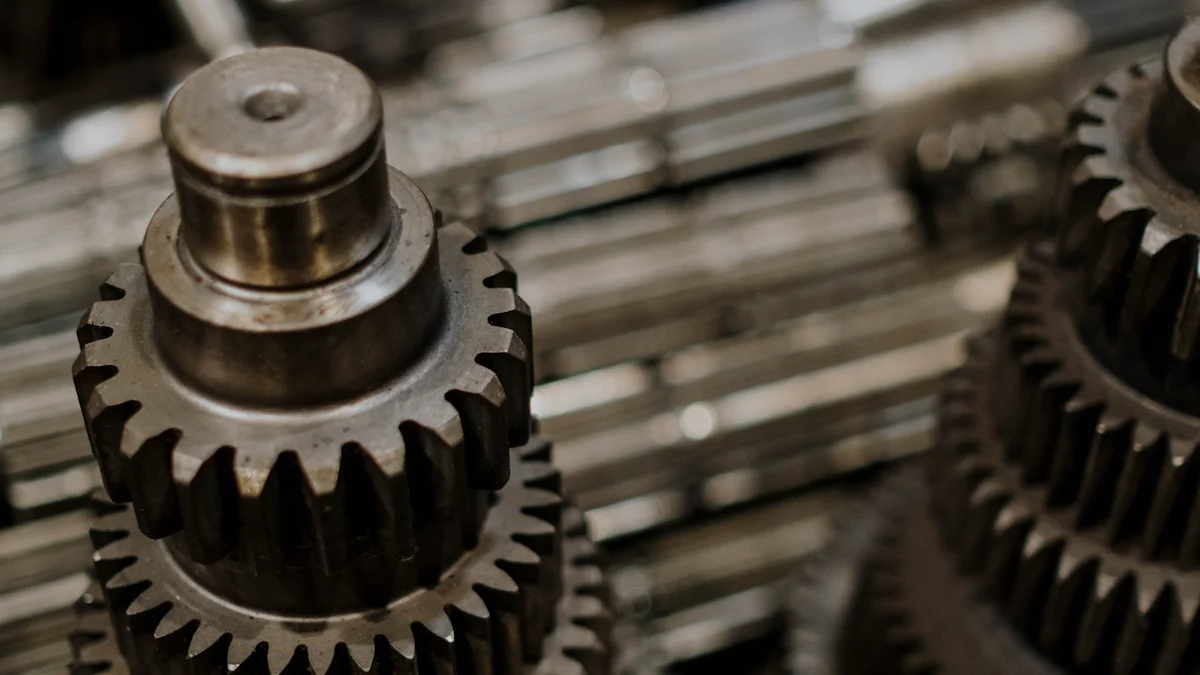
Helical gears are a type of cylindrical gear distinguished by their angled teeth, which are cut at an angle to the gear's axis. This unique design allows the teeth to engage gradually rather than all at once. As a result, helical gears operate more smoothly and quietly compared to spur gears, which have straight teeth. The overlapping tooth action in helical gears reduces vibration and noise, making them ideal for applications requiring precision and efficiency.
One key feature of helical gears is the axial thrust they generate during operation. This occurs because the angled teeth create a force along the gear's axis. While this requires additional considerations for support and alignment, the benefits of smoother operation and reduced noise often outweigh the challenges. Helical gears are also known for their ability to handle higher loads due to the increased contact area between teeth.
Applications of Helical Gears
Helical gears are widely used in various industries due to their versatility and performance advantages. Their smooth and quiet operation makes them a preferred choice in automotive transmissions, where noise reduction is critical. You will also find them in industrial machinery, such as conveyors and compressors, where durability and efficiency are essential.
In addition to these applications, helical gears play a vital role in robotics and aerospace engineering. Their ability to transmit power at high speeds with minimal vibration ensures precise motion control in complex systems. Furthermore, helical gears are commonly used in gearboxes for heavy equipment, as they can handle significant torque without compromising performance.
"Helical gears provide smoother operation with gradual tooth engagement, reducing noise and vibration compared to spur gears." This characteristic makes them indispensable in environments where reliability and quiet performance are paramount.
By understanding the unique features and applications of helical gears, you can appreciate their importance in modern machinery. Whether you're learning how to cut helical gears in the milling machine or exploring their uses, these gears offer unmatched benefits in terms of efficiency and functionality.
Tools and Equipment for How to Cut Helical Gears in the Milling Machine
When learning how to cut helical gears in the milling machine, selecting the right tools and equipment is crucial. Proper tools ensure precision, efficiency, and durability during the gear-cutting process. Below, you’ll find a breakdown of the essential tools, additional equipment, and materials required to achieve optimal results.
Essential Tools
To cut helical gears effectively, you need specific tools designed for this purpose. The following are indispensable:
- Gear Cutters: High-quality gear cutters are vital for creating accurate gear teeth. These cutters are specifically designed for helical gear cutting and help reduce wear and tear on the tools.
- Dividing Head: A dividing head is necessary for indexing and rotating the gear blank at precise angles. This tool ensures that the teeth are spaced evenly around the gear.
- Milling Machine: A horizontal or universal milling machine is ideal for cutting helical gears. These machines provide the stability and control needed for intricate gear designs.
- Lubricants and Coolants: Applying proper lubricants and coolants during the cutting process prevents overheating and extends the life of your tools.
"Using high-quality gear cutters and applying lubricants during the cutting process significantly improves the quality of the finished product."
Additional Equipment
In addition to the essential tools, certain equipment can enhance the gear-cutting process:
- 4-Axis or 5-Axis Milling Heads: These advanced milling heads allow for greater flexibility and precision, especially when working on complex gear shapes like double helical or herringbone gears.
- Helical Guides: For programmable lead machines, helical guides are essential. They help maintain the correct angle and alignment during the cutting process.
- Measuring Instruments: Tools like micrometers and calipers are necessary for inspecting the dimensions of the gear teeth and ensuring accuracy.
Multi-axis milling machines are particularly useful for single-part production. They allow for hard machining and are ideal for larger workpieces, making them a preferred choice for advanced gear-cutting tasks.
Materials and Gear Blanks
The choice of materials and gear blanks plays a significant role in the success of your gear-cutting project. Here’s what you should consider:
- Gear Blanks: Gear blanks must be made from durable materials that can withstand the cutting process. Steel is a common choice due to its strength and versatility.
- Material Properties: Select materials with properties that match the intended application of the gear. For example, high-strength alloys are suitable for heavy-duty machinery, while lightweight materials may be better for aerospace applications.
- Pre-Machining Preparation: Ensure the gear blank is properly prepared before cutting. This includes checking for uniformity and ensuring the blank is securely mounted on the milling machine.
By using the right tools, equipment, and materials, you can master how to cut helical gears in the milling machine. These components work together to ensure precision, efficiency, and durability, resulting in high-quality gears that meet your specific needs.
Step-by-Step Process for How to Cut Helical Gears in the Milling Machine
Setting Up the Milling Machine
Begin by ensuring your milling machine is clean and free from debris. A clean machine prevents inaccuracies during the cutting process. Check that all moving parts are lubricated and functioning smoothly. Proper maintenance of the machine ensures consistent performance.
Next, install the dividing head on the milling machine. The dividing head allows you to rotate the gear blank at precise angles, which is essential for cutting helical teeth. Align the dividing head with the machine's spindle to maintain accuracy. Secure it tightly to prevent any movement during the operation.
Adjust the milling machine's table to the correct angle for the helix. This angle depends on the gear's specifications, such as the helix angle and the number of teeth. Use the machine's protractor or angle gauge to set the table accurately. Double-check the alignment to avoid errors.
Finally, select the appropriate gear cutter for the job. High-quality gear cutters designed for helical gears produce better results. Attach the cutter to the spindle and ensure it is firmly secured. Test the rotation of the cutter to confirm it operates without wobbling.
"Proper setup of the milling machine is the foundation for cutting high-quality helical gears."
Preparing the Gear Blank
Start by selecting a gear blank made from a material suitable for your application. Steel is a common choice due to its strength and durability. Ensure the blank is uniform in shape and free from defects. A well-prepared blank contributes to the precision of the final gear.
Mount the gear blank onto the dividing head. Use a chuck or a faceplate to hold the blank securely. Check that the blank is centered and aligned with the spindle. Misalignment can lead to uneven teeth and poor gear performance.
Mark the reference points on the gear blank. These points guide the cutting process and help maintain consistency. Use a scribe or a marker to create visible lines on the blank. These markings ensure that each tooth is cut at the correct position.
Before proceeding, verify the setup by rotating the dividing head. Ensure the gear blank moves smoothly and maintains its alignment. This step prevents errors during the cutting process.
Cutting the Gear Teeth
Begin the cutting process by positioning the gear cutter at the starting point on the gear blank. Lower the cutter slowly until it makes contact with the blank. Start the milling machine and proceed with the first cut. Move the cutter along the blank to create the initial tooth.
After completing the first cut, rotate the dividing head to the next position. The dividing head ensures that each tooth is spaced evenly around the gear. Repeat the cutting process for each tooth, maintaining a steady pace to avoid mistakes.
Apply lubricant or coolant during the cutting process. This reduces heat and minimizes wear on the cutter. Proper lubrication also improves the surface finish of the gear teeth.
Once all the teeth are cut, inspect the gear for accuracy. Use measuring instruments like calipers to check the dimensions of the teeth. Ensure that the teeth are evenly spaced and match the gear's specifications.
"Monitoring the cutting process closely ensures precision and prevents errors."
By following these steps, you can master how to cut helical gears in the milling machine. Each stage, from setup to cutting, plays a crucial role in achieving high-quality results. With practice and attention to detail, you can produce gears that meet the highest standards of accuracy and performance.
Finishing and Inspection
Finishing and inspecting your helical gear ensures it meets the required specifications and performs efficiently. This step is as critical as the cutting process itself. Proper finishing enhances the gear's durability, while thorough inspection guarantees precision.
Finishing the Gear
Start by deburring the gear teeth. Use a fine file or a deburring tool to remove sharp edges and burrs left from the cutting process. This step prevents premature wear and ensures smooth operation. Work carefully to avoid altering the gear's dimensions.
Polish the gear teeth to improve surface finish and reduce friction during operation. Use abrasive paper or a polishing wheel for this task. A smoother surface minimizes noise and vibration, enhancing the gear's performance. Apply light pressure to maintain the gear's integrity.
If required, heat-treat the gear to increase its hardness and strength. Heat treatment improves the gear's ability to withstand heavy loads and resist wear. Follow the recommended process for the material used in your gear blank. After heat treatment, recheck the gear for any distortions.
"Finishing steps like deburring and polishing improve the gear's performance and longevity."
Inspecting the Gear
Begin the inspection by measuring the gear's dimensions. Use precise tools like micrometers and calipers to check the tooth thickness, pitch, and overall diameter. Ensure these measurements match the gear's design specifications.
Check the alignment and spacing of the gear teeth. Use a gear tooth caliper or a profile projector to verify that the teeth are evenly spaced and correctly angled. Misaligned teeth can cause operational issues and reduce efficiency.
Test the gear's functionality by meshing it with a compatible gear. Rotate the gears to ensure smooth engagement and operation. Listen for unusual noises or observe any resistance during rotation. These signs may indicate errors in the cutting or finishing process.
Inspect the gear visually for surface defects. Look for scratches, cracks, or uneven surfaces that could affect performance. Address any issues immediately to prevent further complications.
"Thorough inspection ensures the gear meets quality standards and operates efficiently."
By completing the finishing and inspection process, you ensure your helical gear is ready for use. These steps are essential for achieving high-quality results when learning how to cut helical gears in the milling machine. Attention to detail during this phase guarantees a reliable and durable gear.
Tips for Precision and Avoiding Common Mistakes
Ensuring Accurate Setup
Achieving precision begins with a meticulous setup of your milling machine. Start by verifying that the machine is level and stable. Any imbalance can lead to uneven cuts and misaligned gear teeth. Use a spirit level to check the machine's alignment and make adjustments as needed.
Position the dividing head correctly. Align it with the spindle to ensure the gear blank rotates at precise angles. Double-check the angle of the milling table. The helix angle must match the gear's specifications. Even a slight deviation can compromise the gear's performance.
Secure the gear blank firmly. A loose blank can shift during the cutting process, resulting in inaccurate teeth spacing. Use a chuck or faceplate to hold the blank in place. Test its stability by rotating it manually before starting the machine.
"A precise setup is the foundation of successful helical gear cutting. Small errors in alignment can lead to significant issues in the final product."
Maintaining the Milling Machine
Regular maintenance of your milling machine ensures consistent performance and extends its lifespan. Begin by cleaning the machine after each use. Remove debris, metal shavings, and lubricant residue. A clean machine operates more smoothly and reduces the risk of inaccuracies.
Lubricate all moving parts. Proper lubrication minimizes friction and prevents wear. Focus on the spindle, table, and dividing head. Use high-quality lubricants designed for milling machines. Check the manufacturer's guidelines for recommended products and application methods.
Inspect the machine for signs of wear or damage. Look for worn gears, loose bolts, or misaligned components. Address these issues immediately to prevent further complications. Replace worn parts promptly to maintain the machine's precision.
"A well-maintained milling machine not only improves accuracy but also reduces downtime and repair costs."
Avoiding Common Errors
Mistakes during the gear-cutting process can lead to wasted materials and subpar results. Understanding common errors helps you avoid them and achieve better outcomes.
Using the wrong gear cutter can result in poorly shaped teeth. Always choose cutters specifically designed for helical gears. High-quality tools produce cleaner cuts and last longer.
-
Improper Lubrication: Skipping lubrication causes overheating and excessive tool wear. Apply coolant or lubricant consistently during the cutting process. This reduces friction and improves the surface finish of the gear teeth.
-
Rushing the Process: Cutting too quickly can lead to uneven teeth and tool damage. Work at a steady pace, allowing the cutter to move smoothly through the material. Patience ensures precision and reduces the risk of errors.
-
Neglecting Inspections: Failing to inspect the gear during and after cutting can result in undetected flaws. Measure the dimensions of the teeth regularly. Verify their spacing and alignment to ensure they meet the gear's specifications.
"Avoiding common mistakes requires attention to detail and a commitment to quality. Each step in the process contributes to the success of the final product."
By focusing on accurate setup, regular maintenance, and avoiding common errors, you can master the art of cutting helical gears. These tips not only improve the quality of your work but also enhance your efficiency and confidence in the process.
Cutting helical gears in a milling machine requires precision, proper tools, and a systematic approach. You must focus on key steps like setting up the machine, preparing the gear blank, and cutting the teeth with care. Regular maintenance of your milling machine and attention to detail during inspections ensure consistent results. By mastering these techniques, you can create high-quality gears that meet exact specifications. Experimenting with different methods and materials will enhance your skills and confidence. Gear cutting is a craft that rewards patience and practice, so start applying these techniques today.
FAQ
What causes inaccuracies in gear dimensions?
Inaccurate gear dimensions often result from improper tool setup or worn-out cutting tools. When tools are not calibrated correctly, the gear teeth may not align with the intended specifications. Regular maintenance and proper calibration of your tools ensure precision and prevent these issues.
"Proper tool setup and maintenance are crucial for ensuring accurate gear dimensions."
How do I choose the right gear-cutting tools?
Selecting the right gear-cutting tools depends on the type of gear you want to produce. High-quality gear cutters designed specifically for helical gears deliver better results. The material of the cutting tool also matters. Tools made from durable materials, such as high-speed steel or carbide, improve accuracy and extend tool life.
Why is the speed and feed rate important during gear cutting?
The speed and feed rate directly affect the surface finish and accuracy of the gear. If the speed is too high, it can cause overheating and tool wear. A slow feed rate may lead to uneven cuts. Calibrating the speed and feed rate carefully ensures optimal cutting conditions and enhances the quality of the finished gear.
"Careful calibration of speed and feed rate is essential for optimal cutting conditions and improved gear accuracy."
What should I do if I encounter persistent quality issues?
Persistent quality issues, such as incorrect dimensions, tooth profile errors, or poor surface finishes, may indicate deeper problems. These could stem from improper setup, tool wear, or machine misalignment. If these issues persist despite adjustments, consulting a professional or an expert in gear cutting can help identify and resolve the root cause.
"Consulting experts may be necessary to address persistent quality issues in gear cutting operations."
How can I ensure my milling machine stays in good condition?
Maintaining your milling machine involves regular cleaning, lubrication, and inspection. Remove debris and metal shavings after each use. Lubricate moving parts to reduce friction and wear. Inspect the machine for loose bolts, worn gears, or misaligned components. Address any issues promptly to keep the machine running smoothly.
What materials are best for gear blanks?
The choice of material depends on the gear's application. Steel is a common choice due to its strength and durability. For heavy-duty machinery, high-strength alloys work well. Lightweight materials, such as aluminum, are suitable for aerospace applications. Always match the material properties to the gear's intended use.
How do I avoid overheating during the cutting process?
Overheating occurs when there is insufficient lubrication or the cutting speed is too high. Apply proper lubricants or coolants consistently during the cutting process. This reduces friction and heat buildup, extending the life of your tools and improving the surface finish of the gear teeth.
Can I cut helical gears without a dividing head?
Cutting helical gears without a dividing head is challenging and may lead to uneven teeth spacing. A dividing head ensures precise rotation of the gear blank, which is essential for accurate tooth alignment. Investing in a dividing head simplifies the process and improves the quality of your gears.
What are the benefits of using multi-axis milling machines?
Multi-axis milling machines, such as 4-axis or 5-axis models, offer greater flexibility and precision. These machines are ideal for complex gear shapes, like double helical or herringbone gears. They also allow for hard machining and are suitable for larger workpieces, making them a preferred choice for advanced gear-cutting tasks.
When should I replace my gear-cutting tools?
Replace your gear-cutting tools when you notice signs of wear, such as dull edges or uneven cuts. Worn tools can compromise the accuracy and surface finish of the gear. Regularly inspect your tools and replace them as needed to maintain high-quality results.
See Also
Effective Techniques for Enhancing CNC Metal Cutting
Guidelines for Metal Cutting Using Desktop CNC Machines
Manual Die Cutting Techniques for Creative Projects