How to Cut Plexiglass with a CNC Machine

When deciding what's best for cut plexiglass laser or CNC machine, CNC cutting stands out for its unmatched precision and efficiency. Using a CNC machine allows you to create intricate designs and achieve clean edges that are difficult to replicate with manual tools. Plexiglass, celebrated for its durability and clarity, pairs seamlessly with CNC technology. The machine applies just the right amount of force, preventing the material from cracking or melting. This method also saves time, making it an excellent choice for both simple and complex projects. Whether you’re crafting custom shapes or working on detailed components, CNC cutting consistently delivers professional results.
Choosing the Right Plexiglass for CNC Cutting
When working with a CNC machine, selecting the right type of plexiglass is crucial. The material you choose directly impacts the quality of your cuts and the ease of the process. Let’s break it down.
Cast vs. Extruded Plexiglass
You’ll often encounter two main types of plexiglass: cast acrylic and extruded acrylic. While both are widely used, they behave differently during CNC cutting.
-
Cast Acrylic: This type is your best bet for CNC machining. It has a higher melting point, which means it’s less likely to melt or stick to the cutting bit. Cast acrylic also offers better optical clarity and durability, making it ideal for projects requiring precision and a polished finish. Its structure allows for cleaner cuts and reduces the risk of cracking or crazing during machining.
-
Extruded Acrylic: Although more affordable, extruded acrylic isn’t as CNC-friendly. It tends to melt under the heat generated by the cutting process, which can cause the material to bind to the bit. This not only affects the quality of the cut but may also damage your tools. If you’re aiming for professional results, it’s best to avoid extruded acrylic for CNC projects.
By choosing cast acrylic, you ensure smoother operations and a superior final product.
Thickness Considerations
The thickness of the plexiglass plays a significant role in how you approach CNC cutting. Thicker sheets require more careful planning and adjustments to your machine settings.
-
For thin sheets, you can use higher spindle speeds and lighter passes. This minimizes the risk of chipping or cracking the material. Thin plexiglass is great for intricate designs and detailed work.
-
With thicker sheets, you’ll need to slow down the cutting speed and increase the depth of each pass gradually. This prevents overheating and ensures clean, precise cuts. Keep in mind that thicker materials may require additional finishing to achieve smooth edges.
Always match the thickness of the plexiglass to the capabilities of your CNC machine and the requirements of your project. Proper planning here saves time and avoids costly mistakes.
Choosing the right type and thickness of plexiglass sets the foundation for a successful CNC cutting experience. It’s all about understanding the material and how it interacts with your tools.
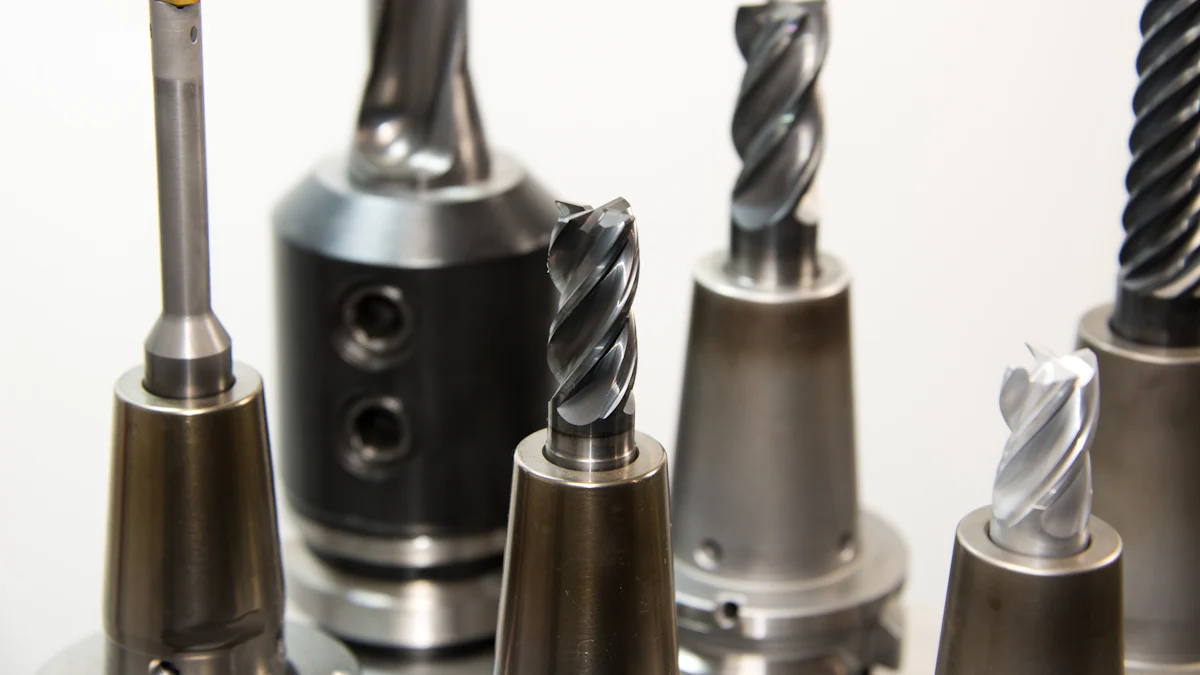
Selecting the Best CNC Bits for Plexiglass
Choosing the right CNC bit is essential for achieving clean and precise cuts on plexiglass. The type of bit you use directly impacts the quality of your work and helps prevent issues like chipping or melting. Let’s explore the best options and what makes them effective.
Recommended Bit Types for Cutting Acrylic on a CNC Machine
When cutting plexiglass, not all bits are created equal. Some are specifically designed to handle acrylic, ensuring smooth edges and minimal heat buildup. Here are the top recommendations:
-
O-Flute End Mill Bits: These bits are a favorite among professionals for cutting acrylic. Their sharp edge and single-flute design reduce heat generation, which prevents the material from melting. They also help in efficiently removing chips during the cutting process.
-
Solid Carbide O-Flute Bits: If you’re looking for durability and precision, solid carbide O-flute bits are an excellent choice. A 1/4-inch solid carbide O-flute bit works particularly well for plexiglass. It delivers clean cuts and minimizes the risk of material sticking to the bit.
-
Single-Flute or Spiral-Flute Acrylic Bits: These bits are perfect for routers and CNC machines. Their design ensures clean edges without chipping or melting. Maintaining their sharpness is key to consistent results.
Pro Tip: Avoid using wood bits for cutting acrylic. They aren’t designed for this material and can lead to poor-quality cuts or even damage your plexiglass.
By selecting the right bit, you set yourself up for success and make the cutting process much smoother.
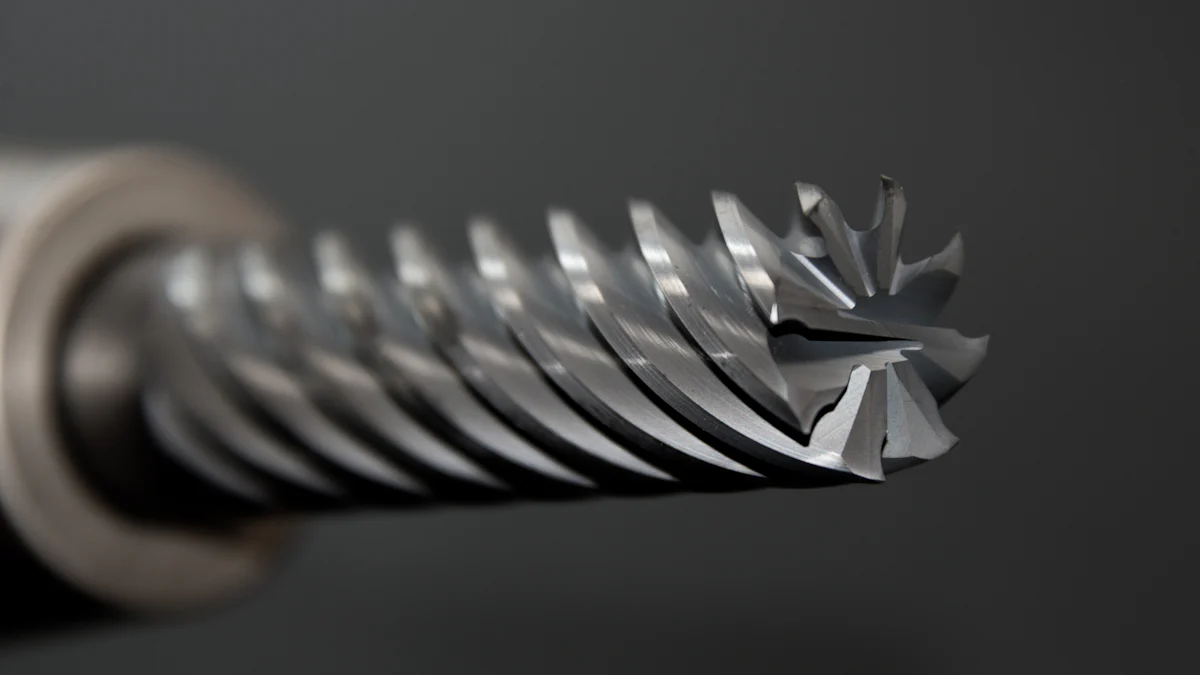
Importance of Bit Geometry and Material
The geometry and material of your CNC bit play a crucial role in how it interacts with plexiglass. Understanding these factors helps you make informed decisions and achieve professional results.
-
Bit Geometry: The shape and design of the bit determine how it cuts through the material. For plexiglass, bits with a single flute or spiral design are ideal. They allow for better chip removal and reduce friction, which minimizes heat buildup. This is especially important because excessive heat can cause the acrylic to melt or warp.
-
Material of the Bit: High-quality materials like solid carbide ensure durability and precision. Carbide bits maintain their sharpness longer, which is essential for clean and accurate cuts. Using a dull bit can lead to rough edges and uneven cuts, so always check the condition of your tools before starting.
Quick Reminder: Keep your bits sharp and clean. Dull or dirty bits can ruin your project and waste valuable time.
Investing in the right CNC bits and understanding their features will save you from headaches and deliver the polished results you’re aiming for.
Setting Up the CNC Machine for Plexiglass Cutting
Setting up your CNC machine properly is the foundation for achieving clean and precise cuts on plexiglass. A well-prepared machine ensures smooth operations and minimizes errors during the cutting process. Let’s dive into the key steps.
Configuring Machine Settings
Getting the machine settings right is crucial when working with plexiglass. Incorrect configurations can lead to rough edges, melting, or even damage to your material. Here’s how you can optimize your CNC router for the best results:
-
Set the Spindle Speed: Use a spindle speed of at least 18,000 RPM. This high speed reduces friction and prevents the plexiglass from melting during the cut. Lower speeds may cause the material to stick to the bit, ruining the finish.
-
Adjust the Feed Rate: Maintain a steady feed rate that matches the thickness of your plexiglass. For thinner sheets, a faster feed rate works well. Thicker sheets require a slower feed rate to avoid overheating and ensure precision.
-
Control the Cutting Depth: Start with a shallow depth of cut, around 1-2 millimeters, especially for finishing passes. Gradually increase the depth for roughing cuts. This approach helps maintain tool sharpness and prevents cracking.
-
Choose the Right Toolpath: Use a ramping technique for entry cuts. This method reduces stress on the material and creates smoother edges. Avoid plunging straight into the plexiglass, as it can cause chipping.
Pro Tip: Always test your settings on a scrap piece of plexiglass before starting your main project. This ensures everything is dialed in perfectly.
By fine-tuning these settings, you’ll create a seamless cutting experience and achieve professional-quality results.
Securing the Plexiglass Material
Properly securing the plexiglass is just as important as configuring your CNC router. A stable workpiece prevents vibrations, uneven cuts, and potential accidents. Follow these steps to keep your material firmly in place:
-
Use Clamps or Vacuum Tables: Clamps are a reliable option for holding down plexiglass sheets. For larger projects, a vacuum table provides even better stability by evenly distributing pressure across the material.
-
Add Rubber Pads: Place rubber pads between the clamps and the plexiglass. This prevents scratches and ensures a firm grip without damaging the surface.
-
Avoid Over-Tightening: Tighten the clamps just enough to hold the material securely. Over-tightening can cause stress on the plexiglass, leading to cracks or warping.
-
Check for Flatness: Ensure the plexiglass lies completely flat on the CNC router bed. Any unevenness can result in inconsistent cuts and poor-quality edges.
-
Secure Smaller Pieces with Double-Sided Tape: For smaller or intricate designs, double-sided tape works wonders. It keeps the material steady without the need for bulky clamps.
Quick Reminder: Always double-check the stability of your setup before starting the machine. A loose workpiece can damage both the material and your CNC router.
By securing the plexiglass properly, you’ll eliminate unnecessary movement and achieve precise, clean cuts every time.
The Cutting Process: Step-by-Step Guide
Cutting plexiglass with a CNC machine requires a systematic approach to achieve clean and professional results. By following these steps, you’ll ensure precision and avoid common pitfalls.
Roughing and Finishing Cuts
When cutting plexiglass, dividing the process into roughing and finishing cuts is essential. Each step serves a specific purpose and contributes to the overall quality of your project.
-
Roughing Cuts: Start with roughing cuts to remove the bulk of the material. Use a larger bit size and set a deeper cutting depth for this stage. This approach speeds up the process and prepares the material for finer detailing. Keep the feed rate steady to prevent chipping or cracking.
-
Finishing Cuts: After roughing, switch to a smaller bit for finishing cuts. Set a shallow depth of cut, around 1-2 millimeters, to refine the edges and achieve a smooth surface. This step eliminates any imperfections left by the roughing process. Take your time here to ensure a polished result.
Pro Tip: Always inspect your bits before starting. Dull tools can ruin both roughing and finishing cuts, leading to uneven edges or melted plexiglass.
By separating these two stages, you’ll maintain control over the cutting process and produce high-quality results.
Ramping Techniques for Clean Cuts
Ramping techniques play a crucial role in achieving clean cuts on plexiglass. Instead of plunging the bit directly into the material, ramping involves gradually lowering the bit as it moves along the toolpath. This method reduces stress on the material and prevents chipping.
-
How to Ramp: Configure your CNC machine to use a ramping entry for each cut. Adjust the angle of the ramp to match the thickness of the plexiglass. A gentler angle works best for thicker sheets, while a steeper angle suits thinner materials.
-
Benefits of Ramping: This technique minimizes heat buildup, which is a common issue when cutting plexiglass. It also ensures smoother edges and reduces the risk of cracks or crazing.
Quick Reminder: Test the ramping settings on a scrap piece of plexiglass before starting your main project. This helps you fine-tune the angle and speed for optimal results.
Incorporating ramping techniques into your workflow will elevate the quality of your cuts and make the process more efficient.
Maintaining Tool Sharpness During Cutting
Tool sharpness is critical when working with plexiglass on a CNC machine. Dull tools generate excessive heat, which can melt the material and compromise the quality of your cuts. Here’s how to keep your tools in top condition:
-
Regular Inspection: Check your bits for signs of wear before each use. Look for dull edges or chips that could affect performance.
-
Proper Cleaning: After every session, clean your bits to remove any residue or buildup. Use a soft brush or cloth to avoid damaging the cutting edge.
-
Timely Replacement: Replace worn-out bits promptly. Investing in high-quality bits, like solid carbide O-flute bits, ensures durability and precision.
Did You Know? Maintaining sharp tools not only improves the quality of your cuts but also extends the lifespan of your CNC machine by reducing strain on its components.
By prioritizing tool maintenance, you’ll achieve consistent results and avoid unnecessary downtime.
Tips for Best Results When Cutting Acrylic on a CNC Machine
Avoiding Overheating and Managing Heat
Heat management plays a critical role when cutting acrylic on a CNC machine. Excessive heat can cause the material to melt, stick to the bit, or even warp. To avoid these issues, you need to focus on reducing friction and keeping the cutting process cool.
-
Use High Spindle Speeds: Set your CNC machine to a spindle speed of at least 18,000 RPM. This high speed minimizes friction and prevents heat buildup during the cut. Slower speeds often lead to overheating and poor-quality edges.
-
Maintain a Steady Feed Rate: A consistent feed rate ensures smooth cuts and reduces the chances of heat accumulation. For thicker acrylic sheets, slow down the feed rate slightly to maintain control and precision.
-
Choose the Right Bit: Use bits specifically designed for acrylic, like O-flute or spiral-flute bits. These bits help remove chips efficiently, which reduces heat and keeps the material from melting.
-
Add Cooling Measures: If you notice heat buildup, consider using compressed air or a misting system to cool the cutting area. These methods help dissipate heat and keep the material intact.
Pro Tip: Always monitor the cutting process closely. If you see signs of melting or hear unusual noises, pause and adjust your settings immediately.
By managing heat effectively, you’ll achieve cleaner cuts and protect both your material and tools.
Cleaning and Polishing Edges for a Professional Finish
After cutting acrylic on a CNC machine, the edges may need some extra attention to look polished and professional. Cleaning and polishing the edges not only enhances the appearance but also ensures a smooth finish.
-
Remove Burrs and Residue: Start by using a deburring tool or fine-grit sandpaper to remove any rough edges or leftover material. Work gently to avoid scratching the acrylic surface.
-
Polish with a Flame: For a crystal-clear edge, use a flame-polishing technique. Pass a small flame, like from a propane torch, along the edge of the acrylic. Keep the flame moving to avoid overheating or distorting the material.
-
Buff the Edges: Use a buffing wheel with a polishing compound to achieve a glossy finish. This step works well for projects requiring a high level of clarity and shine.
-
Clean the Surface: Wipe the acrylic with a soft, lint-free cloth and a mild cleaning solution. Avoid harsh chemicals that could damage the material.
Quick Reminder: Always test polishing techniques on a scrap piece of acrylic first. This helps you perfect your method without risking your main project.
Taking the time to clean and polish the edges will elevate the quality of your work and leave a lasting impression.
Safety Precautions During Plexiglass Cutting
Safety should always be your top priority when working with a CNC machine. Cutting plexiglass involves sharp tools, high speeds, and potential hazards, so following proper precautions is essential.
-
Wear Protective Gear: Always wear safety goggles to shield your eyes from flying debris. Use ear protection to reduce noise exposure and gloves to protect your hands from sharp edges.
-
Ensure Proper Ventilation: Cutting acrylic can release fumes, especially if heat builds up. Work in a well-ventilated area or use an exhaust system to keep the air clean.
-
Secure the Material: Make sure the plexiglass is firmly clamped or held in place before starting the machine. Loose material can shift during cutting, leading to accidents or uneven results.
-
Avoid Distractions: Stay focused while operating the CNC machine. Keep your workspace organized and free from unnecessary items that could interfere with the process.
-
Turn Off the Machine Before Adjustments: Always power down the CNC machine before making any changes to the setup or removing the material.
Did You Know? Following safety guidelines not only protects you but also extends the lifespan of your equipment by preventing misuse.
By prioritizing safety, you’ll create a secure environment and enjoy a smoother cutting experience.
What's Best for Cut Plexiglass: Laser or CNC Machine?
When deciding what's best for cut plexiglass laser or CNC machine, understanding the strengths of each method helps you make the right choice for your project. Both technologies offer unique advantages, but their applications differ significantly based on the material and desired outcome. Let’s break it down.
Advantages of Using a CNC Machine
A CNC machine excels in precision and versatility when cutting plexiglass. It allows you to work with thicker materials and create intricate designs that would be challenging with other tools. Here’s why CNC machines stand out:
-
Cuts Through Thick Plexiglass: CNC routers handle thicker sheets with ease. Unlike laser cutters, which struggle with dense materials, CNC machines maintain accuracy and deliver clean edges even on substantial pieces.
-
Supports 3D Designs: CNC machines allow you to cut to specific depths, making them ideal for creating three-dimensional objects or reliefs. This feature opens up possibilities for more complex projects.
-
Durable and Reliable: CNC routers use mechanized cutting tools, which are robust and long-lasting. They can handle repeated use without compromising the quality of the cuts.
-
Faster Cutting Speeds: CNC machines cut faster than lasers, especially when working on larger or thicker pieces. This efficiency saves time and boosts productivity.
-
Handles Painted or Coated Materials: CNC routers cut through painted or coated plexiglass without any issues. This capability ensures consistent results across various types of acrylic.
Pro Tip: For the best results, ensure your CNC machine has features like smooth controls, a strong base, and reliable clamping systems. These elements minimize vibrations and enhance precision.
If your project involves thick plexiglass, detailed designs, or high-speed production, a CNC machine is the clear winner.
Comparison with Laser Cutting
Laser cutting offers its own set of benefits, but it’s better suited for specific tasks. Comparing it with CNC cutting highlights the differences and helps you decide which method aligns with your needs.
-
Material Thickness: Laser cutting works best on thinner plexiglass sheets. It struggles with thicker materials, where CNC machines excel.
-
Edge Quality: Lasers produce clean vertical lines, giving a polished finish to the edges. However, they lack the versatility of CNC machines for creating 3D designs or cutting to varying depths.
-
Speed and Efficiency: CNC machines cut faster than lasers, especially for larger projects. Lasers take more time to process thicker materials, which can slow down production.
-
Complex Shapes: Laser cutting handles intricate shapes smoothly, making it a great choice for engraving or marking on the surface of plexiglass. However, it doesn’t match the depth and detail achievable with CNC routers.
-
Cost and Maintenance: Laser cutters often require more maintenance and have higher operational costs compared to CNC machines. This factor makes CNC cutting more economical for long-term use.
Quick Reminder: If your project involves engraving or working with thin acrylic sheets, a laser cutter might be the better option. For everything else, CNC cutting offers unmatched versatility and precision.
Cutting plexiglass with a CNC machine offers unmatched precision and efficiency. By choosing the right material, tools, and settings, you can achieve clean, professional results every time. CNC technology simplifies complex designs and ensures accuracy that manual methods can’t match.
Remember: Success lies in preparation. Select cast acrylic, use sharp bits, and fine-tune your machine settings. Follow the step-by-step process and safety tips outlined here to avoid mistakes and save time.
With these strategies, you’ll master CNC plexiglass cutting and create stunning, durable projects that stand out.
FAQ
What is CNC acrylic cutting, and how does it work?
CNC acrylic cutting uses a computer-controlled router or milling machine to shape acrylic materials. The process follows a programmed toolpath created from a 3D model or technical drawing. The machine precisely cuts the material based on these digital instructions, ensuring accuracy and consistency. This method is ideal for creating intricate designs and achieving professional results.
What type of bit should I use for cutting plexiglass?
For the best results, use a 1/4-inch solid carbide O-flute bit. This bit is specifically designed for acrylic and helps reduce heat buildup during cutting. Its sharp edge ensures clean cuts, while its design efficiently removes chips, preventing the material from melting or sticking to the bit.
How can I achieve clean cuts on acrylic sheets with a CNC router?
To get clean cuts, focus on three key factors: feed rate, RPM, and cutting depth. Maintain a spindle speed of at least 18,000 RPM and adjust the feed rate based on the thickness of the acrylic. Start with shallow cutting depths, especially for finishing passes. Using ramping techniques instead of plunging directly into the material also helps create smoother edges.
What are some tips for minimizing damage when cutting acrylic?
Here are a few tips to reduce damage:
- Keep your cutter edges razor-sharp to avoid rough cuts.
- Use the correct rake and clearance angles for the cutting edge.
- Pay attention to the direction of the CNC cutter rotation to ensure smooth operations.
- Secure the acrylic firmly to prevent vibrations or movement during cutting.
Why does my acrylic melt during CNC cutting, and how can I prevent it?
Acrylic melts when excessive heat builds up during the cutting process. To prevent this:
- Use high spindle speeds (at least 18,000 RPM) to reduce friction.
- Choose bits designed for acrylic, like O-flute or spiral-flute bits, which help remove chips efficiently.
- Maintain a steady feed rate to avoid lingering in one spot for too long.
- Consider using compressed air or a misting system to cool the cutting area.
Can I use any type of acrylic for CNC cutting?
Not all acrylic types are suitable for CNC cutting. Cast acrylic is the preferred choice because it has a higher melting point and offers better optical clarity. It cuts cleanly and resists cracking. Avoid using extruded acrylic, as it tends to melt and stick to the cutting bit, leading to poor-quality results.
How do I secure plexiglass on the CNC machine?
To keep plexiglass stable:
- Use clamps or a vacuum table to hold the material in place.
- Add rubber pads between the clamps and the acrylic to prevent scratches.
- For smaller pieces, double-sided tape works well to secure the material without bulky clamps.
- Ensure the plexiglass lies flat on the machine bed to avoid uneven cuts.
What safety precautions should I take when cutting plexiglass?
Safety is crucial when working with a CNC machine. Follow these precautions:
- Wear safety goggles to protect your eyes from debris.
- Use ear protection to reduce noise exposure.
- Work in a well-ventilated area to avoid inhaling fumes.
- Always turn off the machine before making adjustments or removing material.
- Keep your workspace organized to prevent accidents.
How do I polish the edges of cut acrylic for a professional finish?
To polish the edges:
- Remove burrs with a deburring tool or fine-grit sandpaper.
- Use a flame-polishing technique by passing a small flame along the edge for a crystal-clear finish.
- Buff the edges with a polishing compound and a buffing wheel for added shine.
- Clean the surface with a soft cloth and mild cleaning solution to remove any residue.
What’s the difference between CNC cutting and laser cutting for plexiglass?
CNC cutting excels at handling thicker plexiglass and creating 3D designs or reliefs. It’s faster for larger projects and more economical for long-term use. Laser cutting, on the other hand, is better for thin sheets and produces polished vertical edges. However, it struggles with thicker materials and lacks the depth versatility of CNC machines. Choose the method that best suits your project’s needs.
See Also
Is CNC Cutting Acrylic Superior to Laser Cutting?
Guide to Metal Cutting Using a Desktop CNC
Best 10 Precision Machines for Cutting Acrylic