How to Create Stencils Using a Cricut Machine

Creating stencils with a Cricut machine transforms your crafting experience. You can bring your ideas to life with precision and ease. Whether you're designing a custom coffee sign or adding flair to home décor, stencils save time and effort. Unlike hand lettering, Cricut stencils deliver polished, professional results every time. The process feels simple yet rewarding, giving you the freedom to personalize projects for any occasion. Wondering, can Cricut machine cut stencils? Absolutely! With the right tools and materials, you’ll unlock endless creative possibilities.
Key Takeaways
- Gather essential tools like a Cricut machine, cutting mat, and weeding tools to ensure a smooth stencil-making process.
- Choose the right materials for your stencils: adhesive vinyl for single-use projects and Mylar sheets for reusable designs.
- Utilize Cricut Design Space to create or import custom designs, adjusting sizes and ensuring proper alignment for best results.
- Apply paint using light, even strokes and a dabbing technique to prevent bleeding and achieve crisp edges.
- Clean reusable stencils immediately after use to maintain their quality and extend their lifespan for future projects.
- Experiment with different stencil projects, from home décor to personalized gifts, to unleash your creativity and make unique items.
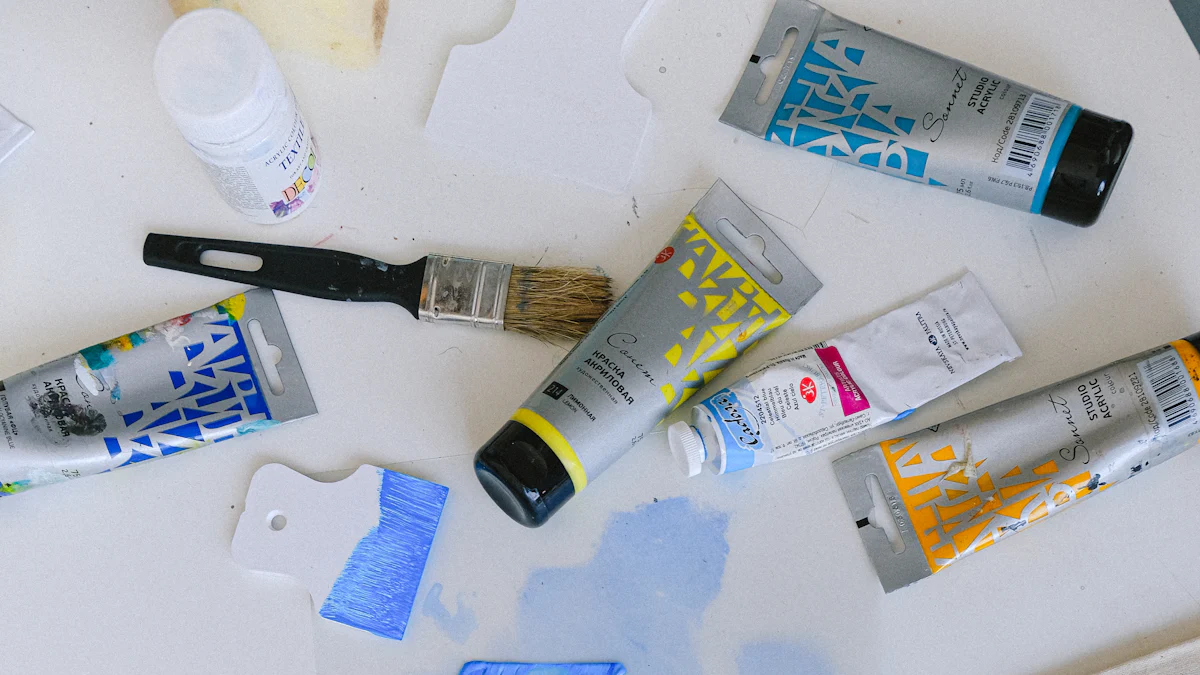
Tools and Materials You’ll Need to Make Stencils
Essential Tools for Stencil Creation
To create stencils with your Cricut machine, you’ll need a few essential tools. These tools ensure precision and make the process smooth.
- Cricut Machine: Whether you use the Cricut Maker, Explore series, or Joy, each machine offers unique features. For larger projects, the Cricut Maker 3 or Explore 3 works best. If you’re working on smaller designs, the compact Cricut Joy is a great choice.
- Cutting Mat: A StandardGrip or LightGrip cutting mat holds your stencil material in place during cutting. The right mat prevents slipping and ensures clean cuts.
- Weeding Tools: These tools help you remove small, intricate pieces from your stencil design. They’re especially useful for detailed patterns or text.
- Transfer Tape (optional): If you’re making adhesive stencils, transfer tape helps move your design from the backing to your project surface without losing alignment.
Best Materials for Stencils
Choosing the right material depends on your project’s needs. Cricut machines are compatible with various stencil materials, so you can pick what works best for you.
- Adhesive Vinyl: Perfect for single-use stencils. It sticks to surfaces, making it ideal for painting signs or other flat projects.
- Mylar Sheets: These durable sheets are reusable and work well for projects requiring multiple uses. They’re flexible yet sturdy, ensuring longevity.
- Cardstock: A budget-friendly option for temporary stencils. It’s great for quick projects but doesn’t hold up as well for repeated use.
Tip: Cricut also offers Smart Stencil, a vinyl-like material designed for precise stencil cutting. It’s available in different sizes and works seamlessly with Cricut Maker 3, Explore 3, and Joy machines.
Additional Supplies for Painting
Once your stencil is ready, you’ll need a few painting supplies to bring your design to life.
- Paint or Ink: Choose the type of paint or ink based on your project. Acrylic paint works well for most surfaces, while fabric paint is ideal for textiles.
- Stencil Brushes or Sponges: These tools help you apply paint evenly. Dab the paint gently to avoid bleeding under the stencil.
- Painter’s Tape or Adhesive Spray: Secure your stencil to the surface with painter’s tape or adhesive spray. This step keeps the stencil in place and ensures crisp edges.
Pro Tip: If you’re using reusable stencils like Mylar, clean them immediately after use to maintain their quality for future projects.
With these tools and materials, you’re all set to start creating stunning stencils. The right combination of equipment and supplies ensures professional results every time.
Can Cricut Machine Cut Stencils? Understanding the Basics
Creating stencils with a Cricut machine opens up endless possibilities for your crafting projects. Whether you're a beginner or an experienced crafter, understanding the basics of stencil-making ensures you get the best results. Let’s dive into the types of stencils you can create, how to choose the right Cricut machine, and how to prepare it for cutting.
Types of Stencils You Can Make
Cricut machines allow you to make different types of stencils, each suited for specific projects. Your choice depends on how you plan to use the stencil and the material you prefer.
Single-use adhesive stencils
Adhesive stencils are perfect for one-time use. These stencils stick directly to your surface, ensuring clean edges and minimal paint bleed. They work well for projects like painting signs or decorating glassware. Adhesive vinyl is the go-to material for this type of stencil. It’s easy to cut and adheres smoothly to flat surfaces.
Pro Tip: Use transfer tape to move intricate adhesive stencil designs without losing alignment.
Reusable stencils with Mylar or stencil film
If you want a stencil that lasts, reusable options like Mylar sheets or stencil film are ideal. These materials are durable and flexible, making them perfect for repeated use. Reusable stencils are great for larger projects or designs you plan to replicate multiple times, such as wall art or fabric patterns.
Expert Insight: DIY In Progress, a crafting expert, recommends using stencil vinyl or stencil film for professional-quality stencils. These materials prevent paint bleeding and bubbling, ensuring crisp results.
Choosing the Right Cricut Machine
Not all Cricut machines are created equal when it comes to stencil-making. Your choice depends on the size and complexity of your project.
Cricut Maker and Explore series for versatile projects
The Cricut Maker and Explore series are excellent for versatile stencil projects. These machines handle a wide range of materials, including Mylar and stencil film. If you’re working on larger designs or need precise cuts, these models are your best bet. The Maker series, in particular, offers advanced cutting capabilities, making it ideal for intricate designs.
Cricut Joy for smaller stencil designs
For smaller projects, the Cricut Joy is a compact and convenient option. It’s perfect for creating stencils for mugs, tote bags, or other small surfaces. While it doesn’t handle thicker materials like Mylar, it works well with adhesive vinyl and cardstock.
Did You Know? The Cricut Joy is portable and easy to use, making it a great choice for quick, on-the-go crafting sessions.
Preparing Your Cricut for Stencil Cutting
Before you start cutting, it’s essential to set up your Cricut machine correctly. Proper preparation ensures clean cuts and prevents material waste.
Selecting the correct material setting in Cricut Design Space
Cricut Design Space lets you choose the material type for your stencil. This step is crucial because it determines the blade pressure and cutting depth. For adhesive vinyl, select the “Vinyl” setting. For Mylar or stencil film, choose the “Custom” setting and adjust it based on the material thickness.
Quick Tip: Test your settings on a small piece of material before cutting the full design. This helps you avoid mistakes and ensures precision.
Using the right blade for your stencil material
The blade you use plays a significant role in achieving clean cuts. For most stencil materials, the standard fine-point blade works well. However, if you’re cutting thicker materials like Mylar, switch to the deep-point blade for better results.
Reminder: Always check your blade for sharpness before starting a project. A dull blade can tear the material and ruin your stencil.
By understanding these basics, you’ll feel confident answering the question, "Can Cricut machine cut stencils?" With the right tools, materials, and preparation, your Cricut machine becomes a powerful tool for creating stunning stencils.
Designing Your Stencil in Cricut Design Space
Cricut Design Space is your creative playground for crafting stencils. Whether you’re importing a design or starting from scratch, this platform makes it easy to bring your ideas to life. Let’s explore how to set up your design, prepare it for cutting, and create stencils that look professional and polished.
Setting Up Your Design
Importing or creating a custom design
Start by opening Cricut Design Space. If you already have a design in mind, you can upload it directly. Click the “Upload” button, choose your file, and follow the prompts to add it to your canvas. Cricut supports various file types, including PNG and SVG, so you have plenty of flexibility. Don’t have a design yet? Use the built-in tools in Design Space to create one. You can draw shapes, add text, or combine elements to craft something unique.
Pro Tip: Searching for inspiration? Type “stencil” in the Design Space project page. You’ll find pre-made designs that you can customize to fit your needs.
Adjusting size and dimensions for your project
Once your design is on the canvas, adjust its size to match your project. Use the resize handles on the corners of your design to scale it up or down. For precise measurements, input the exact dimensions in the toolbar at the top. This step ensures your stencil fits perfectly on your chosen surface, whether it’s a wooden sign, a tote bag, or a piece of furniture.
Quick Tip: If you’re working on a multi-piece project, duplicate your design in different sizes. This approach gives you options and saves time later.
Preparing the Design for Cutting
Removing unnecessary layers and attaching a rectangle shape
Before cutting, clean up your design by removing any extra layers or elements you don’t need. In Design Space, use the “Ungroup” tool to separate layers, then delete the ones you won’t use. Next, attach a rectangle shape around your design. This rectangle acts as the stencil’s border, keeping everything aligned and stable during painting.
Reminder: The rectangle should be slightly larger than your design to provide enough space for securing the stencil to your surface.
Using the "Weld" tool to combine shapes
If your design includes multiple shapes or letters, use the “Weld” tool to merge them into a single layer. This step ensures the Cricut cuts your stencil as one cohesive piece. Without welding, the machine might cut each element separately, which could ruin your design.
Did You Know? Welding is especially useful for text-based stencils. It connects overlapping letters, preventing gaps and ensuring smooth edges.
Tips for Effective Stencil Designs
Avoiding overly intricate designs
While detailed designs look stunning, they can be tricky to cut and paint. Avoid overly intricate patterns with tiny details, as these may tear during cutting or bleed when painted. Stick to bold, simple shapes for the best results.
Expert Insight: Many crafters recommend testing your design on cardstock first. This quick trial run helps you spot potential issues before using more expensive materials like Mylar or vinyl.
Using bold fonts for text-based stencils
For text-based stencils, choose bold, easy-to-read fonts. Thin or script fonts may not cut cleanly and can be challenging to weed. Bold fonts create crisp, professional-looking letters that stand out on your finished project.
Pro Tip: If you’re unsure which font to use, try Cricut’s stencil-specific fonts in Design Space. These fonts are designed to work well with stencils, ensuring clean cuts and easy application.
By following these steps, you’ll master the art of designing stencils in Cricut Design Space. Whether you’re crafting reusable stencils or single-use adhesive ones, this process ensures your designs are ready for cutting and painting. So, go ahead—unleash your creativity and start designing!
Cutting Your Stencil with a Cricut Machine
Once your design is ready, it’s time to cut your stencil. This step requires careful preparation to ensure clean cuts and a usable stencil. Follow these steps to make the process smooth and efficient.
Preparing the Cutting Mat
Placing the stencil material on the mat
Start by placing your stencil material on the cutting mat. Align it with the grid lines to keep it straight. For adhesive vinyl or Mylar sheets, use a StandardGrip mat. If you’re working with lighter materials like cardstock, a LightGrip mat works best. Press the material firmly onto the mat to prevent shifting during the cutting process.
Pro Tip: If you’re using Cricut Smart Stencil, you can skip the mat entirely. This material feeds directly into compatible machines like the Cricut Maker 3 or Explore 3, saving you time.
Securing the material with painter’s tape or adhesive spray
For extra security, especially with thicker materials like Mylar, use painter’s tape or adhesive spray around the edges. This step ensures the material stays in place while the machine cuts intricate designs. Avoid taping over the design area to prevent interference with the blade.
Quick Tip: Experienced Cricut users recommend adhesive spray for reusable stencils. It provides a stronger hold without leaving residue on the mat.
Cutting the Stencil
Selecting the correct material setting in Cricut Design Space
Open Cricut Design Space and select the material type that matches your stencil. For adhesive vinyl, choose the “Vinyl” setting. For Mylar or stencil film, use the “Custom” setting and adjust the pressure based on the material’s thickness. Testing your settings on a small piece of material first can save you from potential errors.
Did You Know? The Cricut Joy, while compact, handles adhesive vinyl and cardstock with ease. It’s perfect for smaller stencil projects like mugs or tote bags.
Loading the mat into the Cricut machine
Load the prepared mat into your Cricut machine. Align the mat with the guides and press the load button. Ensure the mat feeds evenly into the machine to avoid misalignment. If you’re using Cricut Smart Stencil, simply insert the material directly into the machine without a mat.
Starting the cutting process
Once the mat is loaded, double-check your settings in Design Space. Click the “Go” button to start cutting. Keep an eye on the machine as it works, especially for intricate designs. If you notice any issues, pause the machine and make adjustments.
Reminder: Always use a sharp blade for clean cuts. Replace dull blades to avoid tearing or uneven edges.
Removing the Stencil from the Mat
Carefully peeling off the stencil material
After the cutting process finishes, unload the mat and gently peel off the stencil material. Start from one corner and work slowly to avoid tearing delicate parts of the design. For adhesive vinyl, use a weeding tool to lift the edges if needed.
Pro Tip: Flip the mat upside down and peel it away from the material instead of pulling the material off. This technique prevents curling or bending.
Reverse-weeding the design for usability
Reverse-weeding is essential for creating a functional stencil. Remove the inner parts of the design that you want to paint through, leaving the outer areas intact. Use a weeding tool for precision, especially with small or intricate details.
Expert Insight: Many crafters recommend reverse-weeding adhesive stencils directly on the project surface. This approach minimizes alignment issues and ensures a perfect fit.
By following these steps, you’ll create a stencil that’s ready for painting or inking. Whether you’re working on a reusable Mylar stencil or a single-use adhesive one, proper cutting techniques make all the difference. So, can Cricut machine cut stencils? Absolutely—and with these tips, you’ll achieve professional results every time.
Applying and Using Your Stencil
Once your stencil is ready, it’s time to bring your design to life. This part of the process requires careful preparation and attention to detail to ensure your project turns out beautifully. Let’s walk through the steps to prepare your surface, apply paint, and finish with a flawless result.
Preparing the Surface
Cleaning and drying the surface
Start by cleaning the surface where you’ll apply the stencil. Dust, grease, or moisture can interfere with the paint and ruin your design. Use a damp cloth or mild cleaner to wipe the area, then let it dry completely. A clean surface ensures the stencil adheres properly and prevents smudging.
Pro Tip: For surfaces like glass or metal, rubbing alcohol works wonders for removing fingerprints and oils.
Positioning the stencil with painter’s tape or transfer tape
Once the surface is clean, position your stencil exactly where you want the design to appear. Use painter’s tape to secure the edges of reusable stencils like Mylar. For adhesive stencils, transfer tape makes it easy to move the design from its backing to the surface without losing alignment. Smooth out any bubbles or wrinkles to keep the stencil flat.
Quick Tip: If you’re working on a large or intricate design, break it into smaller sections. This approach makes alignment easier and reduces the risk of errors.
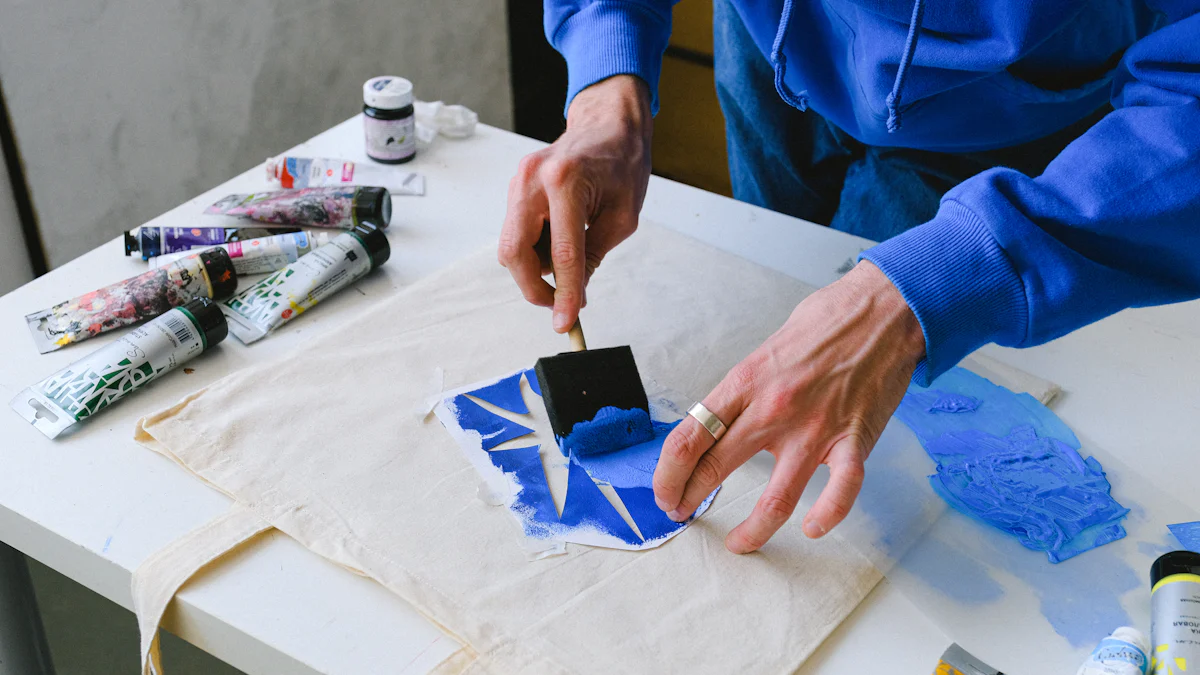
Painting with the Stencil
Using light, even strokes to apply paint
When it’s time to paint, less is more. Dip your stencil brush or sponge lightly into the paint, then dab off the excess onto a paper towel. Apply the paint using light, even strokes or gentle dabbing motions. This technique helps you build up color gradually and avoids overloading the stencil with paint.
Did You Know? Many crafters recommend using multiple thin layers of paint instead of one thick coat. This method gives you better control and prevents smearing.
Avoiding paint bleed by dabbing instead of brushing
To achieve crisp edges, avoid brushing the paint across the stencil. Brushing can push paint under the edges, causing it to bleed. Instead, use a dabbing motion to press the paint onto the surface. Take your time and work carefully, especially around intricate details.
Anecdote: One crafter shared how switching to a dabbing technique transformed her results. Her once-smudged designs became sharp and professional-looking, saving her hours of touch-ups.
Removing the Stencil
Carefully peeling off the stencil after painting
After the paint dries slightly but is still tacky, carefully peel off the stencil. Start from one corner and pull it away slowly to avoid smudging the design. For adhesive stencils, use a weeding tool to lift the edges if needed. Removing the stencil while the paint is semi-dry helps prevent the paint from cracking or peeling.
Pro Tip: If you’re using a reusable stencil, clean it immediately after removal. This step keeps it in good condition for future projects.
Touching up any imperfections
Even with the best techniques, small imperfections can happen. Use a fine brush or a toothpick to touch up any areas where the paint bled or didn’t fully cover. This final step ensures your design looks polished and professional.
Inspiration: One crafter expressed her joy after completing a stencil project, saying, “Didn’t this stencil project turn out great? I love how these designs make perfect gifts and save so much time!”
By following these steps, you’ll create stunning stencil projects that look like they were made by a pro. Whether you’re decorating a wall, personalizing a tote bag, or crafting a custom sign, the right techniques make all the difference. So grab your supplies and start creating—you’ve got this!
Tips for Achieving the Best Results
Choosing the Right Material for Your Project
When to use adhesive vinyl vs. Mylar
Selecting the right material can make or break your stencil project. If you're working on a one-time design, adhesive vinyl is your best bet. It sticks firmly to surfaces, ensuring clean edges and minimal paint bleed. This makes it perfect for projects like custom signs or glassware. Plus, its flexibility allows it to conform to curved surfaces, giving you more creative freedom.
On the other hand, Mylar is the go-to choice for reusable stencils. Its durability and ease of cleaning make it ideal for designs you plan to use repeatedly. Mylar sheets, especially those with a 4-mil thickness, offer consistent cutting results and reduce the chances of paint bleeding. They’re also sturdy enough to handle intricate patterns without tearing. If you’re aiming for long-term use, Mylar is worth the investment.
Pro Tip: For professional-quality stencils, consider using Cricut stencil vinyl or stencil film. These materials prevent bubbling and bleeding, especially on non-flat surfaces.
Benefits of reusable stencils
Reusable stencils save time and money in the long run. With materials like Mylar, you can create stencils that last through multiple uses. This is especially useful for larger projects or designs you want to replicate, such as wall art or fabric patterns. Reusable stencils also maintain their shape and quality, even after cleaning. Unlike single-use options, they’re an eco-friendly choice that reduces waste.
Did You Know? Mylar stencils are not only durable but also easy to clean. A quick rinse with warm water and mild soap keeps them ready for your next project.
Avoiding Common Mistakes
Preventing paint bleed
Paint bleed is a common frustration when working with stencils. To avoid this, always secure your stencil firmly to the surface. Use painter’s tape for reusable stencils or transfer tape for adhesive ones. When applying paint, opt for a dabbing motion instead of brushing. This technique minimizes the risk of paint seeping under the stencil edges.
Another trick is to use less paint. Overloading your brush or sponge increases the chances of bleeding. Instead, build up the color gradually with thin layers. For reusable stencils, materials like Mylar or stencil film provide a tighter seal, further reducing the risk of paint bleed.
Quick Tip: If you’re working on a textured surface, apply a light coat of clear sealant before painting. This creates a smoother base and helps prevent bleeding.
Ensuring proper alignment of the stencil
Proper alignment is key to achieving a polished look. Before securing your stencil, measure and mark the placement with a ruler or masking tape. For adhesive stencils, transfer tape ensures the design stays aligned during application. If you’re working on a multi-piece design, align each section carefully to maintain consistency.
Pro Tip: Test the placement by lightly taping the stencil in place before committing. This allows you to make adjustments without damaging the surface.
Cleaning and Storing Your Stencils
Cleaning reusable stencils after use
Cleaning your stencils immediately after use keeps them in top condition. For Mylar stencils, rinse them under warm water and gently scrub with a soft brush or sponge. Avoid harsh chemicals, as they can damage the material. If you’re using adhesive stencils, remove any leftover paint or residue with a damp cloth.
Reminder: Let your stencils air dry completely before storing them. Moisture can cause warping or mold, especially in reusable materials.
Storing stencils flat to prevent damage
Proper storage extends the life of your stencils. Always store them flat to prevent bending or creasing. Use a folder or a large envelope to keep them organized and protected from dust. For smaller stencils, a binder with plastic sleeves works well. Label each stencil for easy access during future projects.
Did You Know? Storing stencils in a cool, dry place prevents warping and ensures they stay ready for your next creative endeavor.
Take your time, plan carefully, and enjoy the process—you’ve got this for optimal results!
Creative Ideas for Stencil Projects
Stencils open up a world of creative possibilities. Whether you're sprucing up your home, crafting personalized gifts, or preparing for the holidays, stencils can transform ordinary items into something extraordinary. Let’s explore some fun and inspiring stencil project ideas you can try with your Cricut machine.
Home Décor
Custom signs and wall art
Add a personal touch to your living space with custom signs and wall art. Use stencils to create inspirational quotes, family names, or abstract designs on wooden boards or canvases. A Cricut machine makes it easy to cut precise stencils for clean and professional-looking results. You can even experiment with different paint colors to match your home’s aesthetic.
Tip: Start with smaller wall art projects if you’re new to stenciling. This helps you practice your technique before tackling larger pieces.
Stenciled furniture designs
Give your furniture a fresh look with stenciled designs. Add patterns to tabletops, drawers, or even chair backs. Geometric shapes, floral motifs, or vintage-inspired designs work beautifully on furniture. Mylar sheets are a great choice for these projects since they’re reusable and durable, making them perfect for larger surfaces.
Pro Tip: Use craft plastic as your stencil material for furniture projects. It stays in place better than vinyl and doesn’t require transfer tape.
Personalized Gifts
Monogrammed tote bags
Create unique and thoughtful gifts by stenciling monograms onto tote bags. Fabric paint works wonderfully for this type of project. Choose bold fonts or decorative initials to make the design stand out. These personalized bags are perfect for birthdays, weddings, or even as eco-friendly shopping bags.
Quick Tip: Use painter’s tape to secure the stencil to the fabric. This prevents shifting and ensures crisp edges.
Customized glassware
Etch or paint designs onto glassware to create one-of-a-kind gifts. Stencils make it easy to add names, dates, or decorative patterns to wine glasses, mugs, or jars. Adhesive vinyl works best for glass projects since it sticks securely to curved surfaces. You can also use etching cream for a permanent and elegant finish.
Did You Know? Etched glassware makes an excellent gift for weddings or anniversaries. It’s both practical and sentimental.
Seasonal and Holiday Crafts
Festive table runners
Dress up your holiday table with a stenciled table runner. Use seasonal patterns like snowflakes, pumpkins, or leaves to match the occasion. Fabric paint and reusable stencils make this project simple and fun. You can also stencil matching napkins or placemats for a cohesive look.
Inspiration: One crafter shared how she used her Cricut to create a Thanksgiving-themed table runner. The stenciled leaves and “Give Thanks” lettering became the centerpiece of her holiday décor.
Holiday-themed decorations
Bring festive cheer to your home with stenciled holiday decorations. Create ornaments, banners, or window clings using your Cricut machine. Adhesive vinyl works well for temporary decorations, while Mylar stencils are perfect for reusable items like wooden ornaments or stockings.
Pro Tip: Start with smaller holiday projects, like stenciled gift tags or ornaments. These are quick to make and help you get comfortable with your Cricut before moving on to larger decorations.
With these creative ideas, your Cricut machine becomes a powerful tool for crafting unique and memorable projects. Whether you’re decorating your home, making personalized gifts, or celebrating the holidays, stencils offer endless opportunities to express your creativity. So grab your materials and start crafting—you’ll be amazed at what you can create!
Creating stencils with a Cricut machine unlocks endless creative opportunities. You can personalize projects like clothing, glassware, or home décor with ease. By following the steps outlined, you’ll confidently design and cut stencils that look professional. Stick to high-quality materials like stencil vinyl or stencil film for the best results. These materials prevent issues like paint bleeding, ensuring crisp and clean designs. Start experimenting with different ideas and let your creativity shine. Whether it’s a one-time project or reusable stencils, the possibilities are truly limitless. So, grab your Cricut and start crafting today!
FAQ
What materials do I need to make a reusable stencil with my Cricut?
To create a reusable stencil, you’ll need a few key materials. Mylar sheets are the most popular choice because they’re durable and flexible. You can also use stencil film, which works well for intricate designs. A StandardGrip cutting mat is essential to hold the material in place during cutting. Don’t forget a fine-point or deep-point blade, depending on the thickness of your stencil material. For painting, you’ll need stencil brushes or sponges and paint suitable for your project surface.
Pro Tip: Mylar sheets with a 4-mil thickness strike the perfect balance between flexibility and durability for reusable stencils.
How do I make my own reusable stencil with a Cricut?
Making a reusable stencil is simple with the right steps. Start by designing your stencil in Cricut Design Space. Use bold shapes or fonts for the best results. Once your design is ready, place a Mylar sheet on a StandardGrip mat and load it into your Cricut machine. Select the appropriate material setting, such as “Stencil Film” or “Custom,” and let the machine cut your design. After cutting, carefully remove the stencil from the mat and clean up any small pieces using a weeding tool.
Reminder: Always test your design on a small piece of material before cutting the full stencil to ensure the settings are correct.
Can I use cardstock to make stencils?
Yes, cardstock works well for temporary stencils. It’s a budget-friendly option for quick projects or one-time use. However, cardstock isn’t as durable as Mylar or stencil film, so it may tear or warp after use. If you’re working on a project that requires precision or multiple uses, consider investing in reusable materials like Mylar.
Quick Tip: Use a LightGrip mat when cutting cardstock to prevent tearing during the process.
What’s the best way to prevent paint bleed when using stencils?
To avoid paint bleed, secure your stencil firmly to the surface. Use painter’s tape for reusable stencils or transfer tape for adhesive ones. Apply paint in thin layers using a dabbing motion instead of brushing. This technique keeps paint from seeping under the stencil edges. For textured surfaces, applying a light coat of clear sealant before painting can help create a smoother base.
Expert Insight: Many crafters recommend using stencil brushes or sponges instead of regular paintbrushes for better control and cleaner edges.
Can I reuse adhesive vinyl stencils?
Adhesive vinyl stencils are typically designed for single use. The adhesive backing loses its stickiness after being removed, making it difficult to reuse. If you need a reusable option, Mylar or stencil film is a better choice. These materials can be cleaned and stored for future projects.
Did You Know? Adhesive vinyl stencils are perfect for intricate designs where precision is key, even if they’re not reusable.
What’s the difference between Mylar and stencil film?
Both Mylar and stencil film are excellent for reusable stencils, but they have slight differences. Mylar is a durable, flexible plastic that’s easy to clean and works well for most projects. Stencil film, on the other hand, is thinner and more pliable, making it ideal for detailed designs. Your choice depends on the complexity of your project and how often you plan to reuse the stencil.
Pro Tip: For beginners, Mylar is a great starting material because it’s sturdy and forgiving during the cutting process.
Can I use Cricut Joy to make stencils?
Yes, Cricut Joy can create stencils, but it’s best suited for smaller designs. The compact size of the machine limits the dimensions of your stencil. Adhesive vinyl and cardstock work well with Cricut Joy, but it doesn’t handle thicker materials like Mylar. If you’re working on larger or reusable stencils, consider using a Cricut Maker or Explore series machine.
Did You Know? Cricut Joy is perfect for quick projects like stenciling mugs, tote bags, or small signs.
How do I clean reusable stencils after use?
Cleaning reusable stencils is easy. Rinse them under warm water immediately after use to remove paint or ink. Use a soft brush or sponge to gently scrub away any residue. Avoid harsh chemicals, as they can damage the material. Let the stencil air dry completely before storing it flat to prevent warping.
Reminder: Cleaning your stencils right after use ensures they stay in good condition for future projects.
What’s the best way to store stencils?
Store your stencils flat to prevent bending or creasing. Use a folder, envelope, or binder with plastic sleeves to keep them organized and protected from dust. Label each stencil for easy access during future projects. For larger stencils, consider using a flat storage box.
Quick Tip: Keep your stencils in a cool, dry place to maintain their shape and quality over time.
Can I use Cricut Design Space to create custom stencil designs?
Absolutely! Cricut Design Space offers tools to create custom stencil designs from scratch or upload your own images. You can draw shapes, add text, or combine elements to craft unique designs. Use the “Weld” tool to merge overlapping shapes and ensure your stencil cuts as one cohesive piece.
Pro Tip: Explore the Design Space library for pre-made stencil templates that you can customize to fit your project needs.
See Also
Tips for Cutting Fabric with Your Cricut Machine
Is Your Cricut Machine Good for Cutting Vinyl?
Techniques for Cutting Wood Using a Cricut